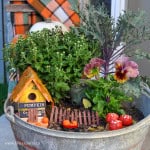
Fall Fairy Garden
Make a fall fairy garden with a DIY fairy house, minature DIY mushrooms, pumpkins and real fairy sized fall leaves.
Cost: $25
Equipment
- ⅝ inch leaf punch
- garden trowel
- hot glue gun
- small paint Bruch
Ingredients
- miniatue doll house
- vintage seed packages print out
- mod lodge
- orange paint
- small pieces of wood for door
- bead for doorhandle
- hot glue
- preserved oak leaves
- sparking wine corks
- red and white paint
- orange and brown polymer clay
- plant pot, galzanized steel pail with drainage, or faux pumpkin with top cut off and drainage holes
- potting soil
- small fall plants like pansies, mums, and kale
- fairy accessories like wagon, and fence
- real fall leaves
Instructions
- Remove the bird peg from the miniature birdhouse, and the screw from the top.
- Give the bird house a quick coat of orange/peach paint.
- Print out a vintage seed package image -like this free sunflower one. Then I cut the seed packages to fit the house and mod podged them onto the house.
- For the door, use a few little pieces of wood and a bead as a door handle and hot glue them on.
- For the roof, use some preserved oak leaves, and mod podge them onto the roof as a finishing touch.
- For the mushrooms, paint the tops of the sparkling wine corks with some reddish-orange craft paint. When it is dry, add some white spots. Then, seal it all with a coat of mod podge.
- For the miniature pumpkins, form orange polymer clay into tiny pumpkin shapes. Don't forget the ridges. Then add a very small brown polymer clay stem. Bake the clay according to the package directions.
- To make the real fairy-sized fall leaves, use a ⅝ inch or 1.5 cm fall leaf punch and use it on real leaves. To get the best look, line up a vein of the leaf along the center of the punch.
- To make the garden, fill your pot of choice with garden soil and plant the small plants near the back, leaving room at the front of the pot to set up your fairy items. Give your garden a drink with some water. Add the house and all the other accessories and enjoy.
Notes
At the end of the fall season, be sure to put your fairy garden accessories away inside to help them last for next fall when you can set it all up again.
