How To Mount A Staghorn Fern
Equipment
- screwdriver
Ingredients
- Staghorn Fern
- wooden tree slice
- picture hanger
- green wire
- four screws
- moss
Instructions
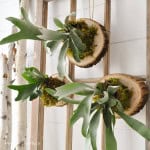
- Prepare your wood piece by adding a hanger to the back of it, so that you can easily hang it when you’re finished. Use a two picture hangers and screw them into the back of the wood.
- Next, you want to add screws to the front. These will hold the base of the fern in place so you want them to be placed in the piece of wood to create an area a little larger than the base of the plant. Screw them into the wood, making sure that about a ½ inch is exposed, so you can wrap the wire around it easily.
- Next remove the loose soil from the roots of the stag head fern. Use your fingers to gently pull away any extra dirt, without damaging the root ball.
- Determine the top of the fern, which has small rounded leaves called the basal fronds. The fern will survive best if these leaves is are at the top when it’s hanging.
- Wrap the roots of the plant in sheet moss, including the back of the plant that will be right against the wooden tree slice. Then set the plant in place against the wooden base and use wire to tightly attach the plant to the backing, wrapping it around the screws to secure it.
- Use a little extra moss as the best way to cover the screws with a mound of moss.
- To water the mounted staghorn fern, it’s recommended that you take the fern down and submerge the entire plant in lukewarm water for about half and hour. Then let it drip dry before hanging it back up
