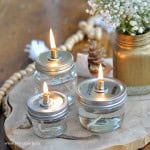
Mason Jar OIl Lamps
Make beautiful and inexpensive mason jar oil lamps with simple materials.
Servings: 3
Cost: $15
Equipment
- Drill with ⅛" Drill Bit
- scissors
Ingredients
- 3 Mason Jars
- Paraffin Lamp Oil
- Cotton Lamp Wick
- 3 ⅛ " Nipples
- 3 ⅛" Couplings
- 3 ⅛" Washers
Instructions
- The first step in making your beautiful mason jar oil lamp is to drill a hole in the canning jar lid. I found it a little tricky to get it in the center of the lid, and found drilling a small hole first, and then the larger ?” one worked best. It still isn’t perfect, but it doesn’t need to be, so don’t worry. Once you've done your first jar lid, repeat this process for the rest of the lamps you're making.
- Next, you thread the nipple through the hole, so it’s about half way through each side, and then add the washer and screw the coupling onto the top of the lid.
- Cut a piece of the cotton wick with enough length of wick so that it is a little longer than the depth of your jar and thread it through the mason jar lid. Fill up your mason jar with lamp oil. The remaining length of the wick will rest on the bottom of the jar, and you can pull it up as necessary. Save your remaining lamp wicks that you've cut off to use as extra wicks in the future.
- Now, screw on the lid on to the top of the jar, with just a little wick at the top. If the wick is too long, it will cause the lamp to smoke, in which case you can trim it shorter, or push it down to make it shorter. Give the wick a bit of time to soak up the oil before lighting it for the first time.
Notes
We like using Paraffin Lamp Oil because it's clean burning and easy to find in any hardware store
Safety Note: Never leave a mason jar oil lamp unattended. Keep away from children, pets, and flammable materials.
