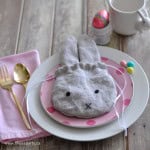
Bunny Treat Bag With Free Pattern
Equipment
- Sewing Machine
- iron
Ingredients
- Linen Fabric
- White Thread
- Thin Ribbon
- Black Embroidery Thread
- Small Black Buttons
Instructions
- Print the free pattern from our free resource library, and then cut it out. Pin it to the fabric and cut out two pieces for the bag, and four pieces for the ears.
- Secondly, pin two of the cut out bunny ears together and sew with a ¼” seam allowance, leaving the bottom open, so you can turn them right-side-out. Next repeat with the other ear. Then, use a pen or chopstick to help you turn the ears right-side-out. (I used linen so there was no right side or wrong side of the fabric, if you use something else take care to sew the wrong sides together for the ears and the bag so that when you turn the seams to the inside of the pieces the good side of the fabric is showing.)
- Next, pin the bag pieces together, and sew taking special care to not sew the top, as marked on the pattern, starting and stopping about an inch and a half from the top, on both sides. This will be where we thread the drawstring through the bag.
- Then use an iron to press the ¼ inch seam open at the top of the bunny bags edges, and then stitch around it, on both sides of the bag.
- Now fold down the top of the bag, to create the channel for the drawstring. Pin in place. Then on one side, pin in place the ears that have been turned right-side-out already. Next, carefully sew around the seam at the top of the bag.
- The next step is to turn the bag right-side-out. Now cut two pieces of ribbon or twine for the drawstring. Thread one through each side, and tie in a knot, using a safety pin to help you thread it through the channel.
- Lastly, use the black embroidery thread to stitch an X for the little bunnies mouth, and sew on the two black buttons for eyes for the sweet bunny face. Another option is to sew a cute pom pom on to the back as a bunny tail.
