Transform your home into Hogwarts this Christmas with these Harry Potter Christmas tree ideas! This complete guide shows you how to create a magical DIY Harry Potter Christmas tree with handmade ornaments, a cozy Weasley-inspired mantel, Dolores Umbridge Christmas tree including charming DIY cat plate ornaments, and your own Honeydukes candy cart. Whether you're looking for Harry Potter ornament ideas, or free printables, this Harry Potter Christmas decoration guide has everything you need to bring the Wizarding World into your holiday celebrations.
A Quick Look At This Post
- 🎄DIY Ornaments: 15+ DIY ornaments tutorials
- ⚡7 Horcruxes: as ornaments
- 🎅 Flying Santa Tree Topper: Full tutorial
- 🧦 Weasley Sweater Stockings: tutorial and full Harry Potter Christmas Mantel
- 🐱 DIY Umbridge Christmas Tree: DIY cat plate ornaments
- 🍫 Honeydukes Candy Trolly: with homemade treats, free printables, and mini candy Christmas tree
- 💲Budget: $50-200+ depending on scope
- ✂️Skill level: Beginner to intermediate
- 🎁Free printables included: Chocolate frog boxes, Bertie Bott's Every Flavor Beans Boxes, Honeydukes labels, cat images, and more
Why You'll Love This Harry Potter Christmas Tree
- Complete room transformation, not just a tree. Get ideas for decorating your entire space from tree to mantel to candy bar.
- One-of-a-kind motorized flying Santa tree topper. This Santa circles the tree on a broomstick -I haven't seen anyone else do this!
- Free printables for everything. Download chocolate frog boxes, Honeydukes labels, cat plate images, and more.
- Budget-conscious and resourceful. Learn how to use thrifted finds and DIY projects to create magic without breaking the bank.
- All 7 Horcruxes included. These life-size movie replicas displayed throughout the tree create a fun conversation piece.
- Represents all four houses. House color ribbons for Gryffindor, Slytherin, Ravenclaw, and Hufflepuff mean everyone feels included.
- Video tutorials included. Watch the full process in our YouTube series embedded throughout.
Jump to:
- A Quick Look At This Post
- Why You'll Love This Harry Potter Christmas Tree
- Planning Your Harry Potter Christmas Tree
- Essential Supplies & Where to Shop
- The 7 Horcruxe Ornaments
- DIY Harry Potter Ornaments
- Quick & Easy Ornaments
- Movie Moments Additional Ornaments
- Tree Topper: Flying Santa on a Broomstick
- Styling Your Harry Potter Christmas Tree
- Harry Potter Christmas Mantel Decor
- Dolores Umbridge Christmas Tree
- Honeydukes Candy Bar
- Free Harry Potter Christmas Printables
- Frequently Asked Questions
- Budget Planning Tips
- Conclusion: Creating Your Own Harry Potter Christmas Magic
- More Harry Potter Inspiration
- Share Your Harry Potter Christmas!

I love Harry Potter, and all the magic and coziness of the world it creates. I thought it would be fun to create a Harry Potter theme for my Christmas tree this year, and I had so much fun incorporating all the DIY ornaments and more.
Decorating the Christmas tree turned into a whole Harry Potter themed Christmas. I couldn't help myself!
I can see my family enjoying this tradition for years to come, cuddling up in front of the fire with the glow of the Christmas tree, eating candy off our Honeydukes trolley and watching Harry Potter movies the whole season.
The beauty of this project? You can do as much or as little as you want. Make one DIY ornament or create the full transformation. Start small this year and add more each Christmas. Make it your own!
I was able to reuse lots of my DIY Harry Potter decor from my previous DIY Harry Potter Decor and free Harry Potter printables post, and the printables got a little Christmas update. Plus, all my Harry Potter snacks and treats are perfect for any Harry Potter movie marathon night. Also check out our Harry Potter Christmas Party, with the menu taken right out of the pages of the book!
Planning Your Harry Potter Christmas Tree
When planning my tree, I wanted it both beautiful AND authentically on-theme. I didn't want it to look like I just threw store-bought ornaments on a tree, I wanted to capture the magic of Hogwarts at Christmas with vintage details and a cohesive aesthetic.
My Unique Approach: The 7 Horcruxes
I decided to display all 7 Horcruxes as ornaments throughout the tree. These life-size movie replicas are prominently featured and create such a fun conversation piece. Any true Harry Potter fans will immediately spot them and get excited.
Representing All Four Houses
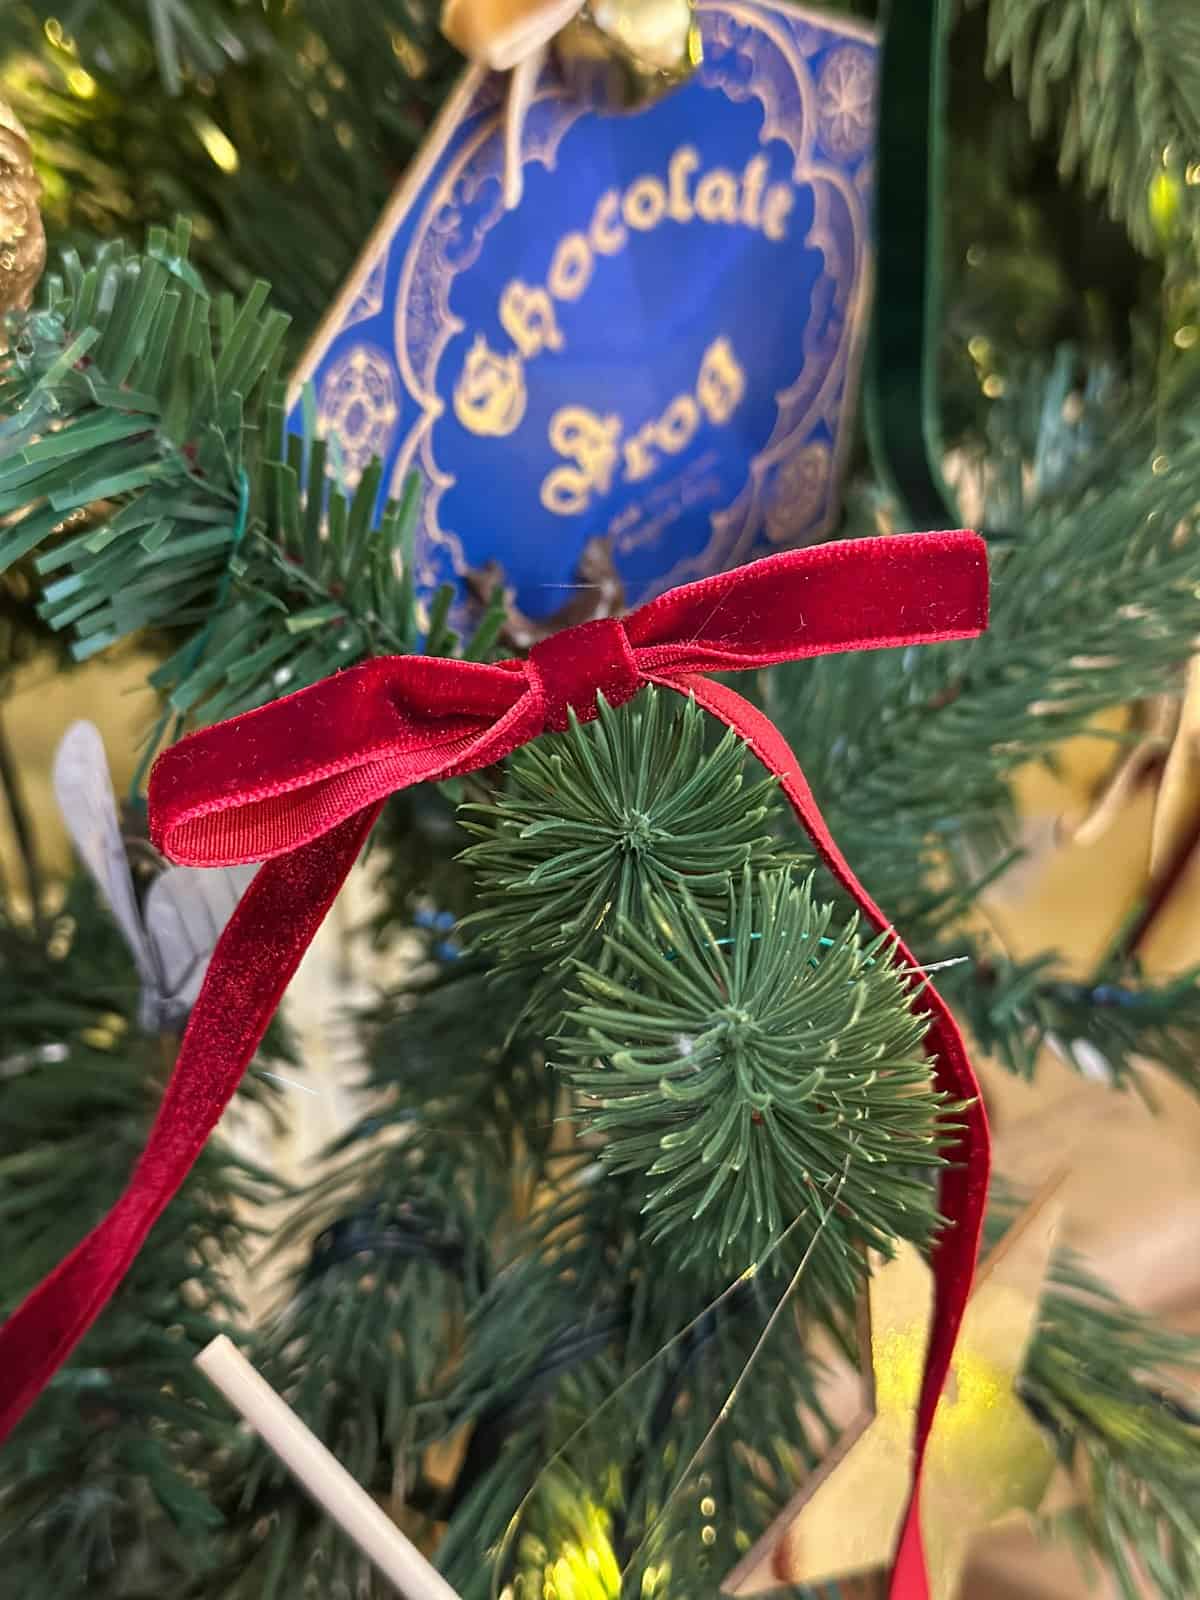
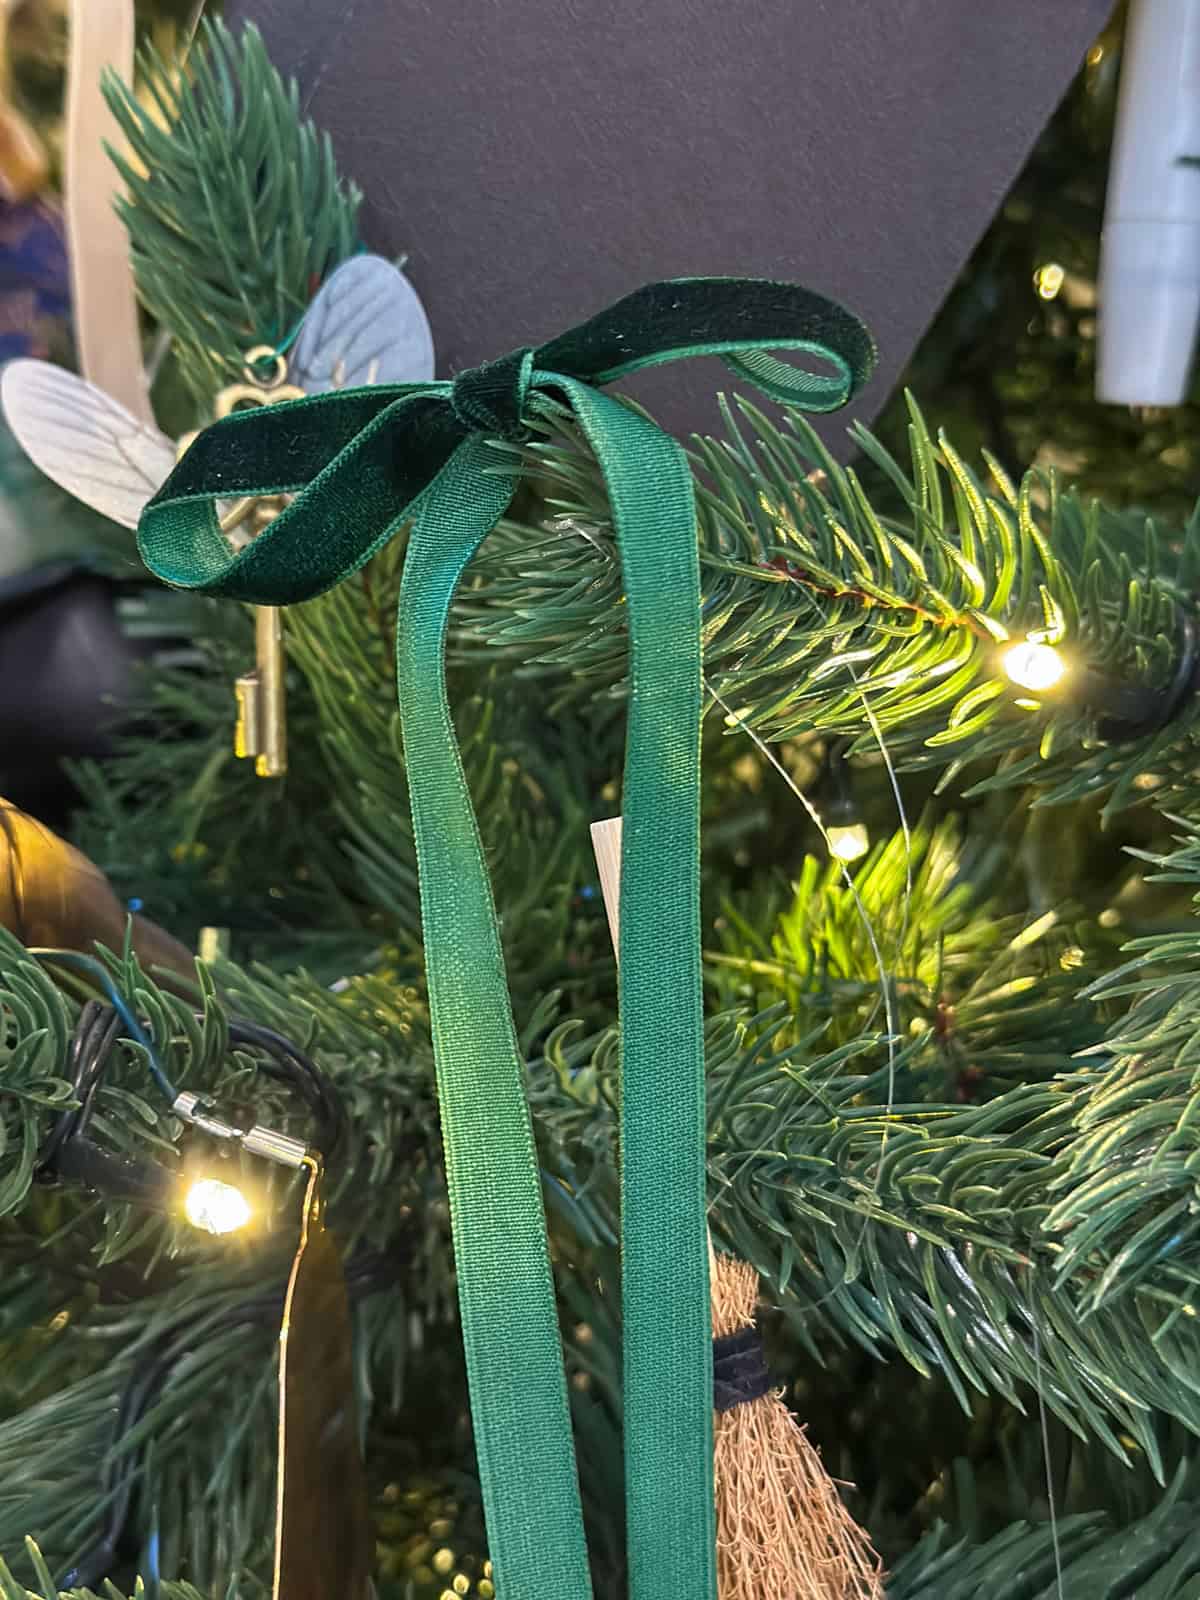
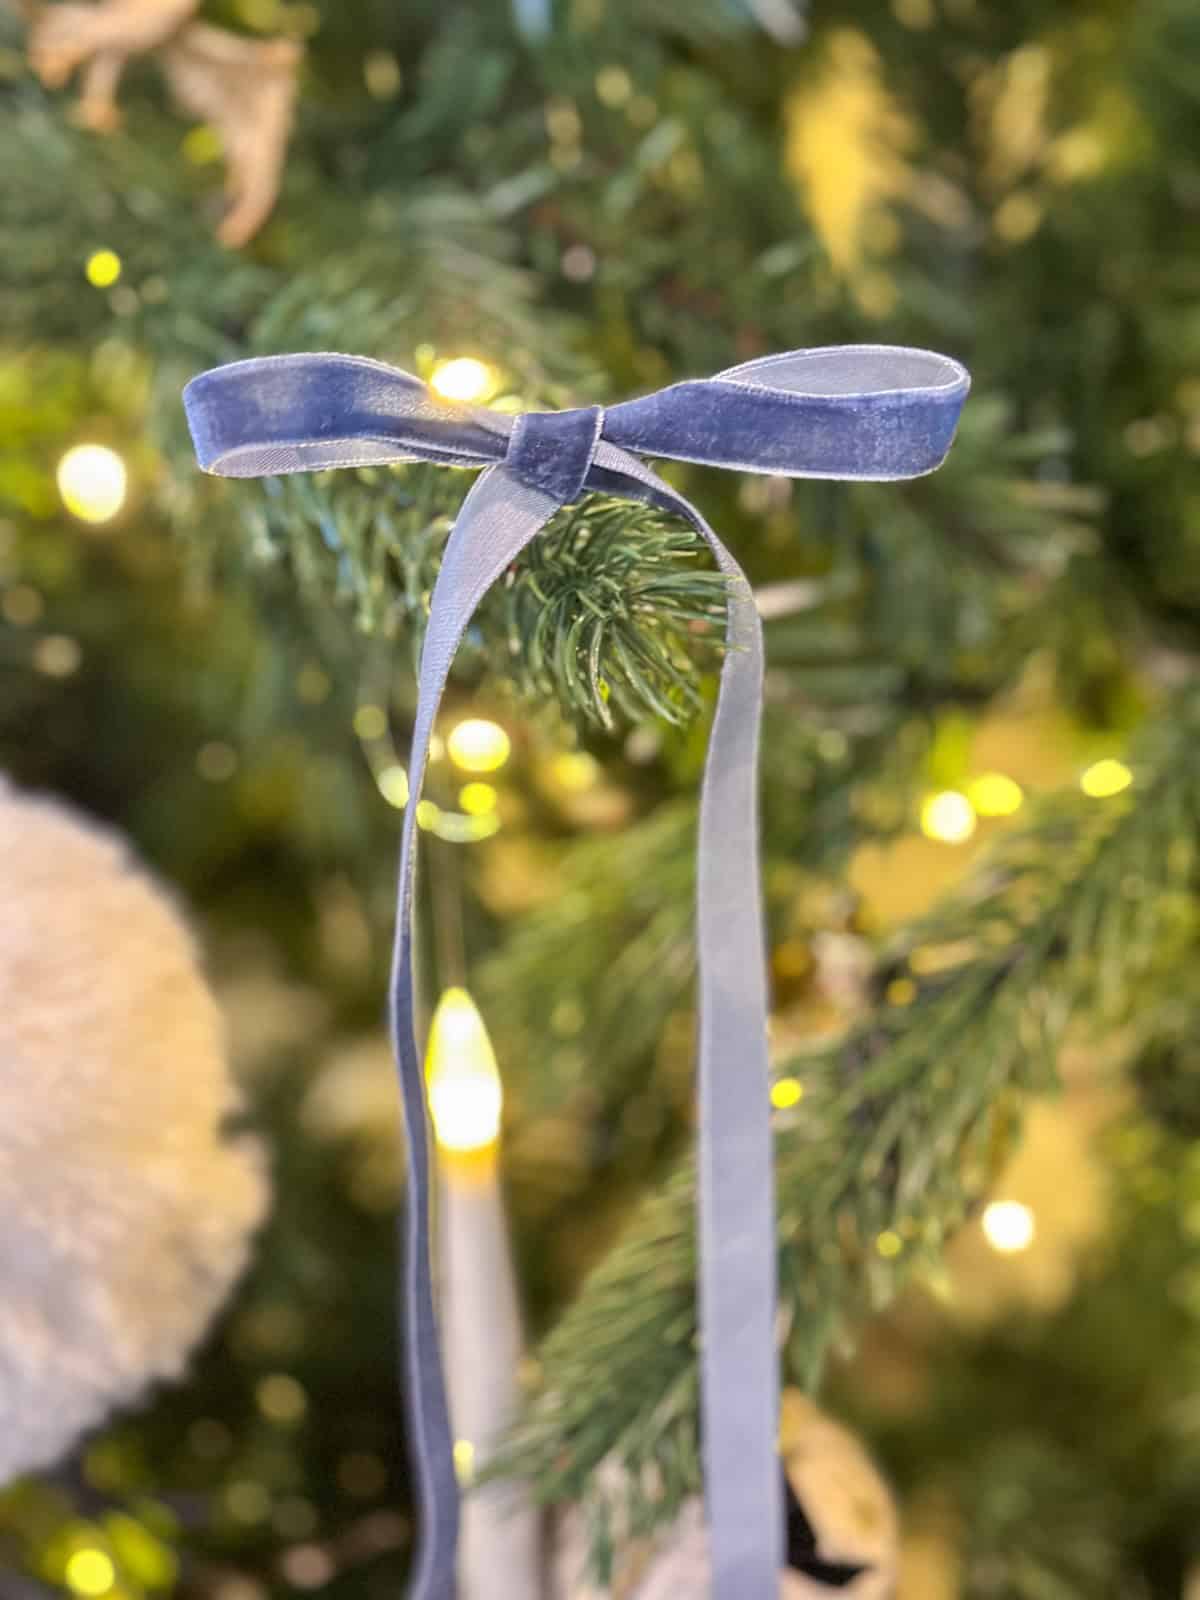
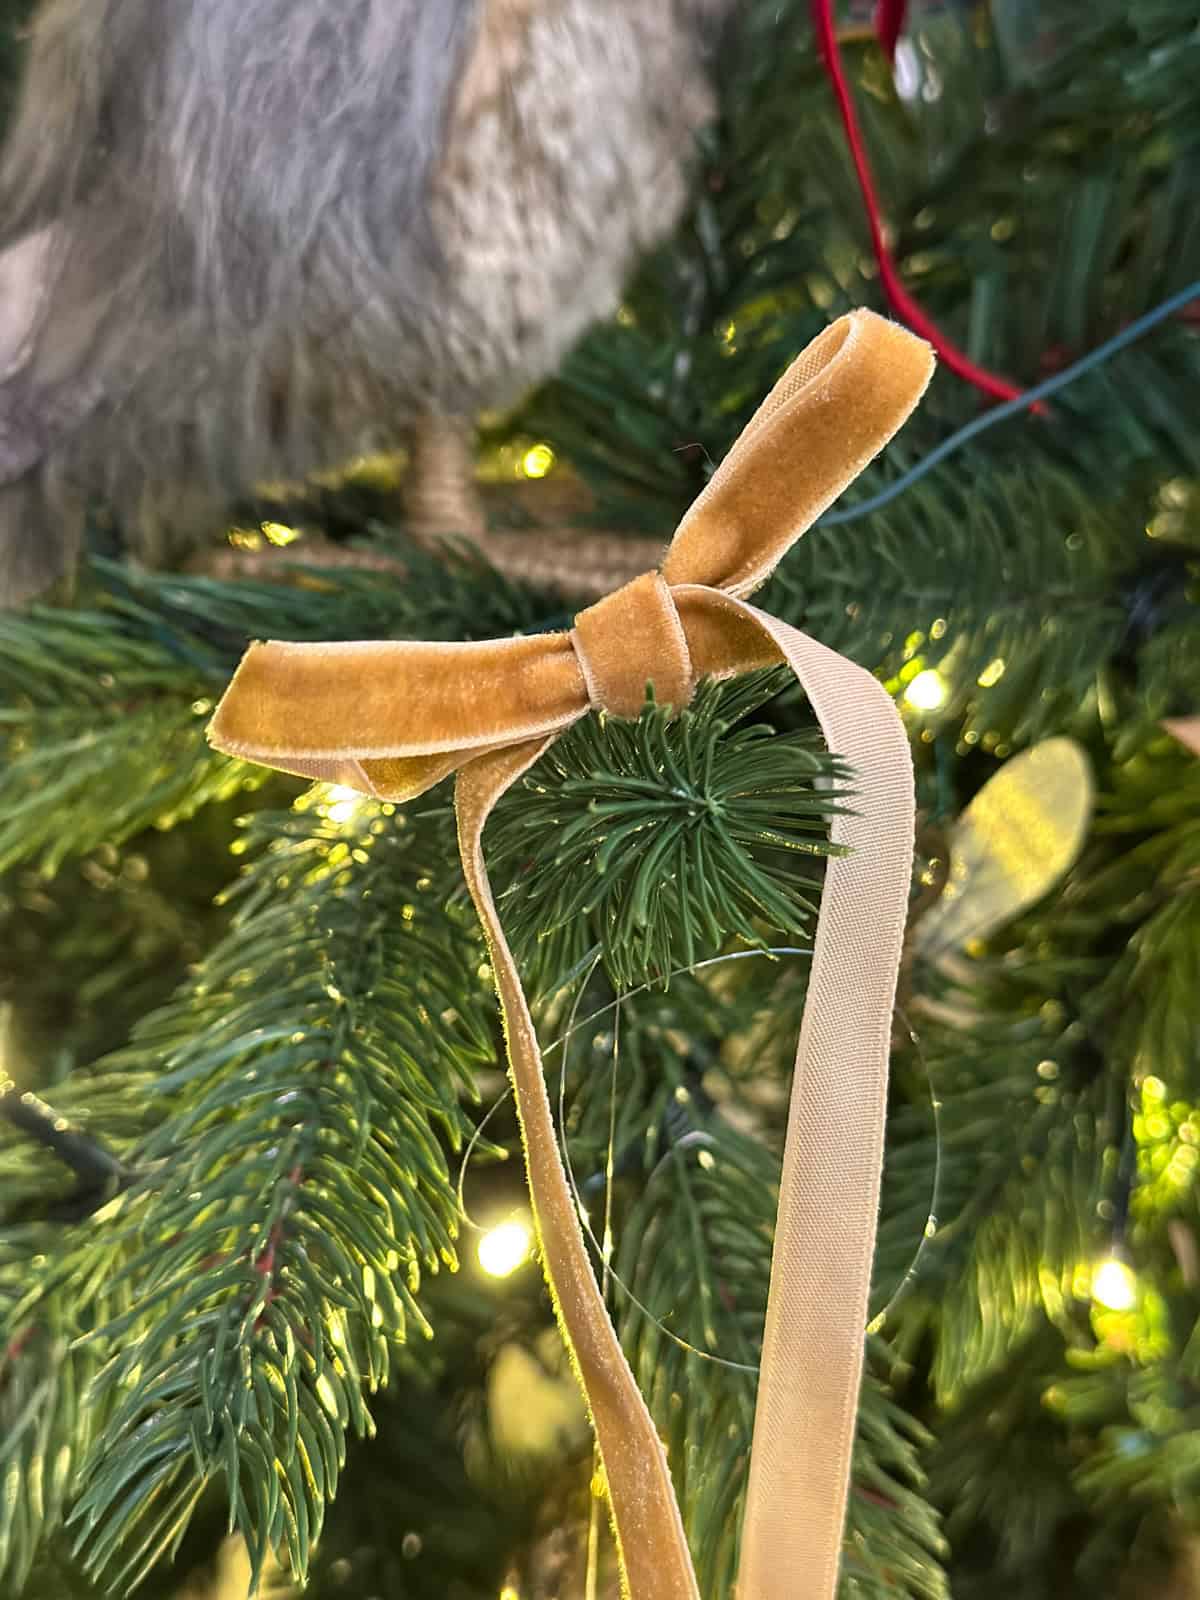
I wanted to include all the house colors using velvet ribbon bows in burgundy (Gryffindor), green (Slytherin), blue (Ravenclaw), and gold (Hufflepuff). But I didn't want to go for bold, bright colors. Fitting with my vintage aesthetic, I used softer versions of the house colors and I love how it turned out.
Movie Moment Ornaments
I also wanted to include some DIY ornaments representing favorite movie moments, like the flying car, Ministry of Magic toilet, Dobby's sock, and more. These details make people smile and spark conversations.
Timeline
I started gathering supplies in early November and spent several weeks crafting ornaments, working on them a little each evening. Sites like Temu and AliExpress were budget-friendly but take 2-3 weeks to arrive, so order early! I went mostly DIY because I love the making process, but there are great store-bought options too if crafting isn't your thing.
Essential Supplies & Where to Shop
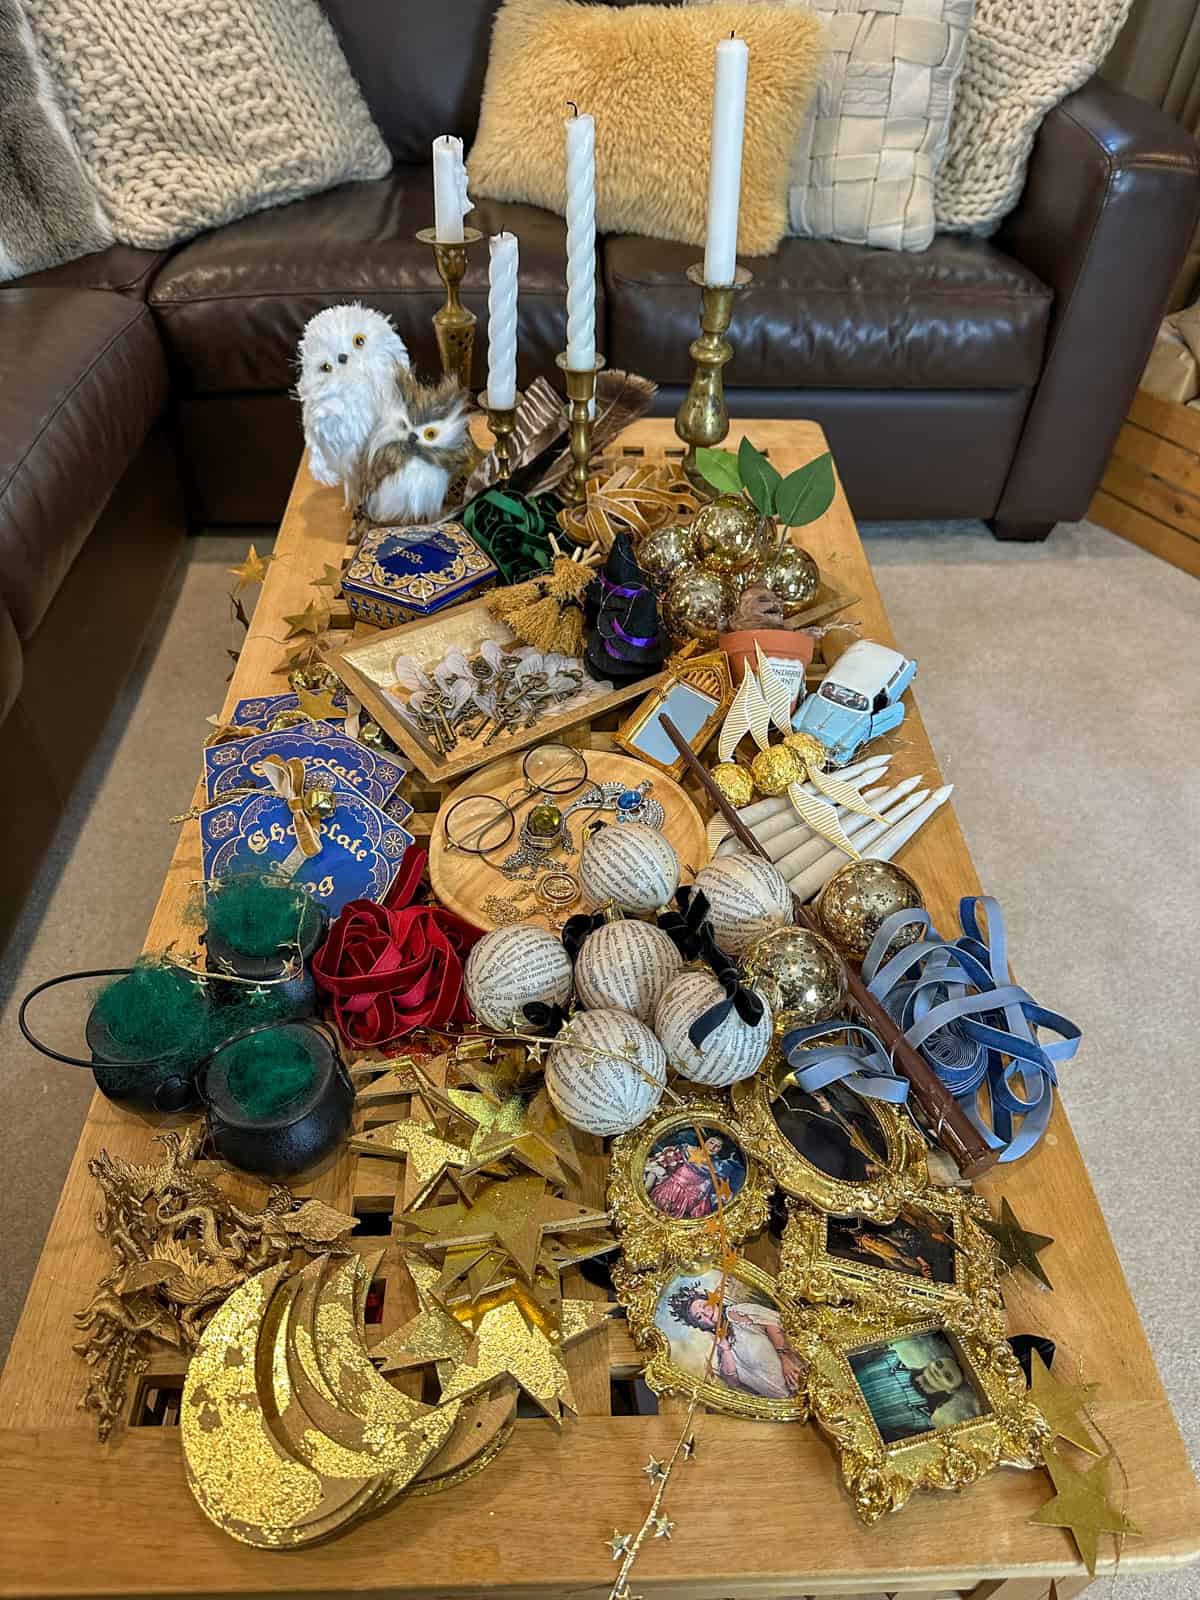
- Thrift stores are my favorite! I found vintage books, sweaters for stockings, mini plates, glass jars, brass candlesticks, the birdcage, and so many treasures for our Harry Potter Christmas here.
- Dollar stores work for clear ornament balls, basic ribbons, craft paint, and candy.
- Craft stores look for spray paint, Mod Podge, and quality ribbons.
- Online shopping (Temu, AliExpress, Amazon) is great for chocolate molds, Horcrux replicas, specialty items, and hard-to-find pieces. Order early -Temu/AliExpress takes 2-3 weeks!
- Bulk food stores for Honeydukes candy.
- Pro Tip: Thrift first, then fill in gaps online. I saved hundreds!
The 7 Horcruxe Ornaments
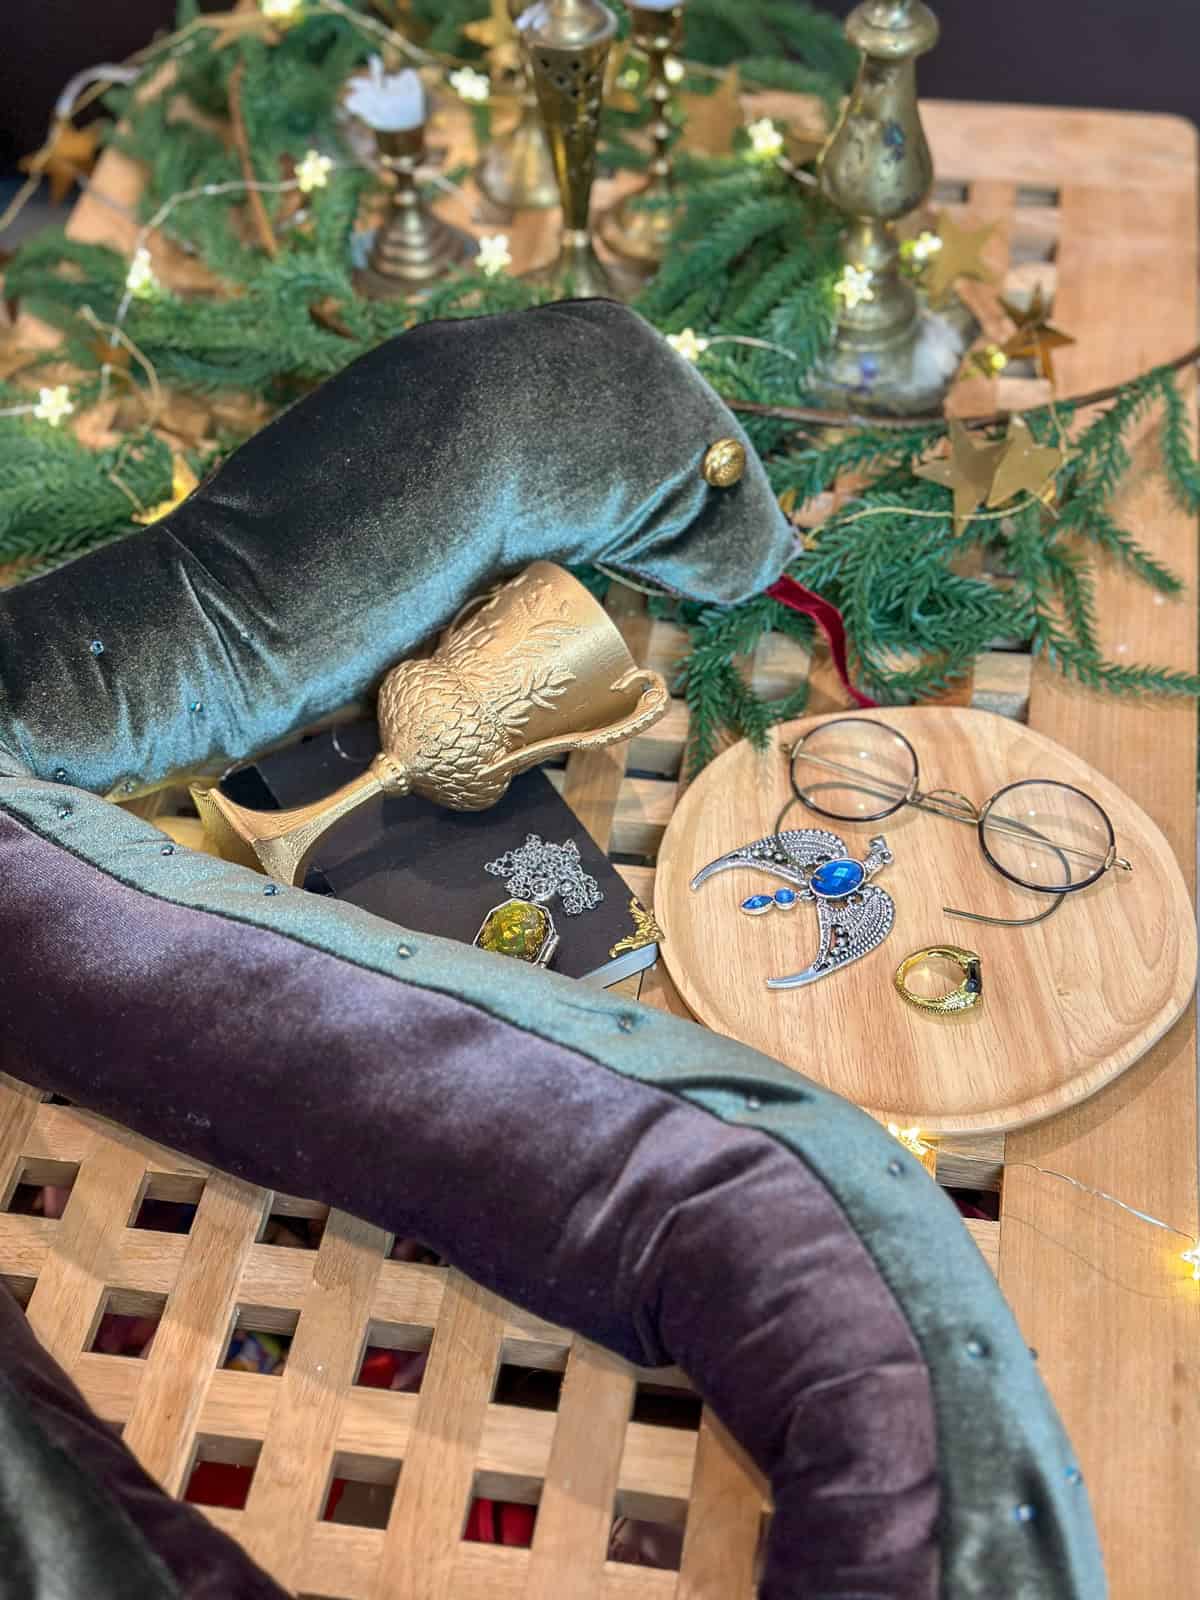
One of my favorite unique touches is displaying all 7 Horcruxes as ornaments. These life-size movie replicas are prominently featured throughout the tree. True fans will immediately recognize them!
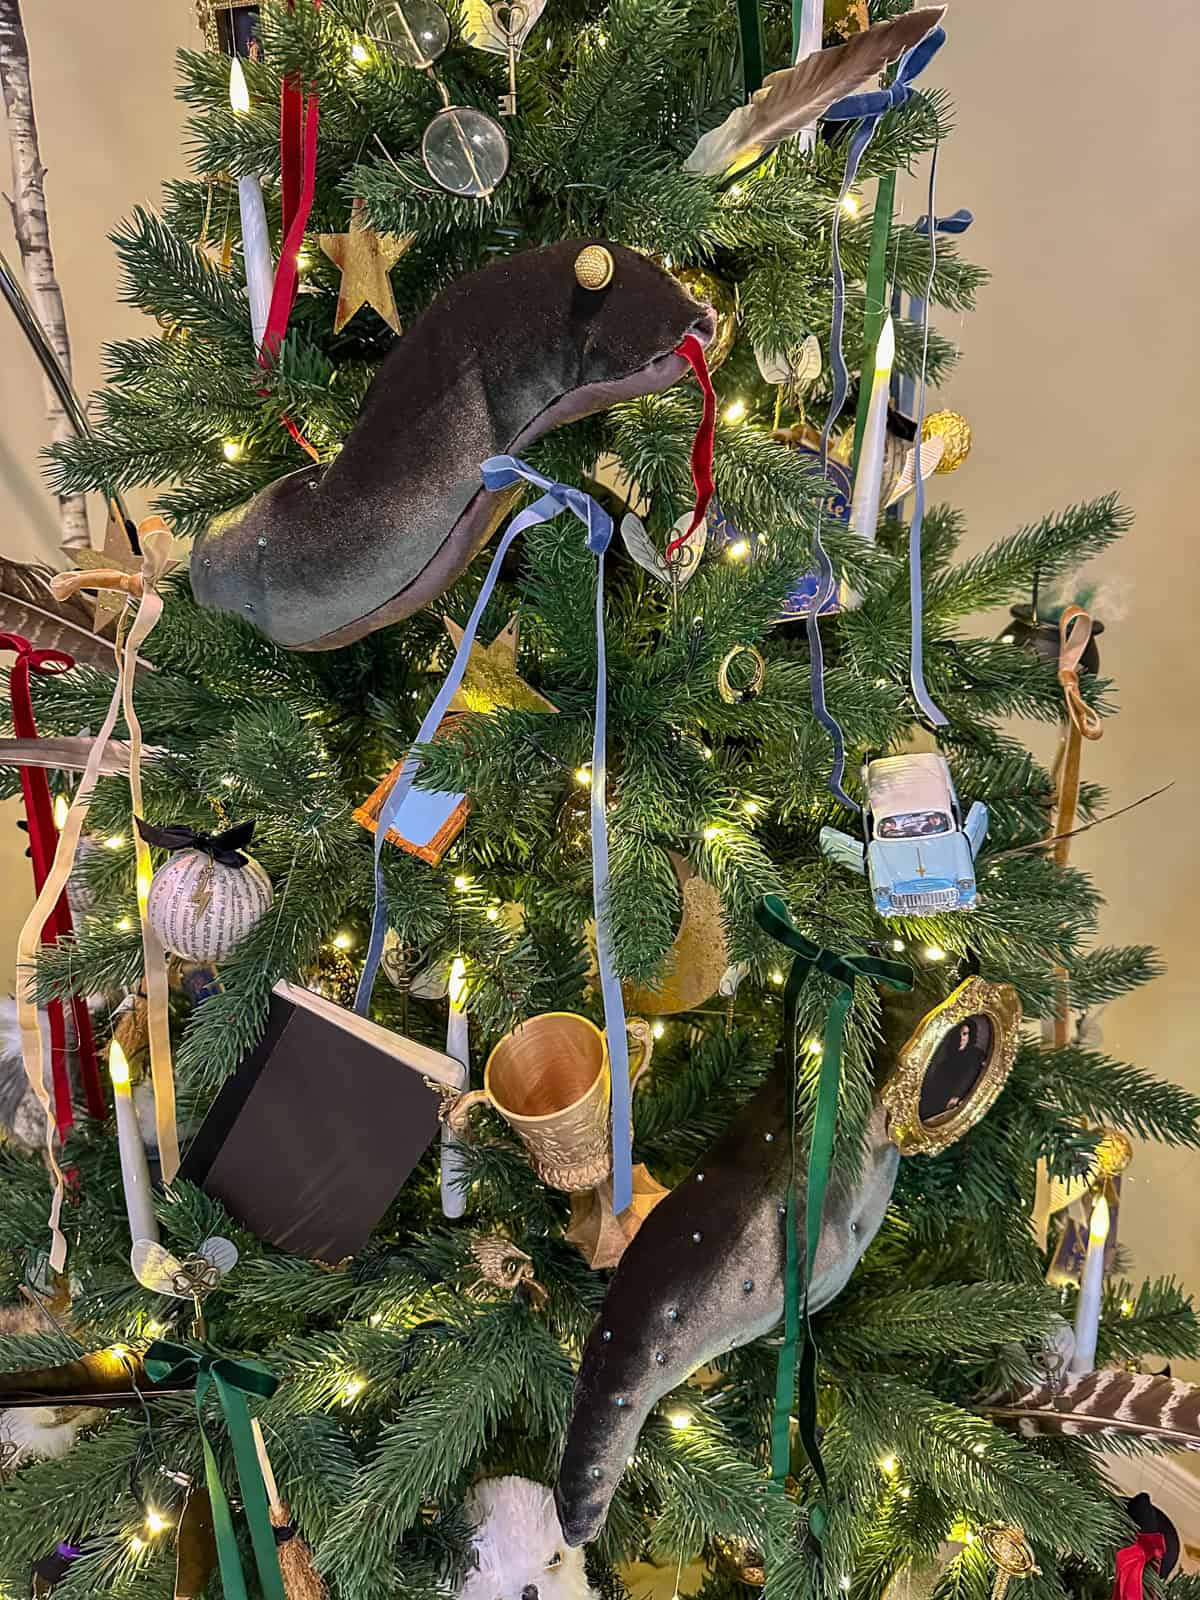
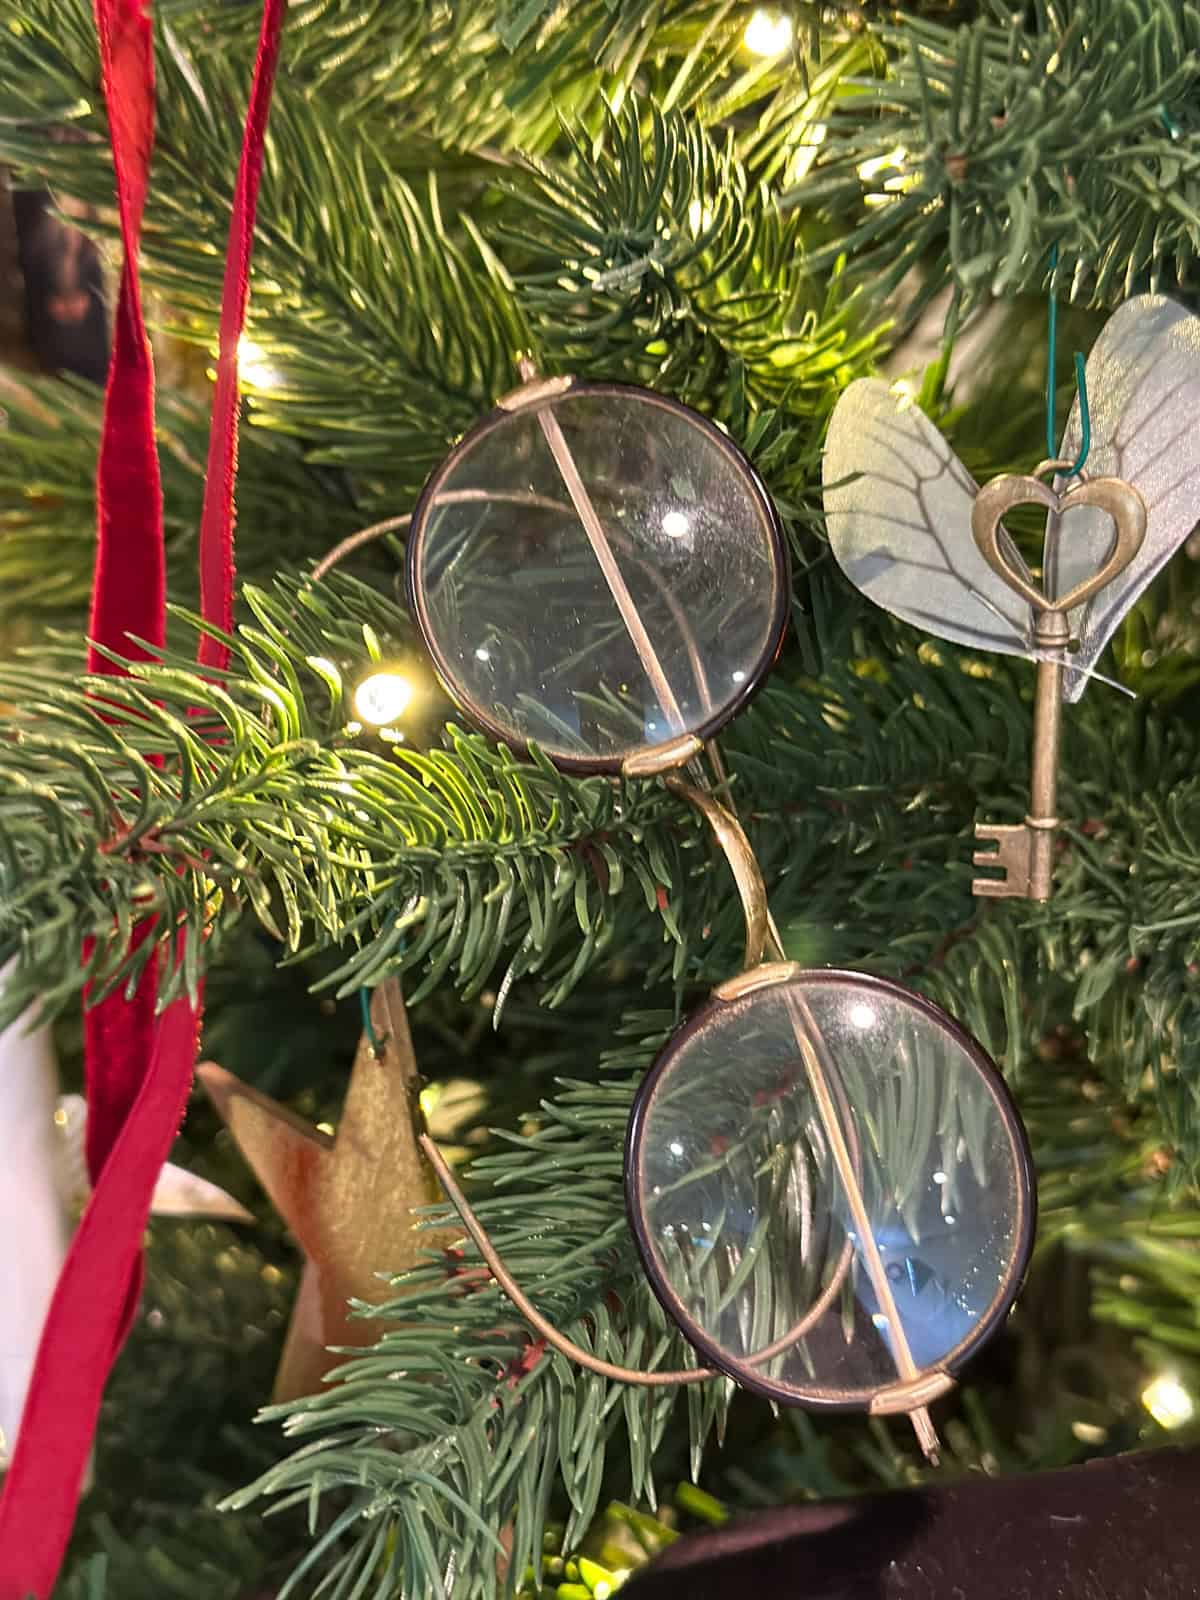
Harry's Glasses
Round wire-frame glasses hung on the tree. I had a vintage pair, look for these at antique stores. The real glass looks great on the tree with the lights. Cost: $10
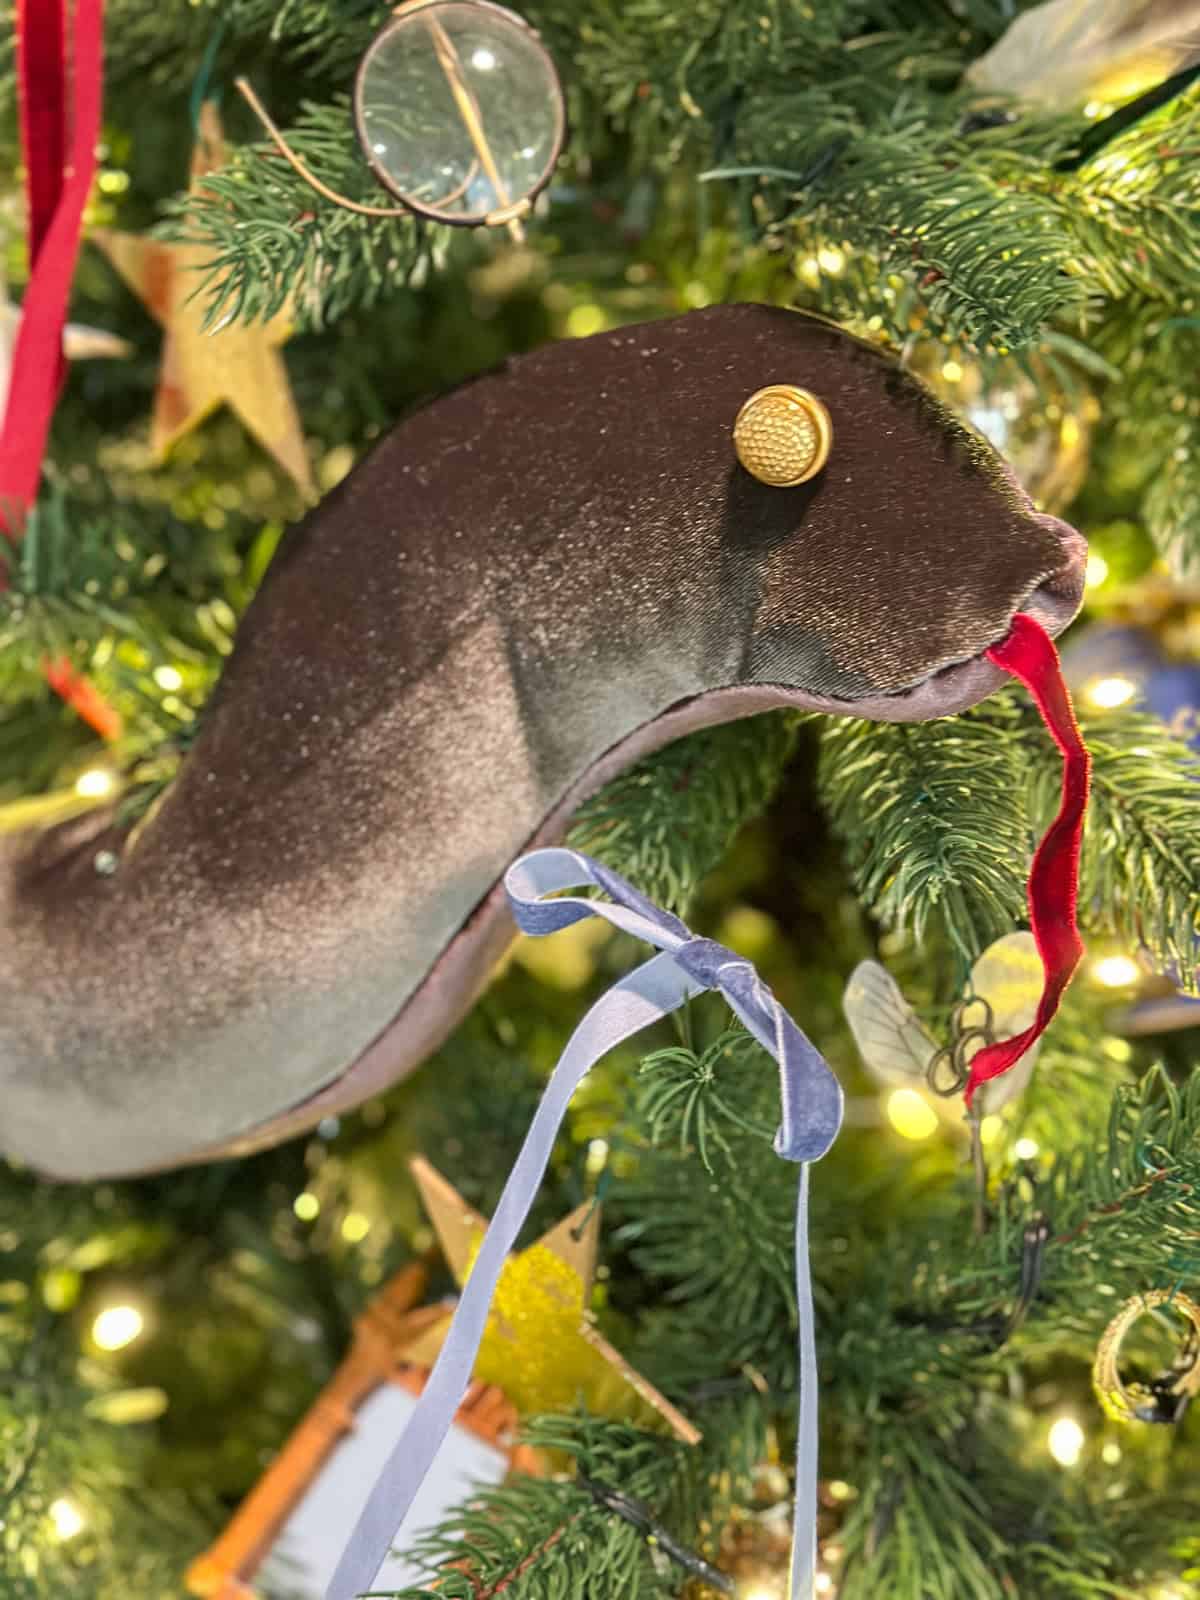
Nagini the Snake
Life-size toy snake (4-5 feet) wrapped dramatically through branches. We bought some stretch velvet fabric in green and brown and cut out our giant snake. Next, we stitched it together on our sewing machine using a zig-zag stitch. Don't forget to add a ribbon snake tongue, and leave a hole for your stuffing. Then stuff your snake with pillow stuffing, and stitch the hole shut by hand. We added a gold button eye, and sewed some iridescent beads on the body of the snake for some glimmer. Once he's done, wrap him in and around the tree. Cost: $12
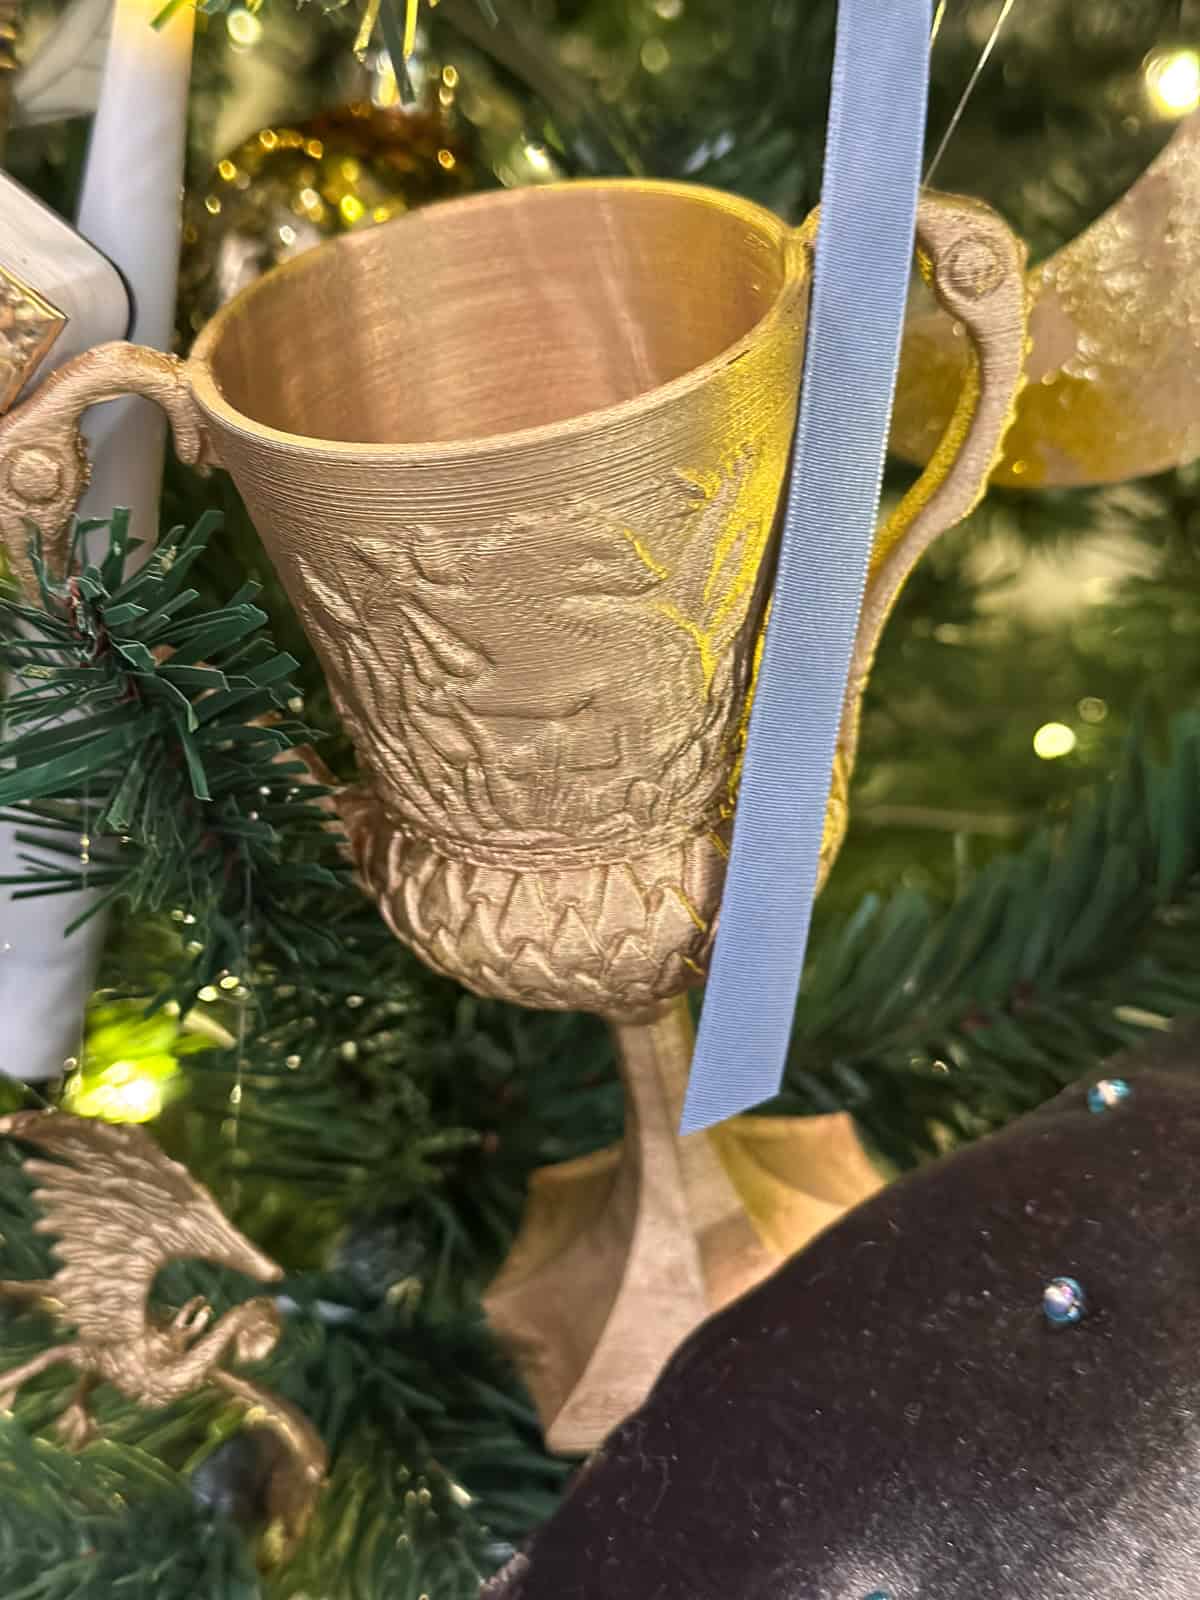
Hufflepuff's Cup
For our cup we used this free pattern to 3D-print it. It turned out so great. If you don't have a 3D printer, check your local library. After it was printed, we spray painted it gold. Cost: 3D print material $10, gold spray paint $20
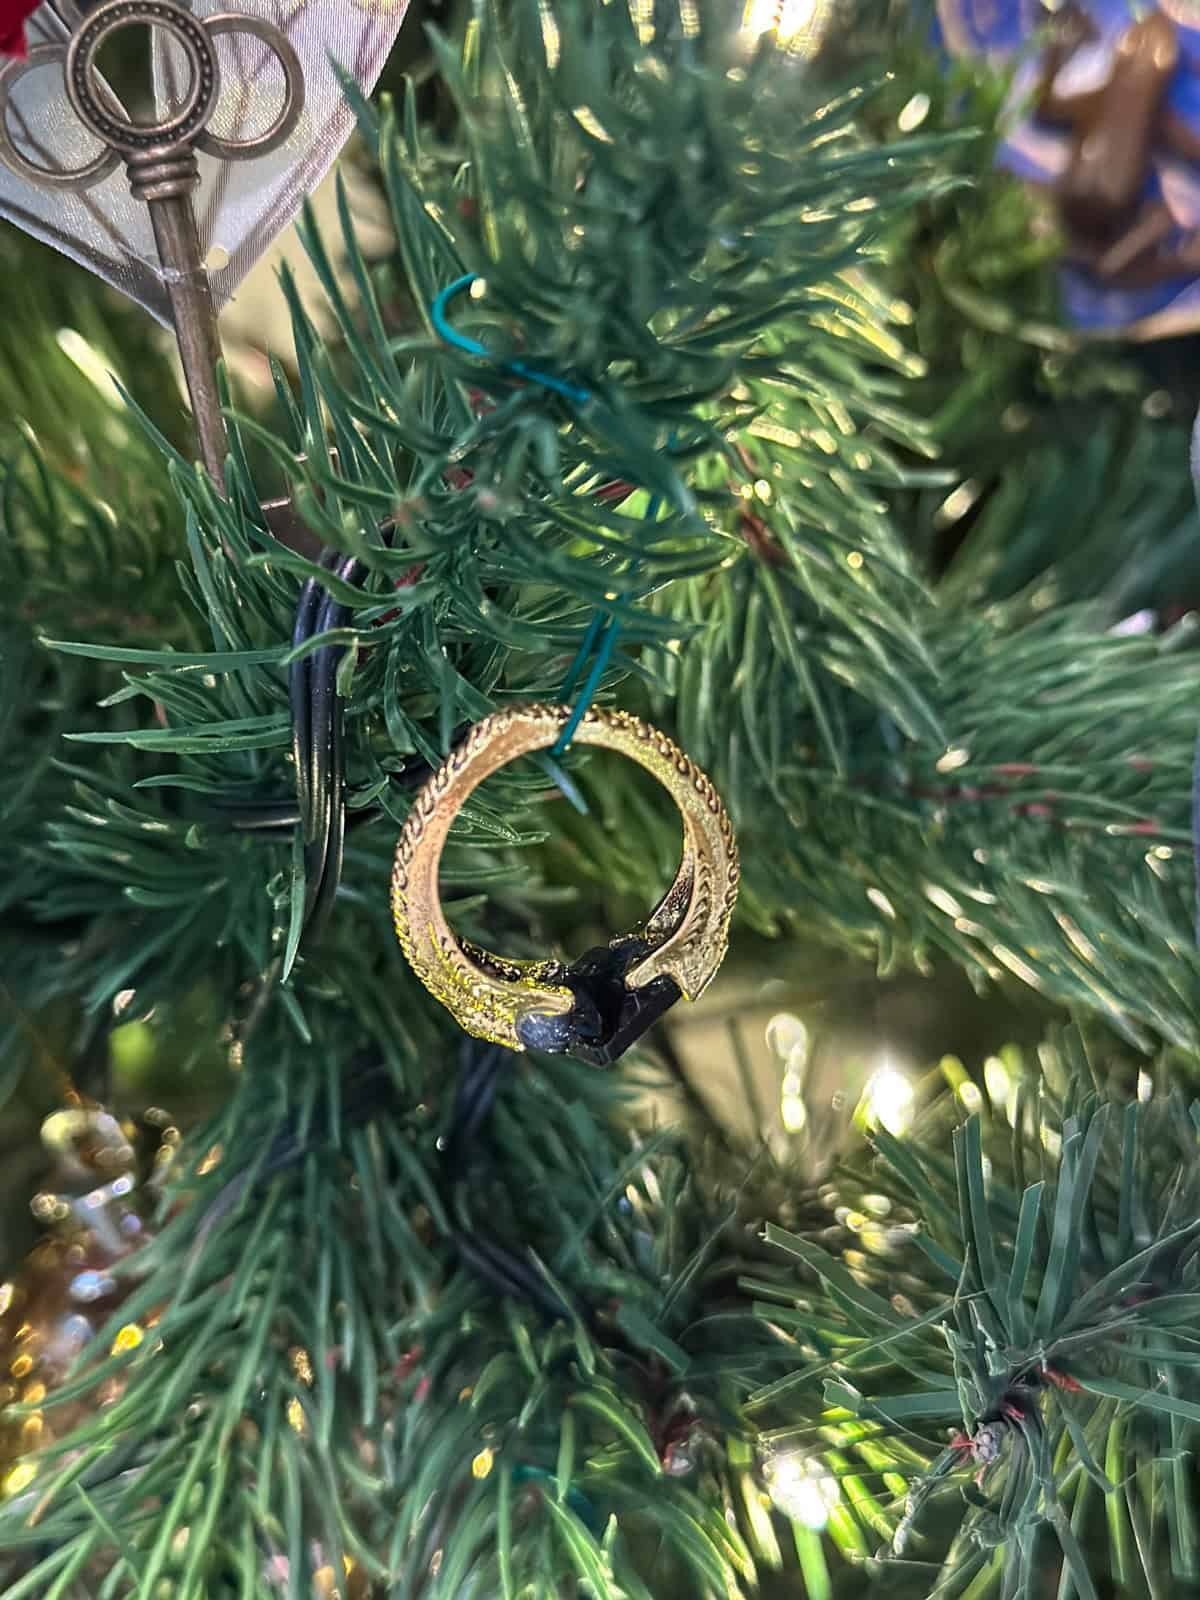
Marvolo Gaunt's Ring
Our life-size ornate ring is an Aliexpress find. (search "Horcrux ring") Cost $4
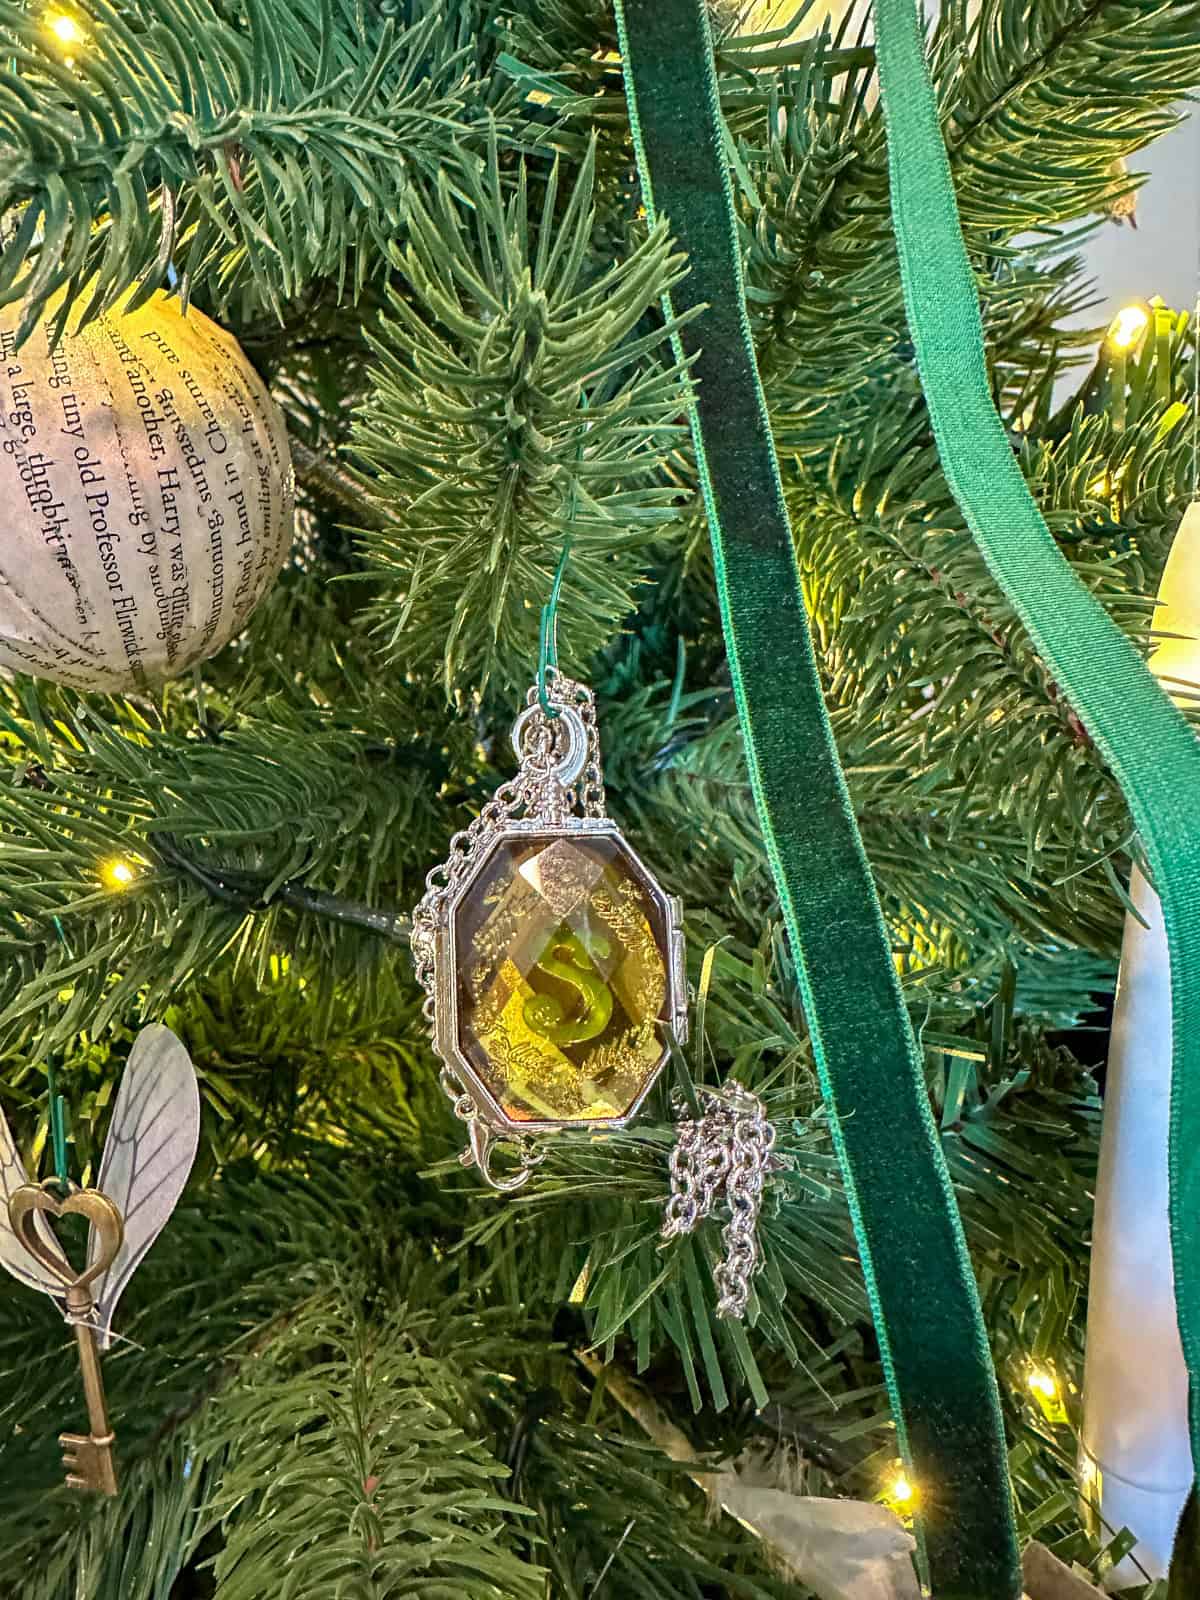
Slytherin's Locket
This full-size locket matching the movie version was another Aliexpress find, and looks great. (search "Slytherin locket" or "Horcrux necklace") Cost $4
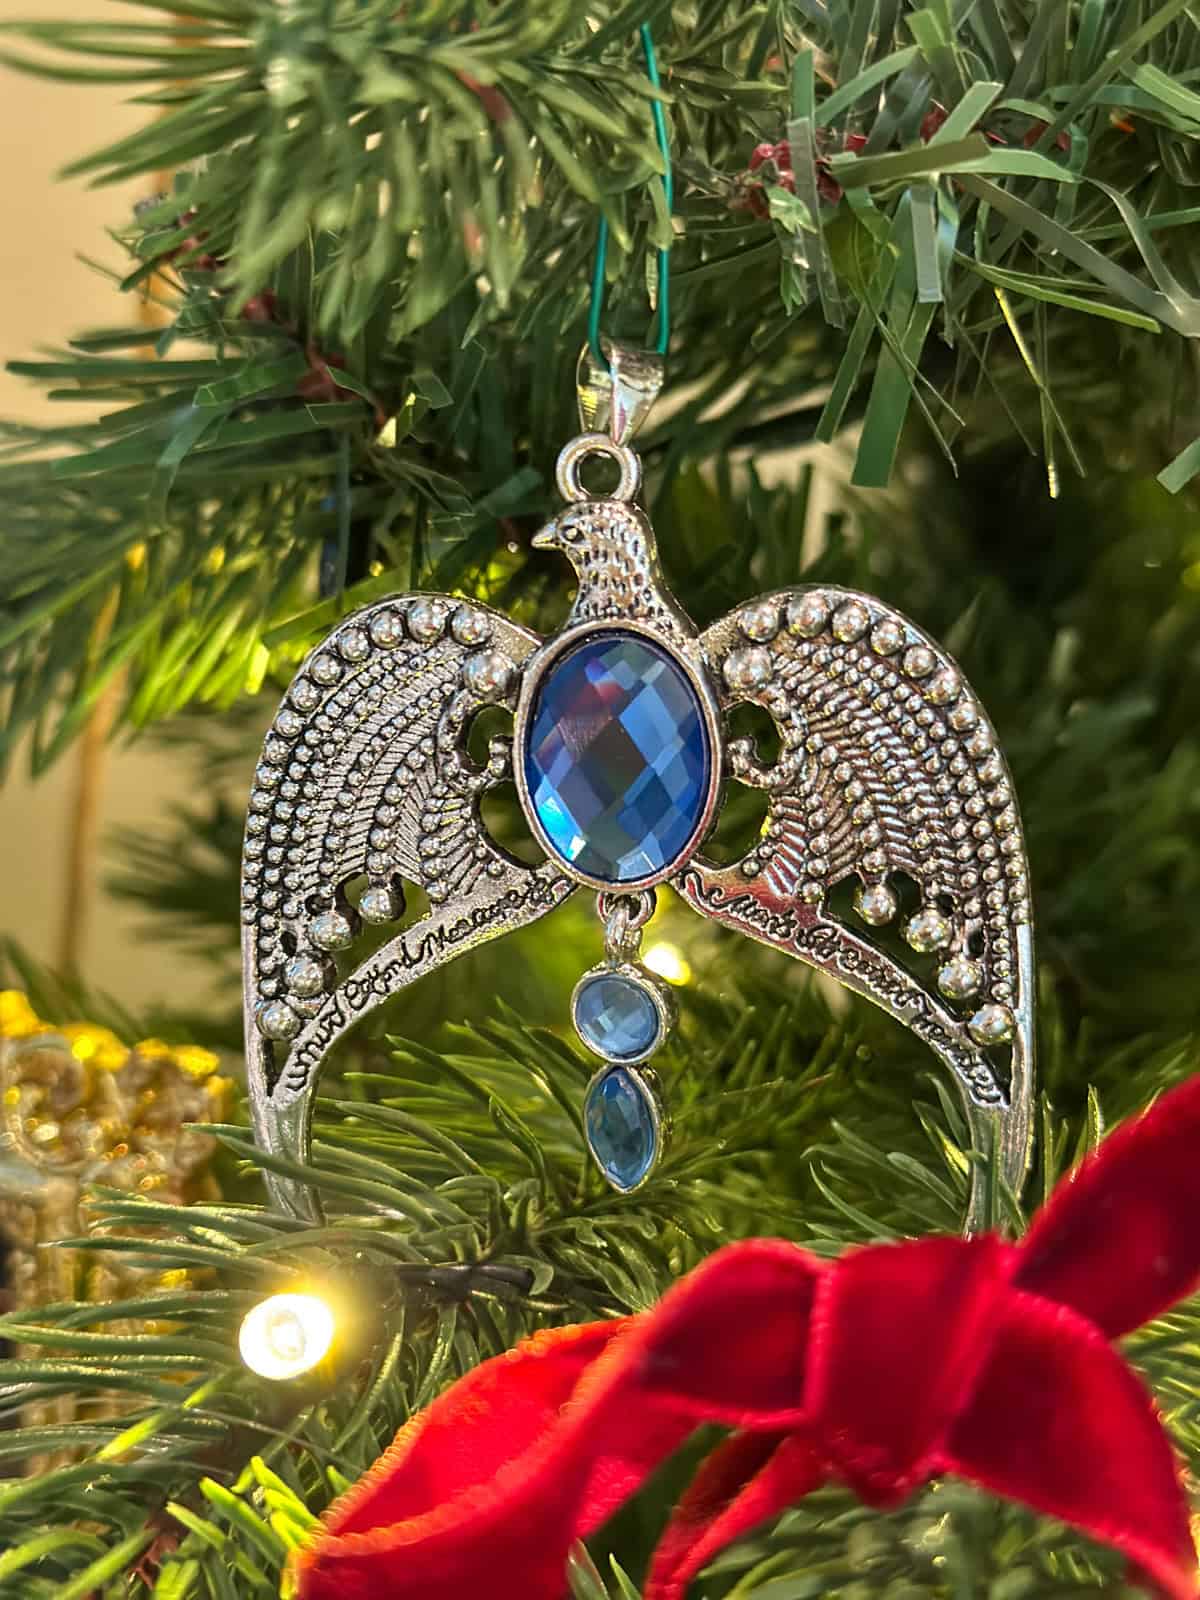
Ravenclaw's Diadem
Life-size diadem/tiara from Aliexpress. It comes as a necklace, but we removed the chain. (search "Ravenclaw diadem" or "Blue artificial gemstone crown necklace, lost crown, Magic Academy movie" Cost $4
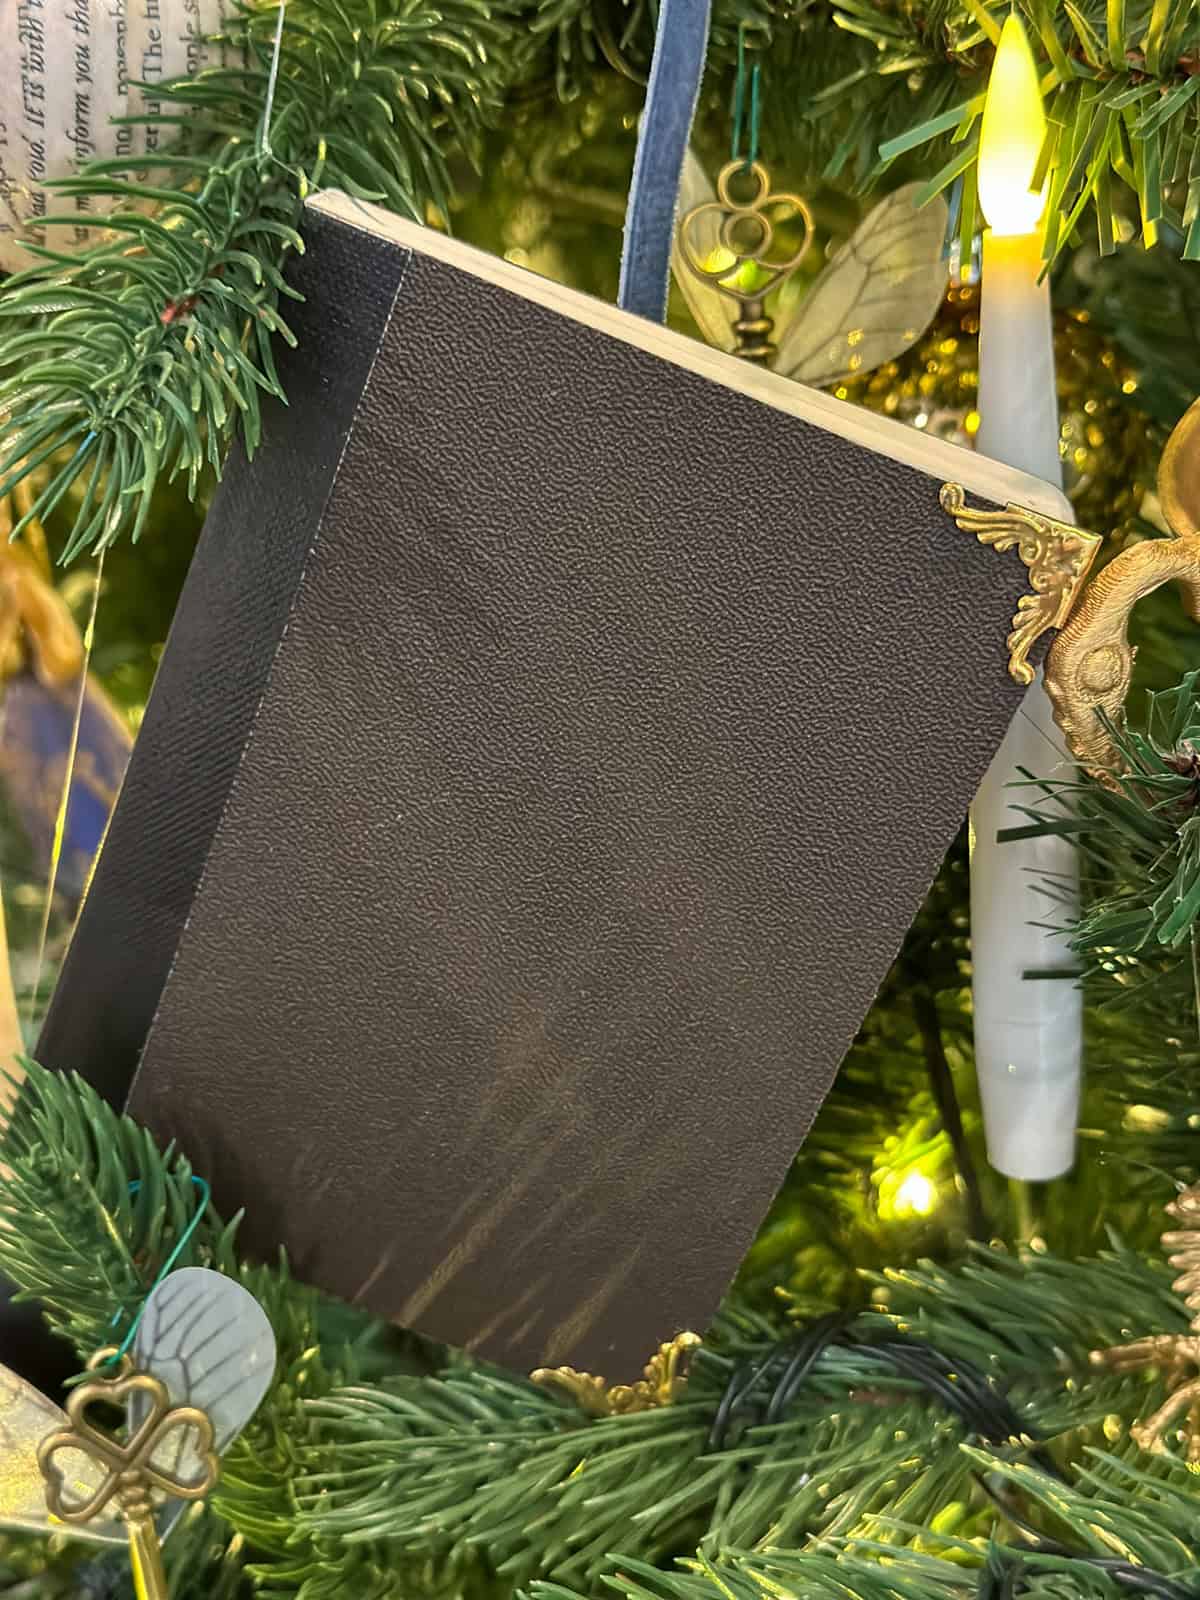
Tom Riddle's Diary
We used a small black diary we had, and a thrifted picture frame that had gold corners. We removed the corners from the frame and added them to the diary corners. Cost free using supplies we had on hand.
Shopping tip: These movie-replica Horcruxes are almost exclusively on AliExpress, very inexpensive ($3-8 each) but allow 2-3 weeks for shipping. They're major conversation starters!
Save this post to Pinterest so you can find it again when you're ready to start crafting.
DIY Harry Potter Ornaments
Now for the fun part -creating magical ornaments! I'm sharing detailed instructions for featured projects plus quick summaries for easier ones.
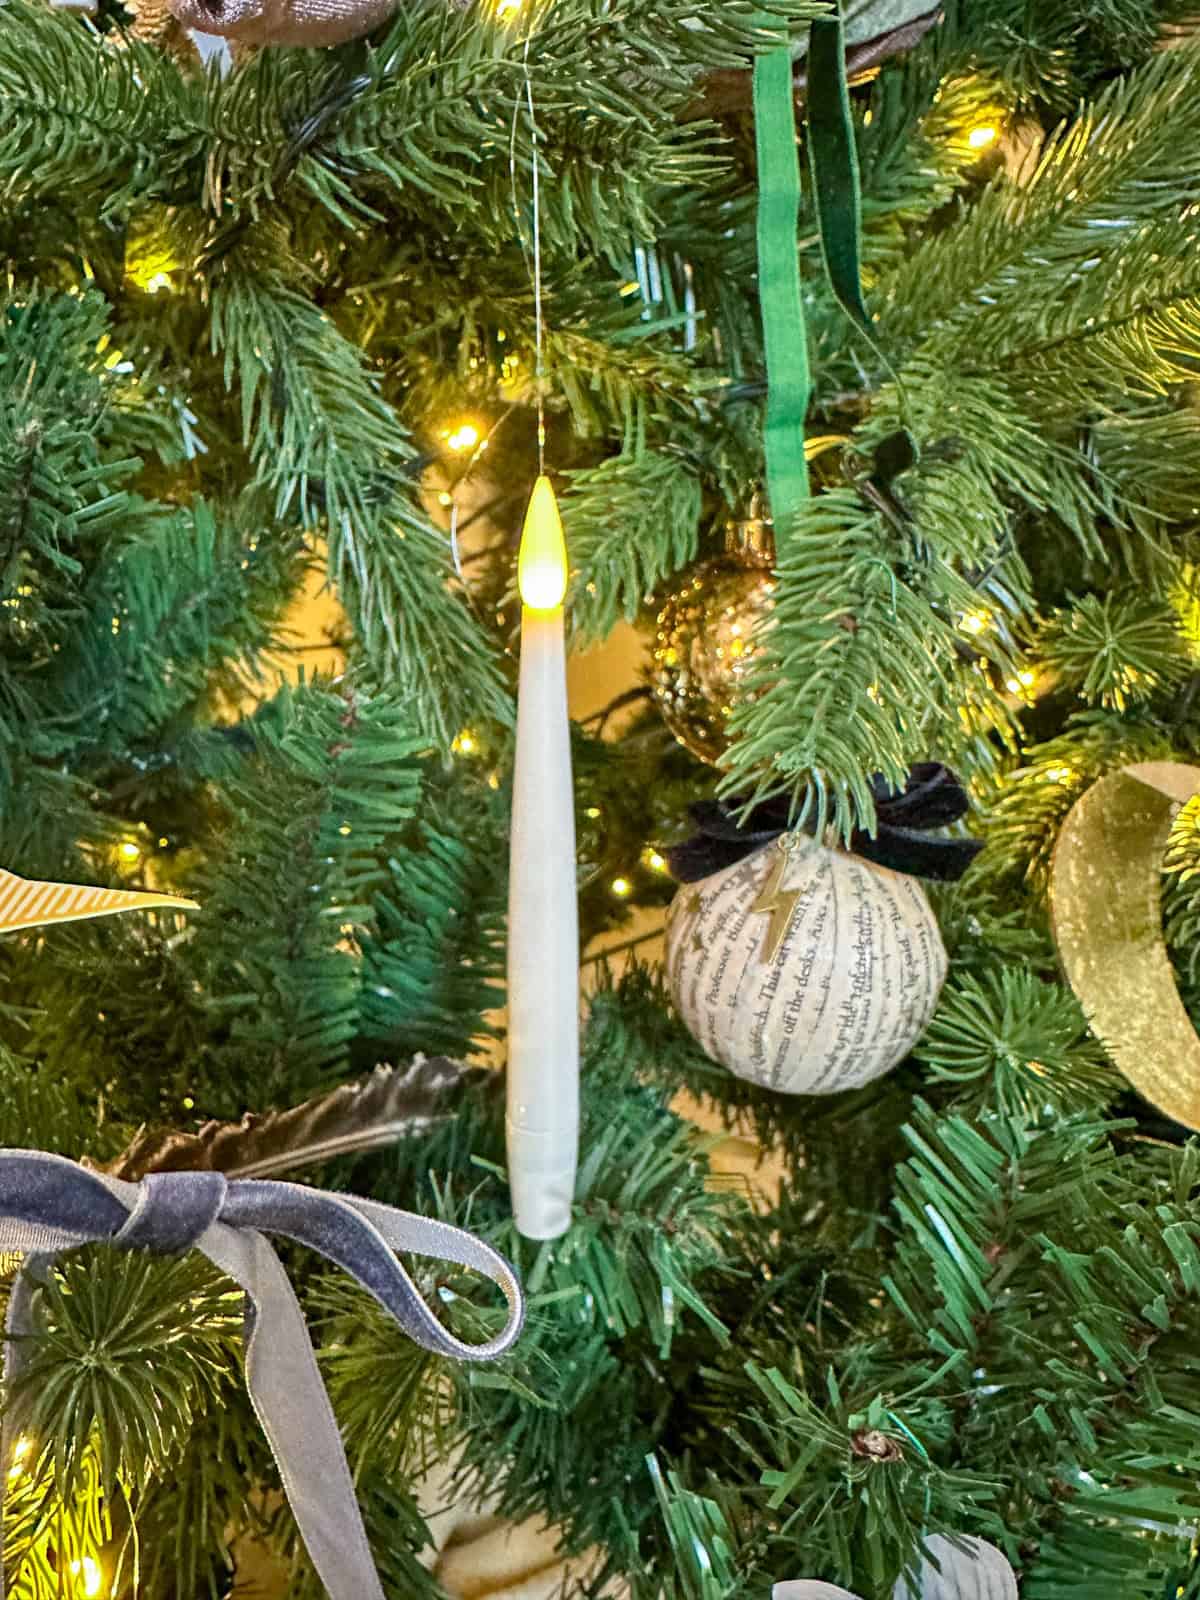
Book Page Christmas Ornaments
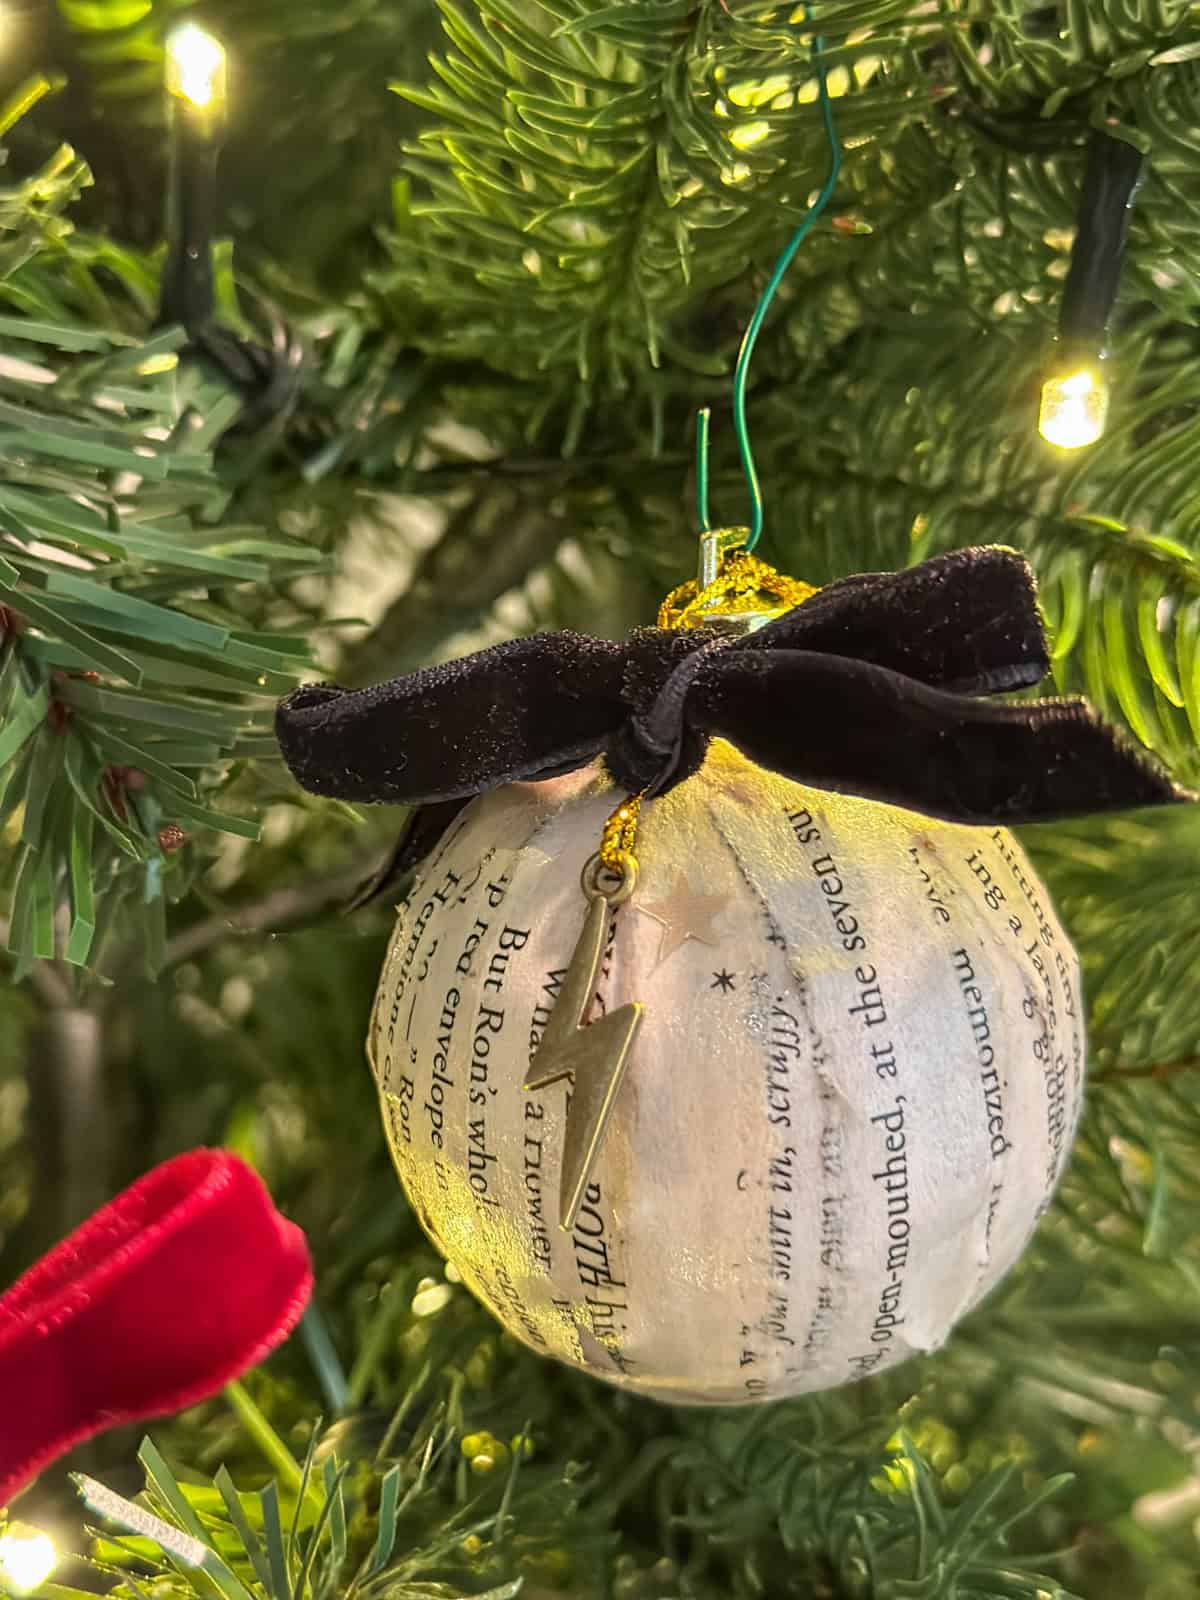
These vintage-inspired ornaments are my favorites! They look elegant and cost just a few dollars using a thrifted Harry Potter paperback. Remove tops from upcycled plastic ornaments and tear book pages into thin strips (tearing gives nice rough edges). Use Mod Podge to glue strips around the ornament, overlapping as you go. Let dry completely. Tie small gold lightning bolt charms to the top with gold string, replace the cap, add a black velvet bow, and optionally add gold star stickers to the outside for extra sparkle. I used my Cricut to cut the stars out with a matte gold vinyl, but stickers work great too.
Materials: Old Harry Potter paperback ($3 thrift store), upcycled ornaments, Mod Podge, gold lightning bolt charms (search online), gold string, black velvet ribbon, gold vinyl stars.
Time: 15-20 minutes each (plus drying) | Cost: ~$2 each | Difficulty: Beginner
Portrait Ornaments
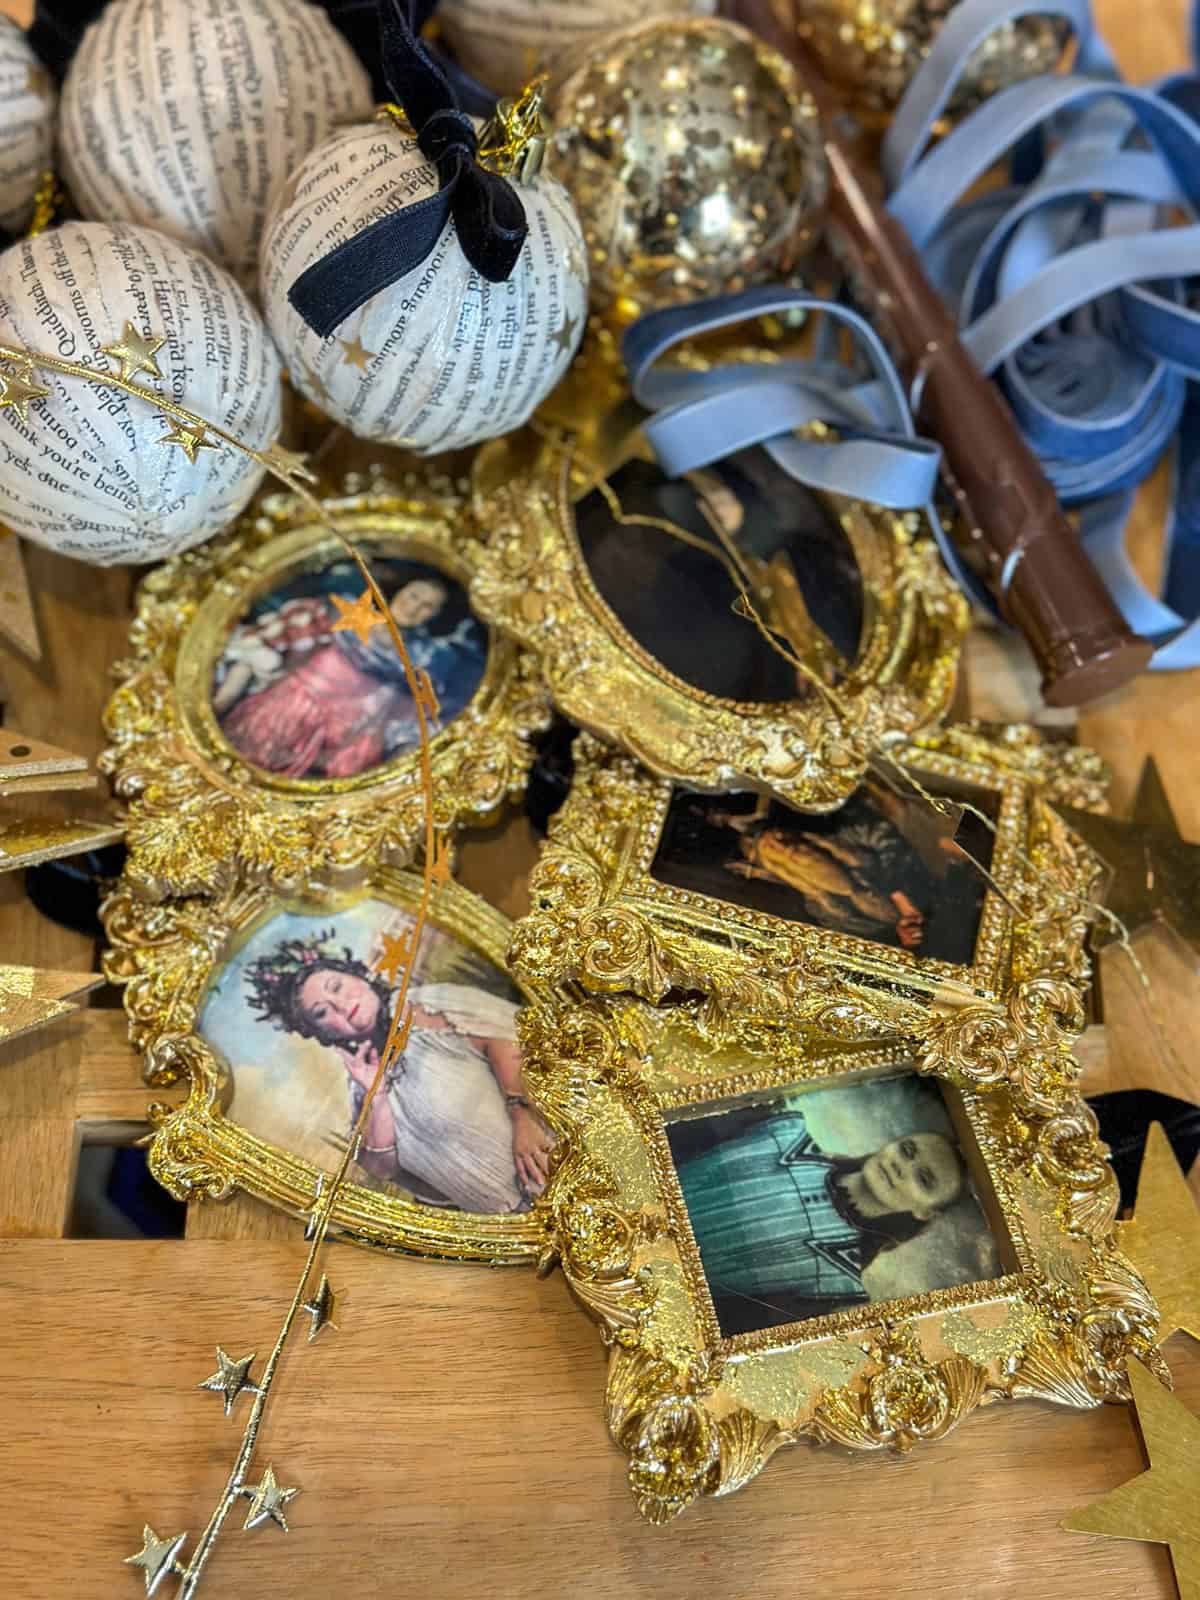
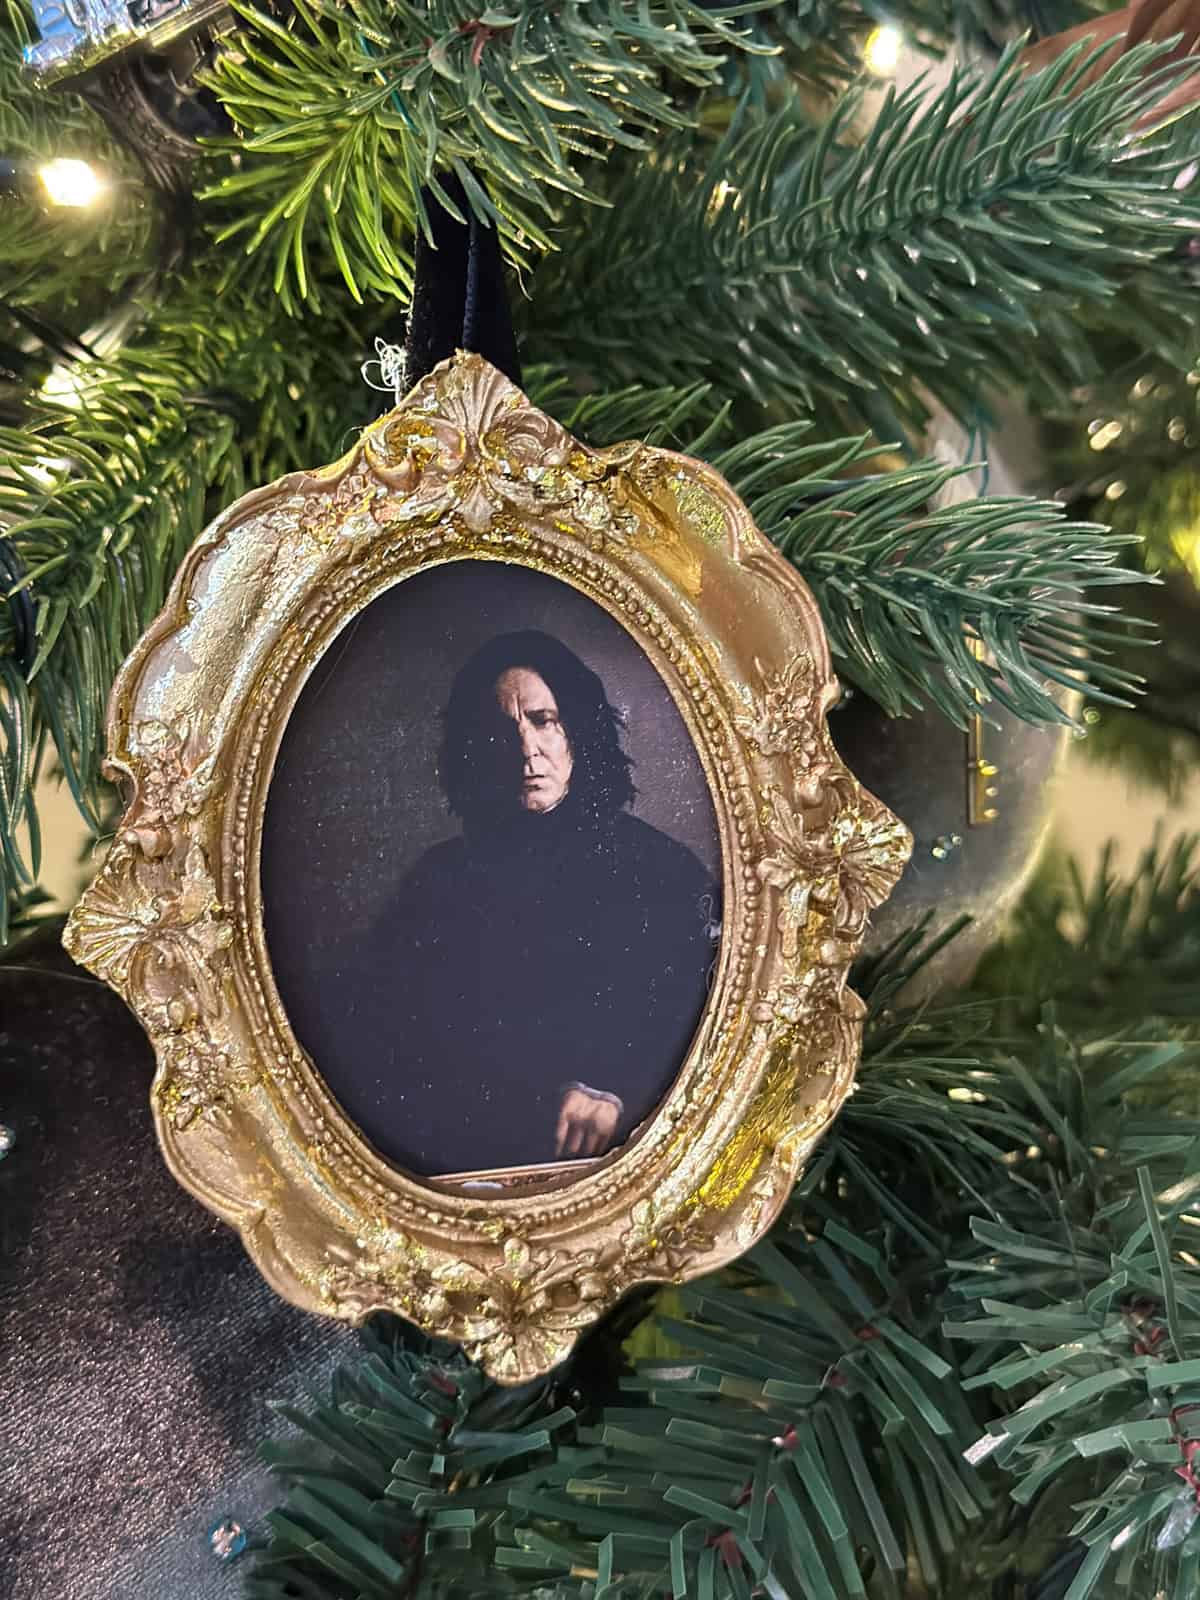
These framed portrait ornaments look like they came straight from Hogwarts! Look for ornate small resin frames online, or hunt for vintage ones at the thrift store. Spray paint gold and let dry. Apply gold leaf glue according to the package directions, and then add gold leaf, and brush off any excess with a soft paint brush. Print Harry Potter character images sized to fit your frames on cardstock or use our free printables. Hot glue images to frame backing, and then glue black velvet ribbon for hanging.
- Materials: Small resin or vintage frames, character images or our printables, cardstock, gold spray paint, gold leaf and glue, hot glue, black velvet ribbon.
- Time: 15 minutes each (plus paint drying)
- Cost: $2-3 each
- Difficulty: Beginner
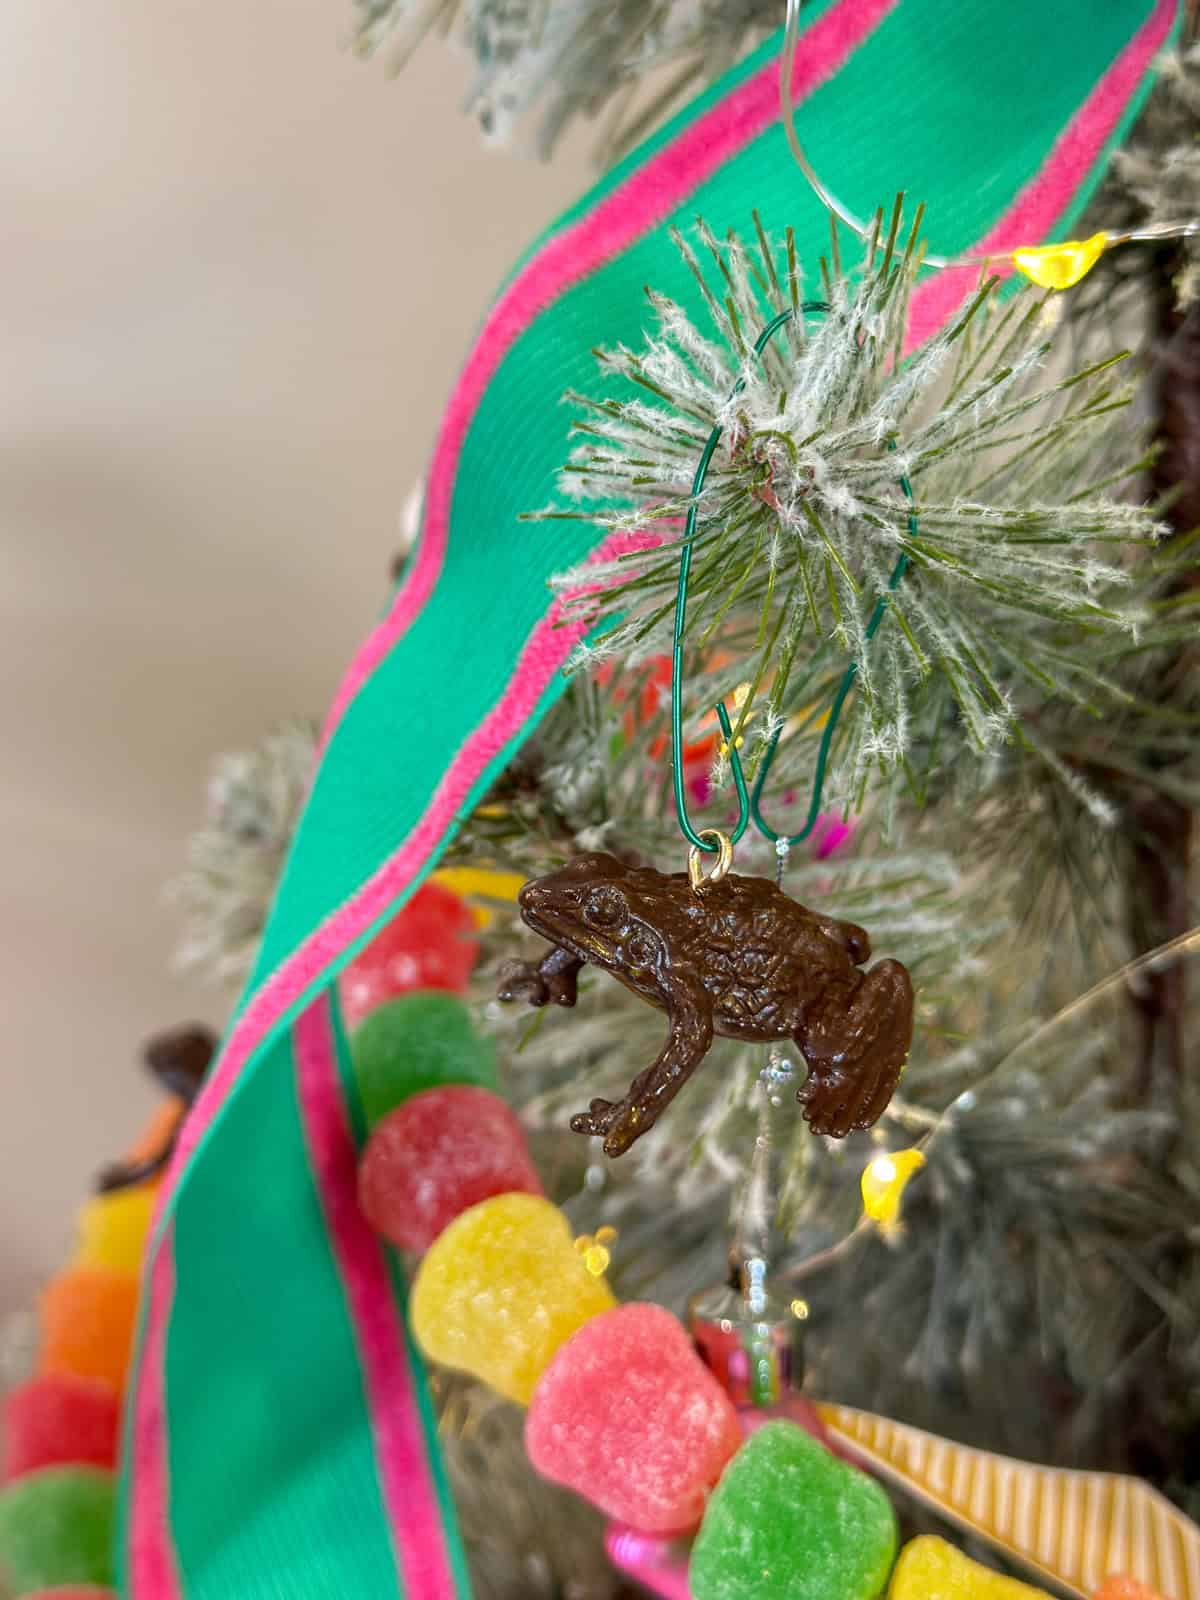
Chocolate Frog Ornaments
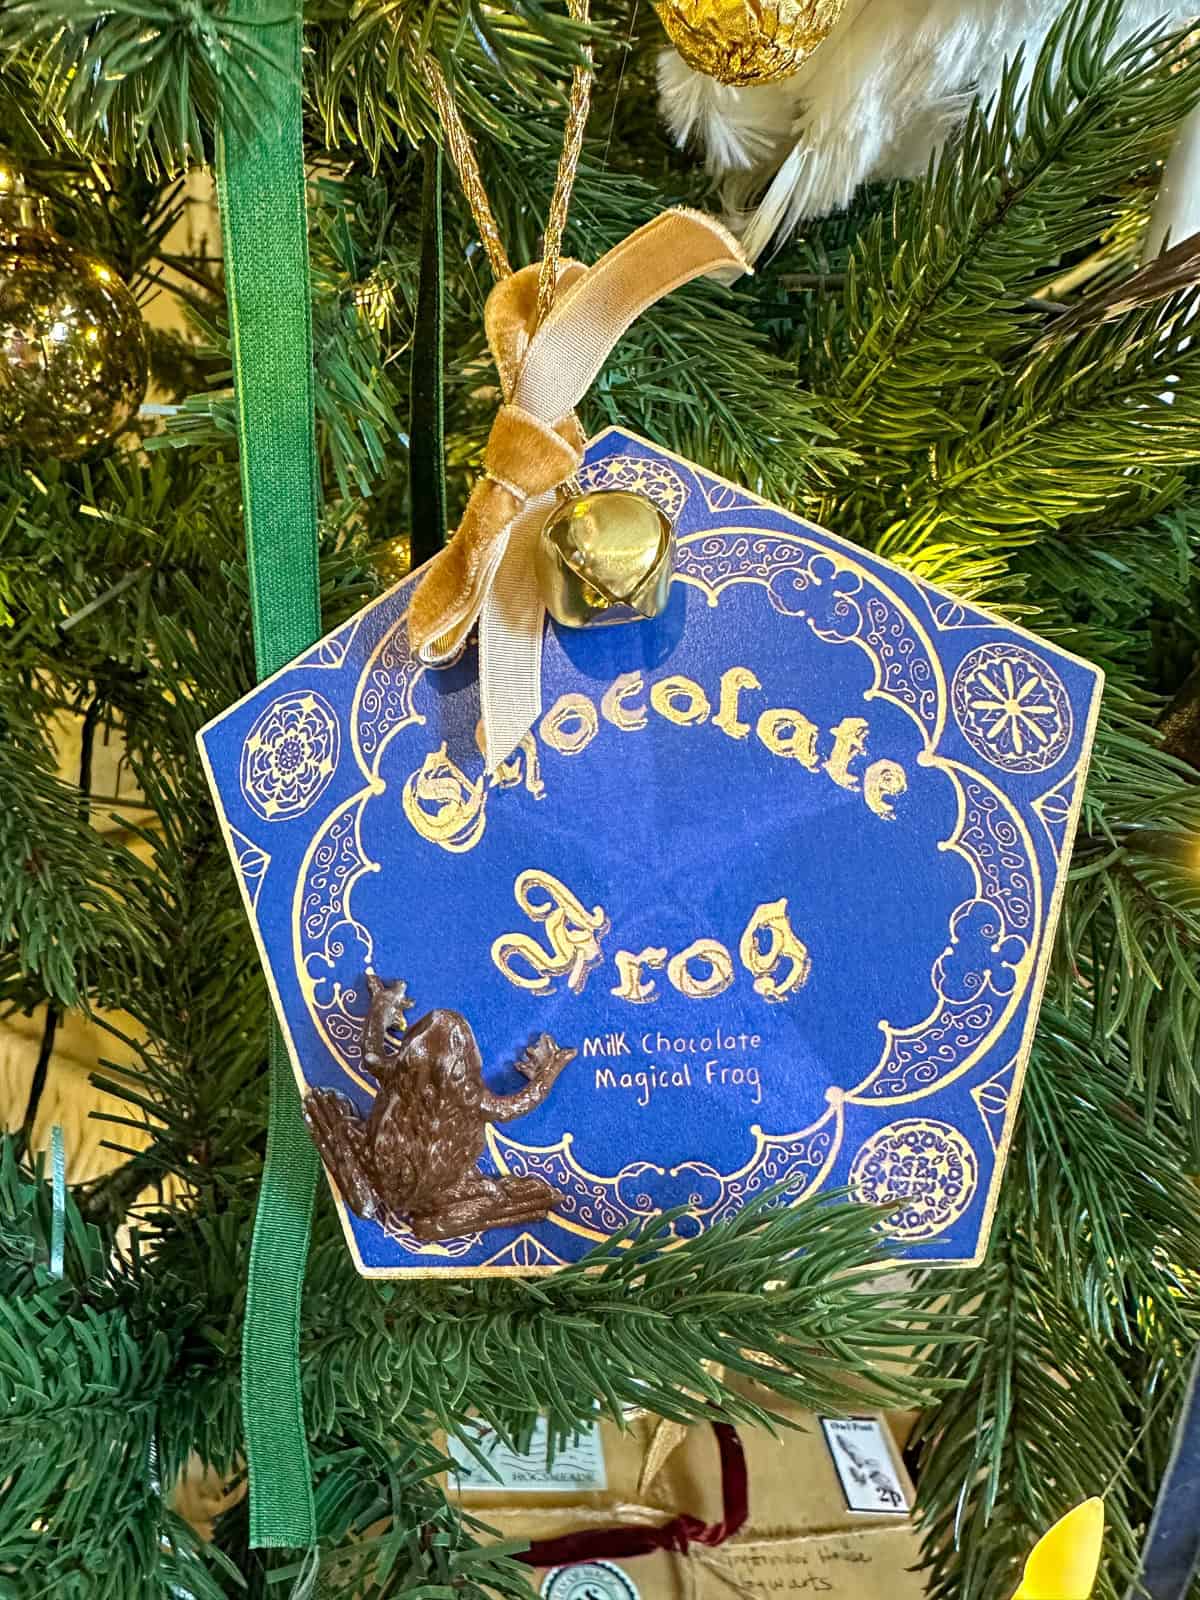
These are so fun and whimsical! I was inspired by The Linen Rabbit, check out her instagram for some amazing Harry Potter Christmas decor.
Start with the flat version of our free printable chocolate frog box printed on copy paper. I used my Cricut to add gold foil to the letters, you could also use a gold paint pen, or leave as is. Cut it out. Then cut out a piece of thin balsam wood in the exact same size. Spray paint the wood gold, making sure to get the edges. Glue the printed image to one side with a glue stick. Add some gold ribbon and jingle bell to the top for hanging. For the chocolage frog, paint a children's small toy frog brown. We used acylic paint and gave it several coats, with a top coat of mod podge for shine. Or use brown spray paint. Hot glue the chocolate frog to the corner of the box.
The wood backing makes these sturdy and gives nice weight. The frog adds dimension and the jingle bell makes it feel festive.
- Materials: Our flat chocolate frog printable, thin wood pieces (craft stores), Cricut or scissors, gold spray paint, brown acrylic paint, Mod Podge, small decorative chocolate frogs, hot glue, gold jingle bells, gold velvet ribbon, ornament hooks.
- Time: 15-20 minutes each (plus drying)
- Cost: $2-3 each
- Difficulty: Beginner to Intermediate
Gold Stars and Moons
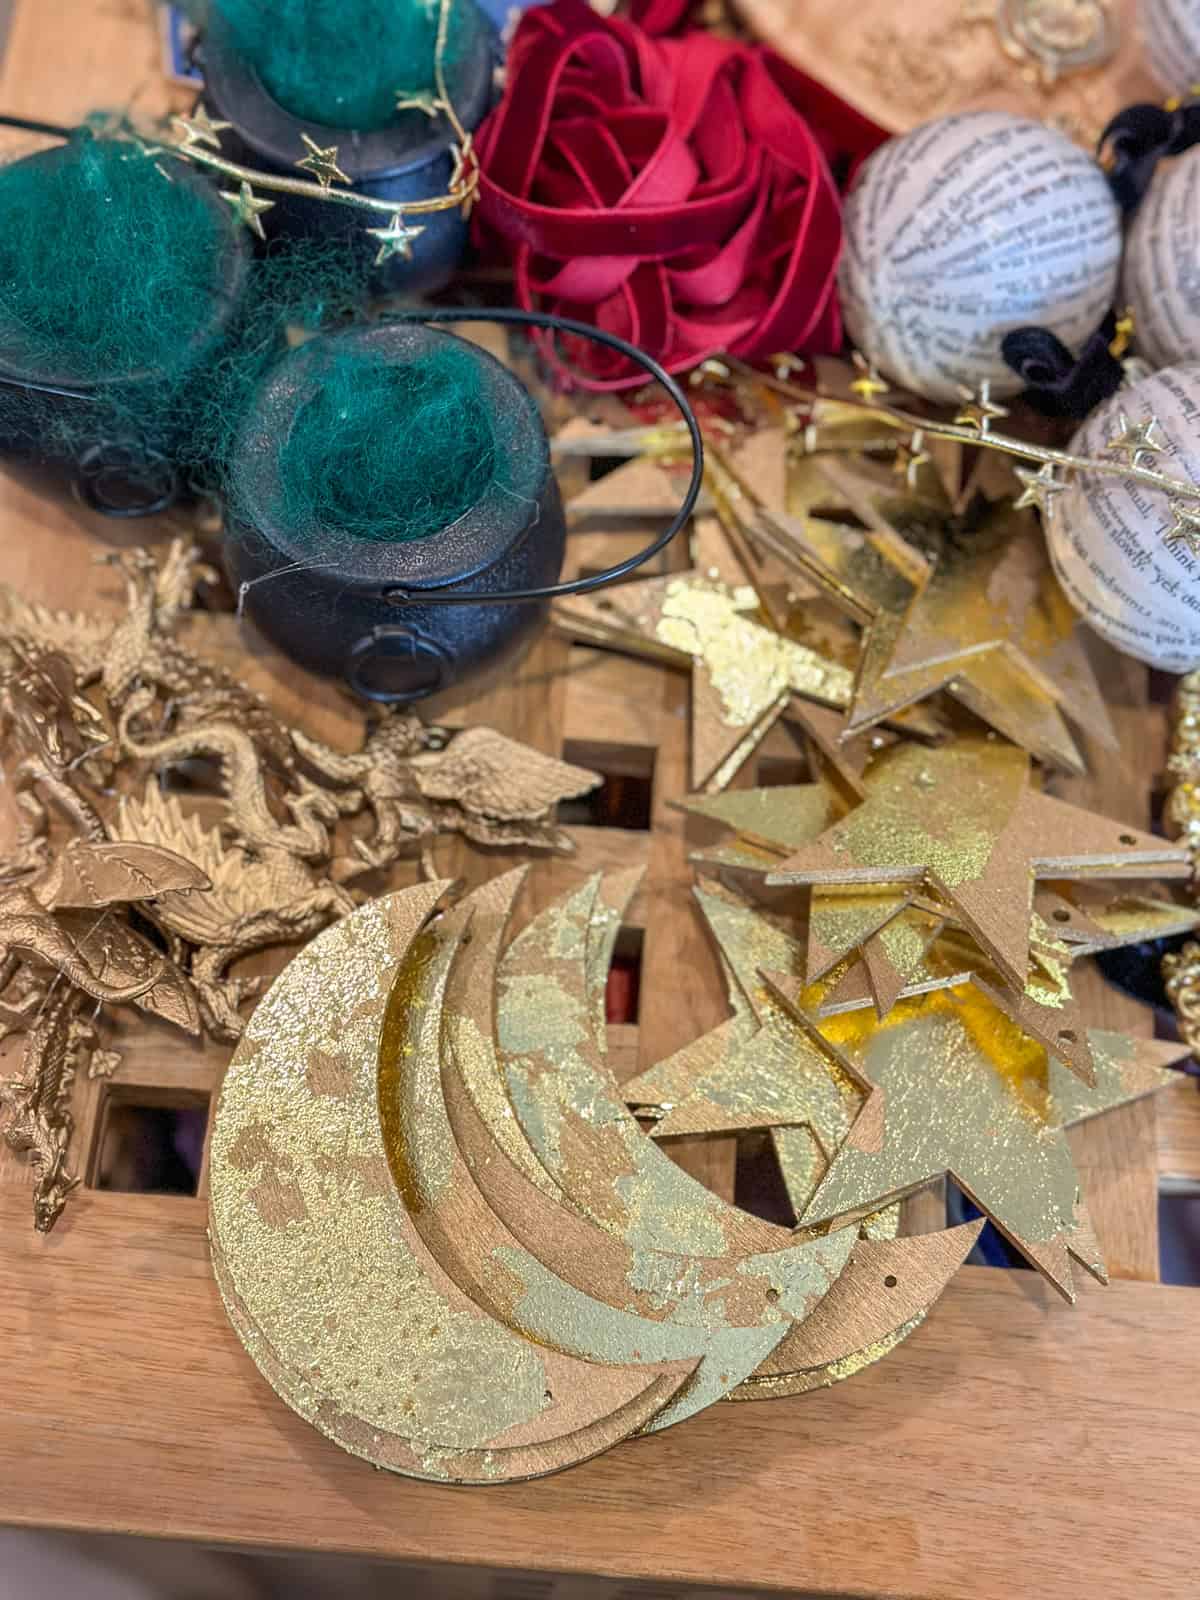
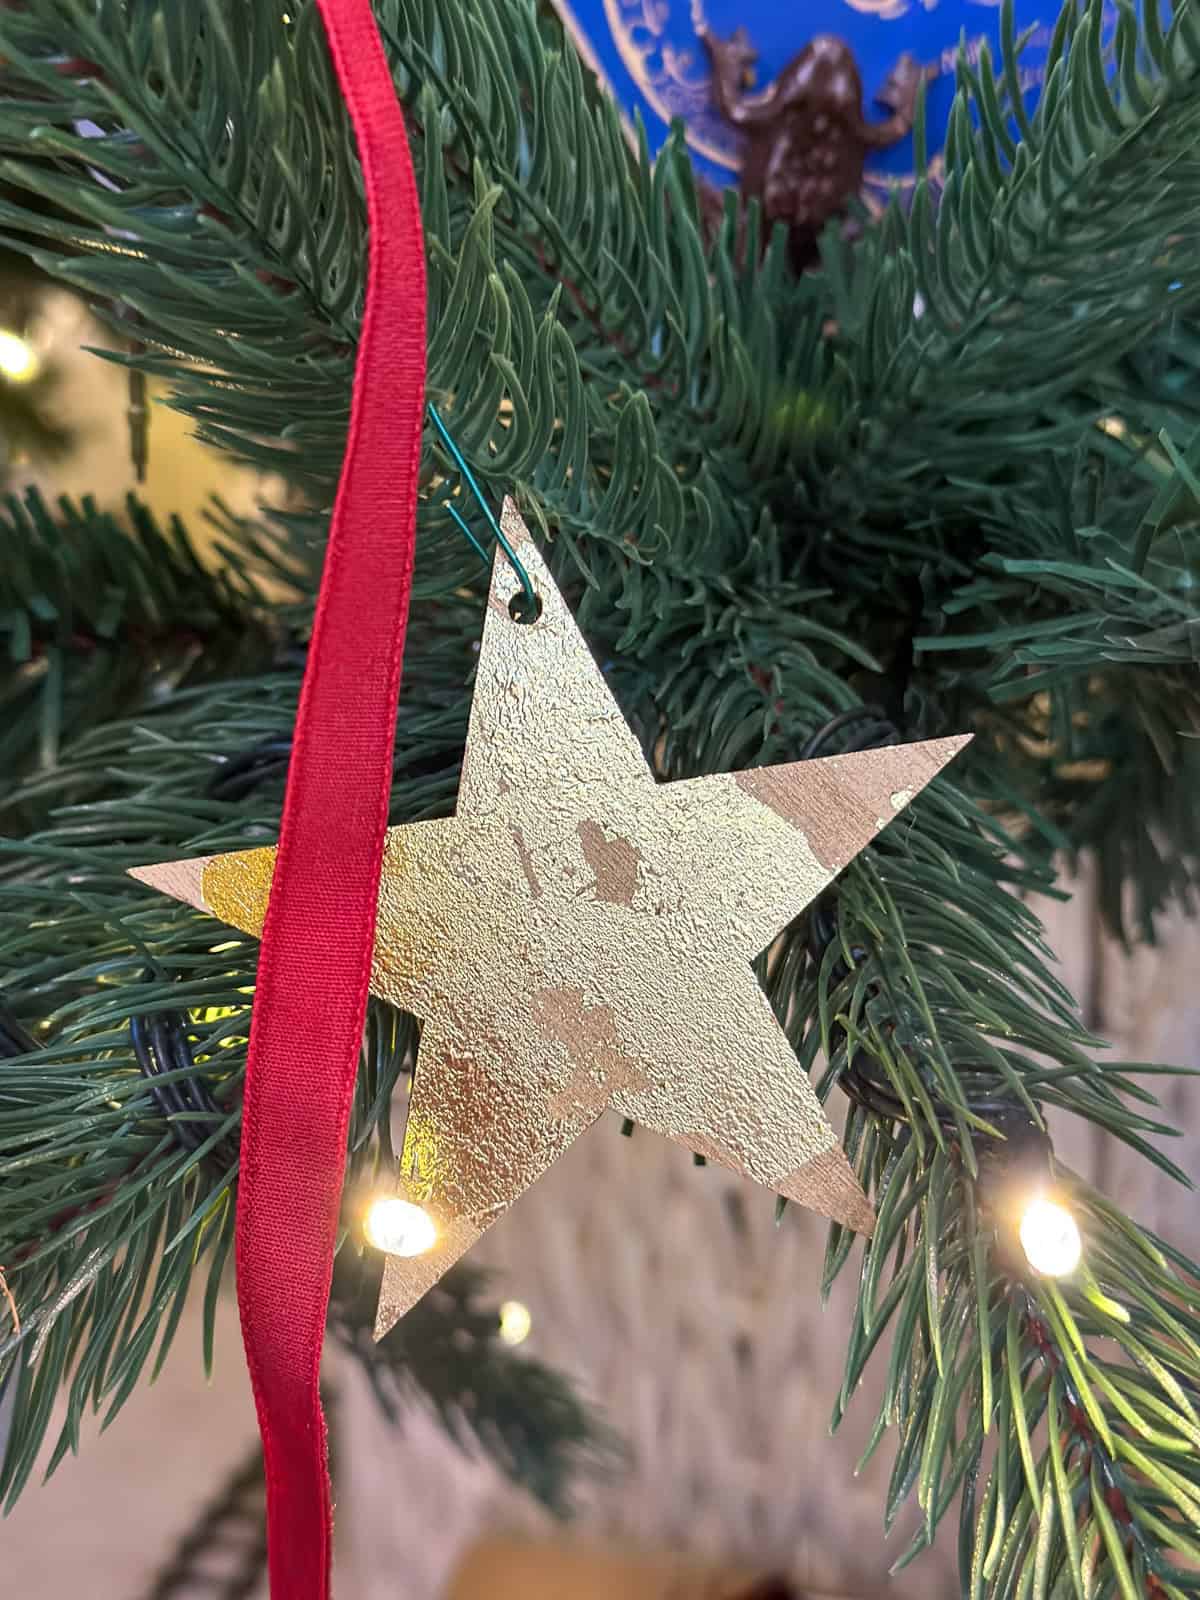
In the great hall at Hogwarts, the trees are decorated with lots of stars and a celestial theme. I was lucky enough to get to see the actual sets at the Universal Harry Potter Experience in London last Christmas, and it inspired me.
For out stars and moons we started out with inexpensive wooden cutouts and gave them a base coat of gold spray. Then we added some gold leaf for extra sparkle. Apply the gold leaf glue according to the package directions, and carefully add the gold leaf, using a soft brush to remove any extra. We used imitation gold leaf, which is a bit cheaper and still looks great. ($0.50 each)
Quick & Easy Ornaments
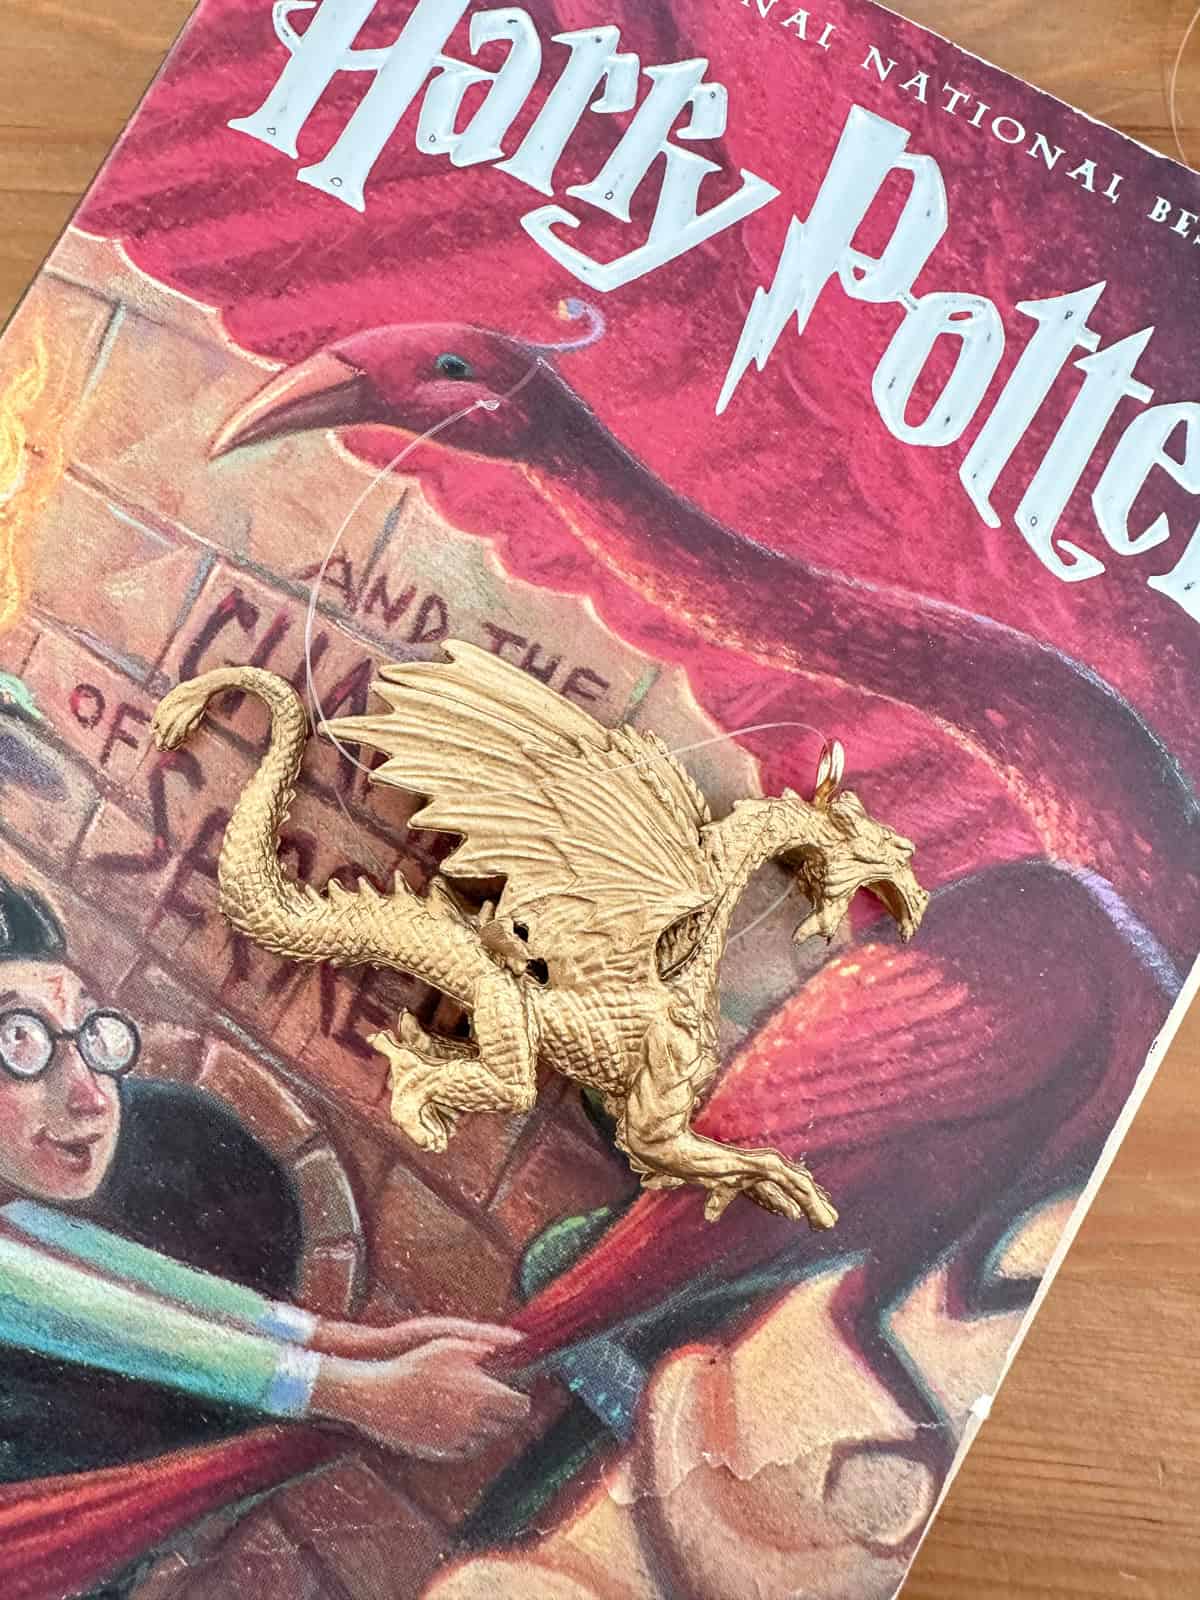
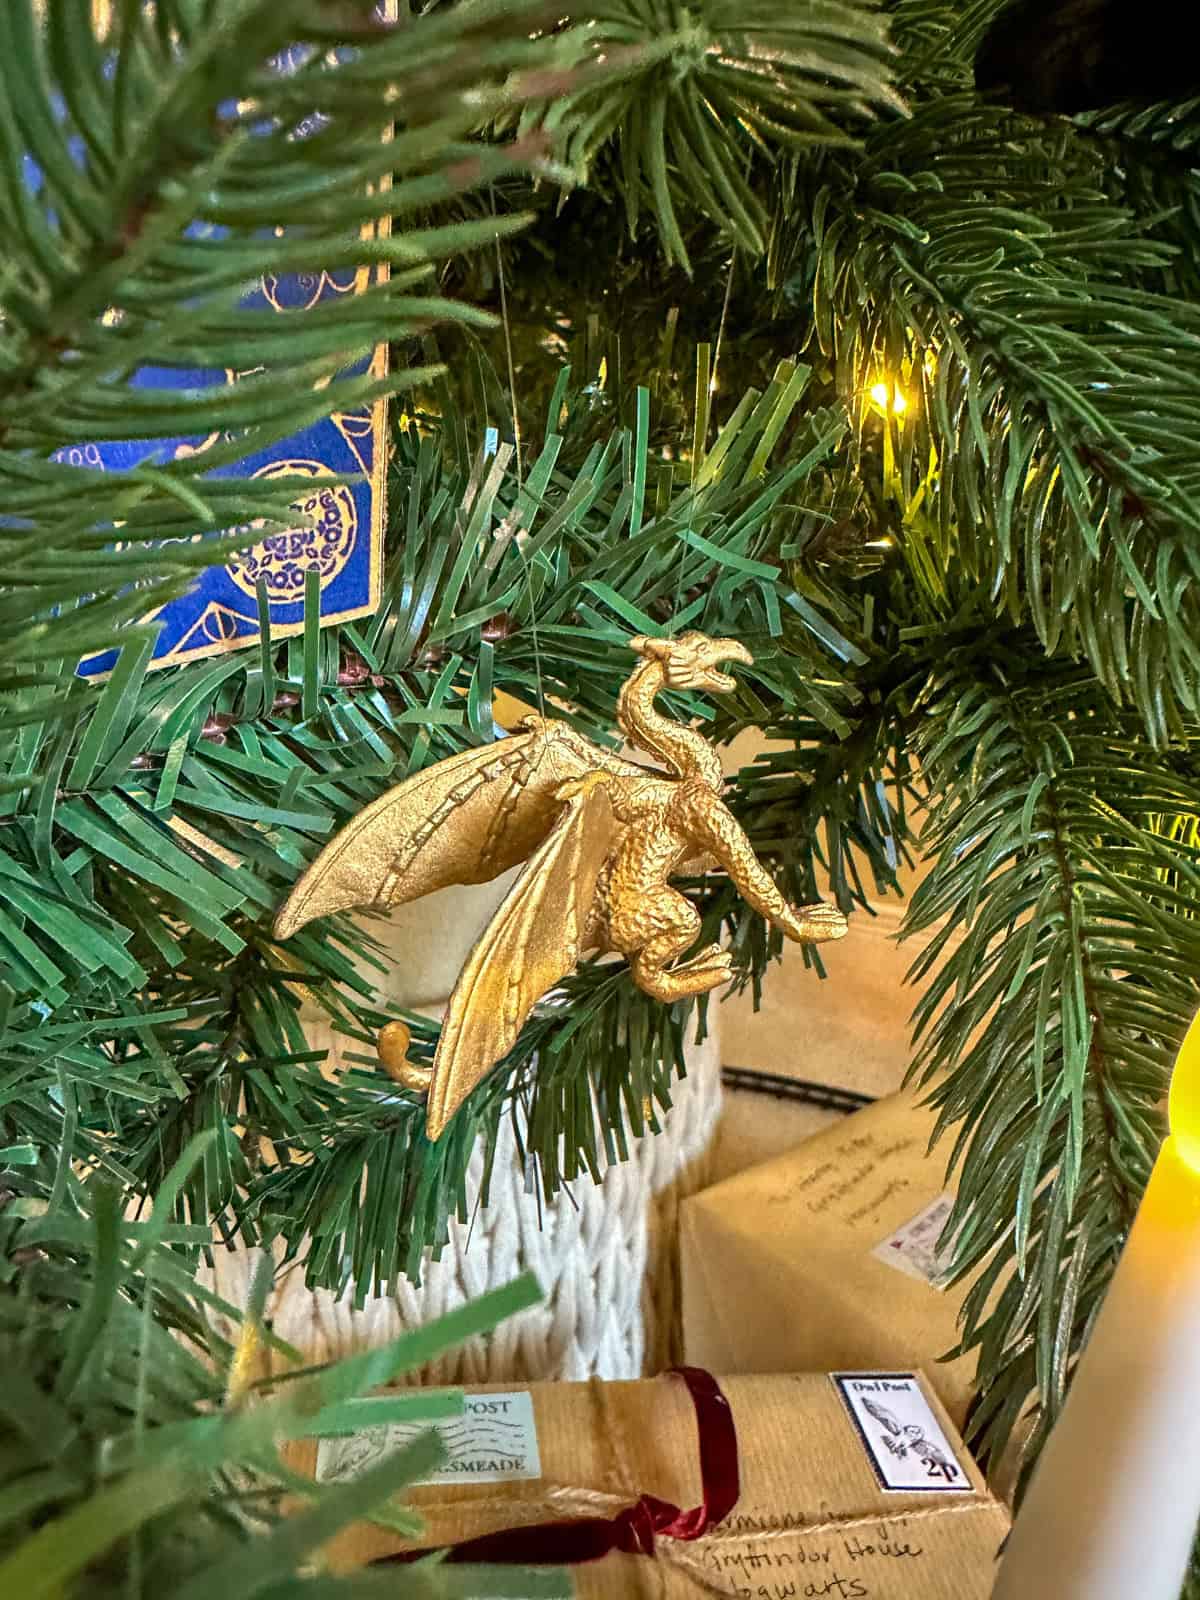
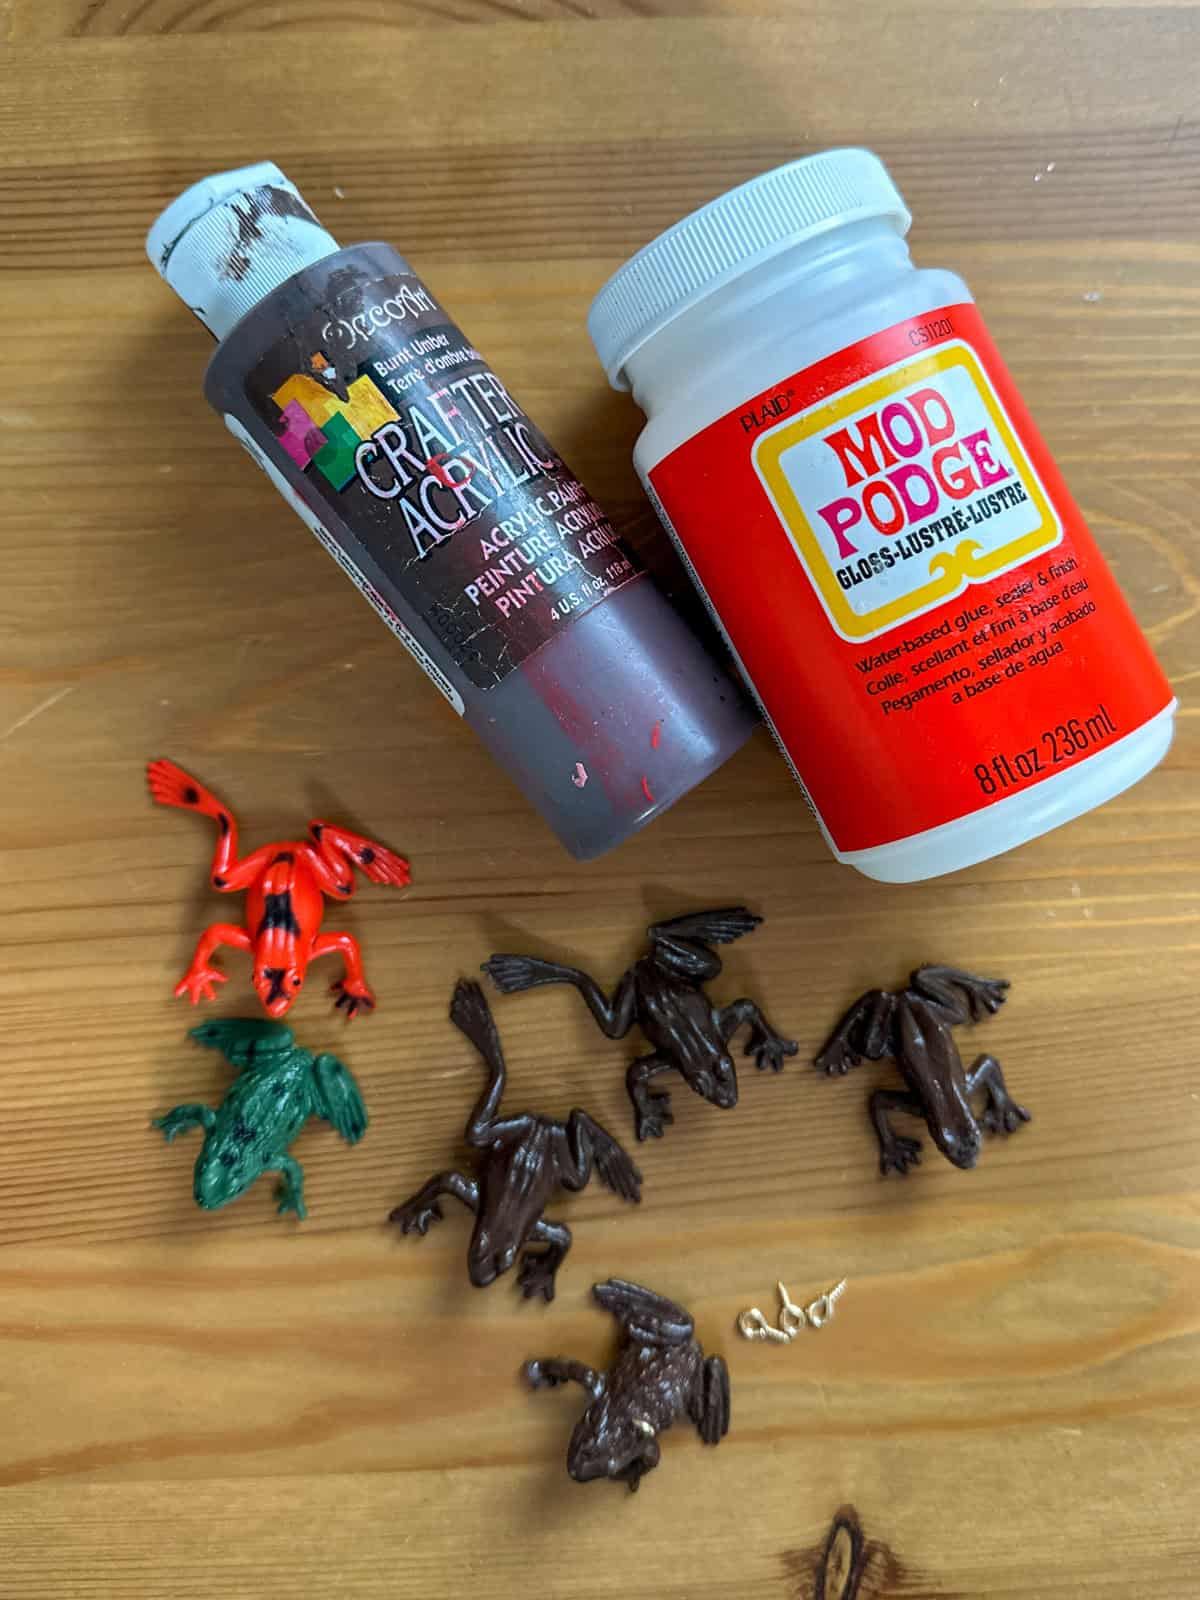
Gold Dragons
Spray paint small toy dragons gold, add tiny gold eye hooks, hang with fishing line. Position at different angles for a flying effect. ($5 for pack of 6, gold spray paint $20)
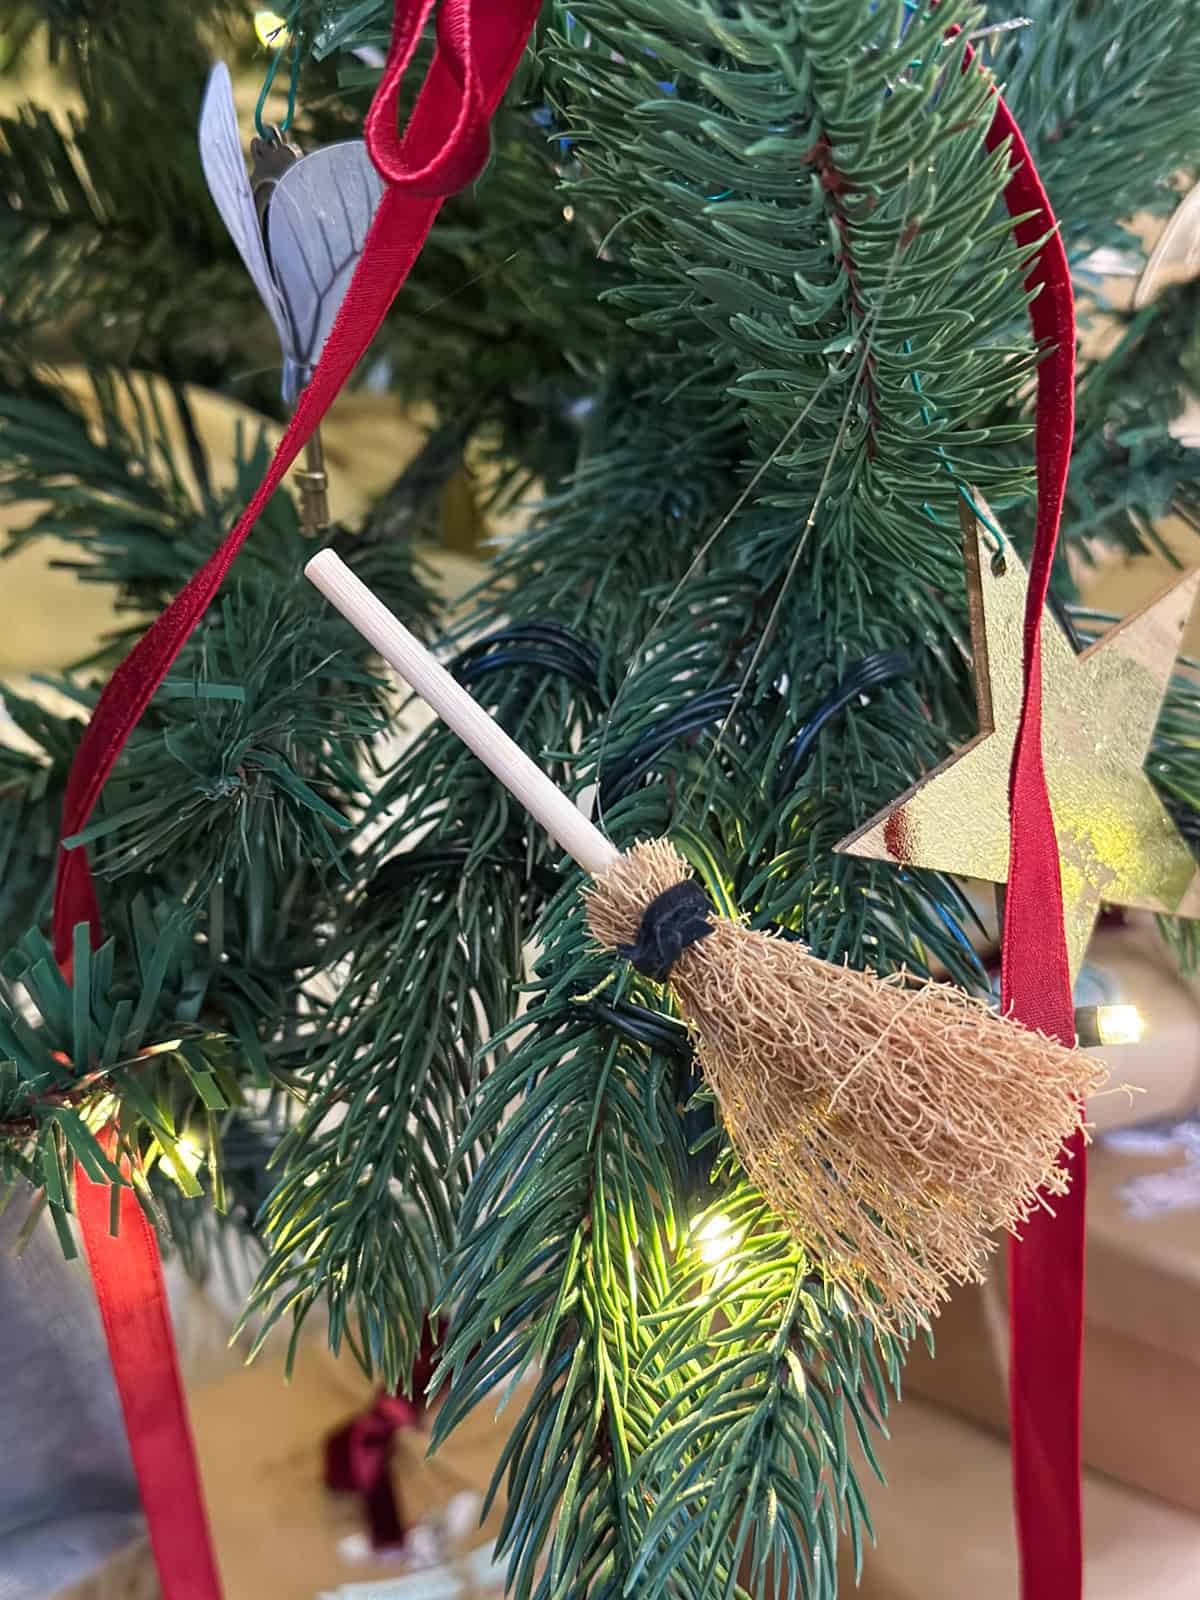
Mini Brooms
Halloween mini brooms get a second life! Cover any bright thread with black leather lacing and add fishing line for hanging. Position some horizontally like they're flying. ($0.50-$1 each)
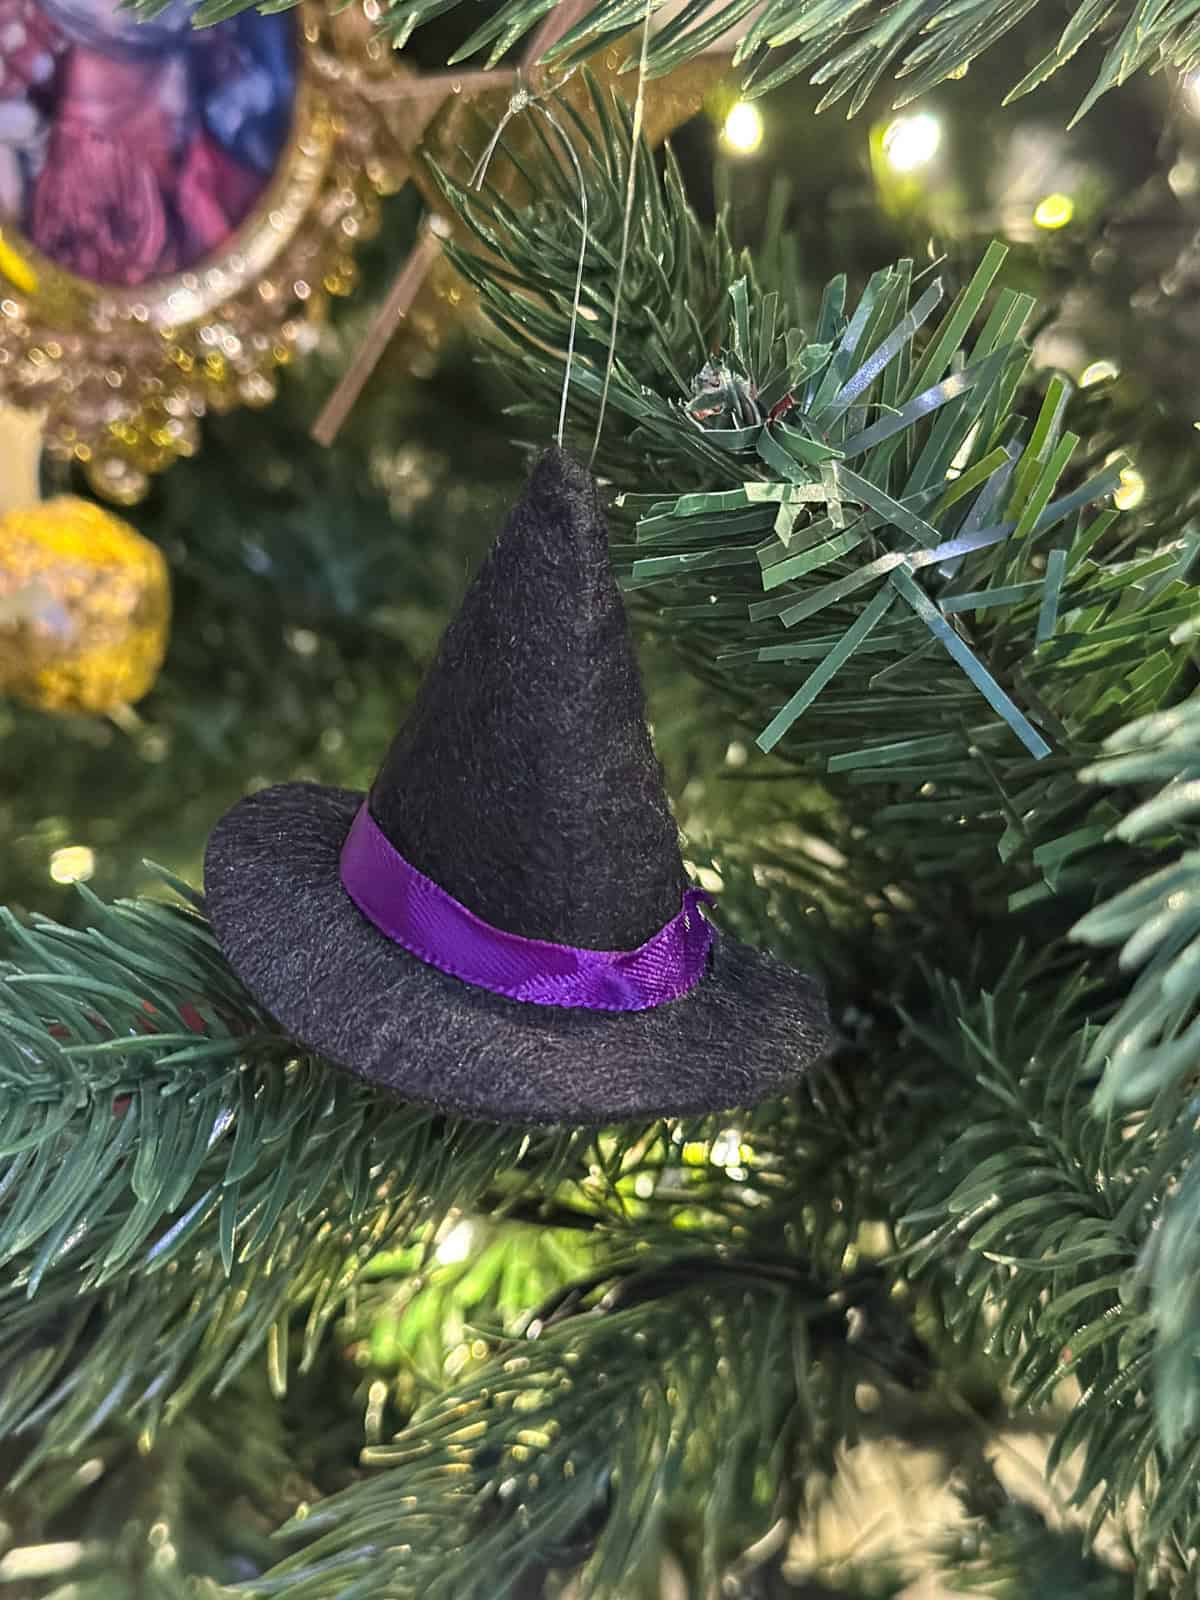
Witch Hats
Small felt black witch hats from Halloween with ribbon. Use a needle and thread to add fishing line for hanging. ($0.50-$1 each)
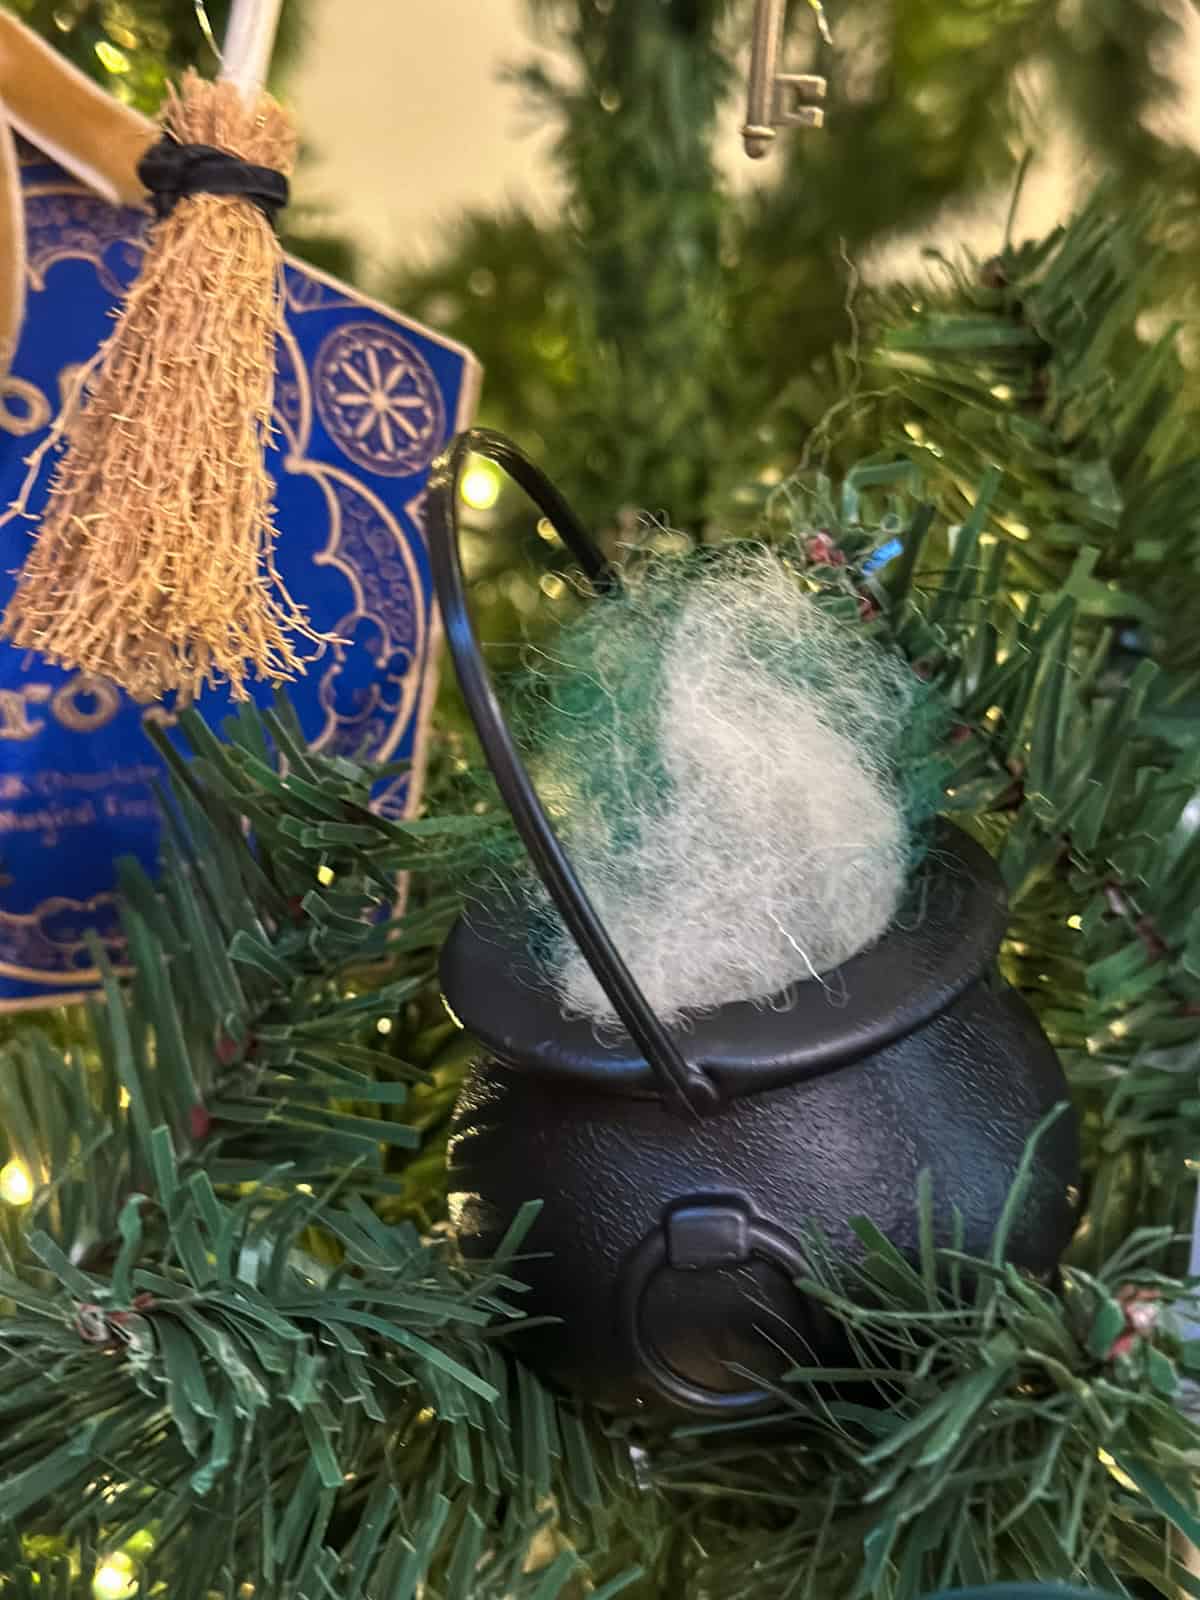
Cauldrons with Potions
Mini black cauldrons with green, and white wool tucked inside to look like bubbling potions. Use the cauldron handle for hanging. ($0.50-$1 each)
Floating Candles
Battery-operated floating candles with wand remote control (search "flameless floating candles Harry Potter style"). Hang with fishing line at varying heights. They flicker like real candles! This is one of my favorite details, and a must for Harry Potter in my opinion. Reuse them for Halloween decor too. ($20-30 for set of 10)
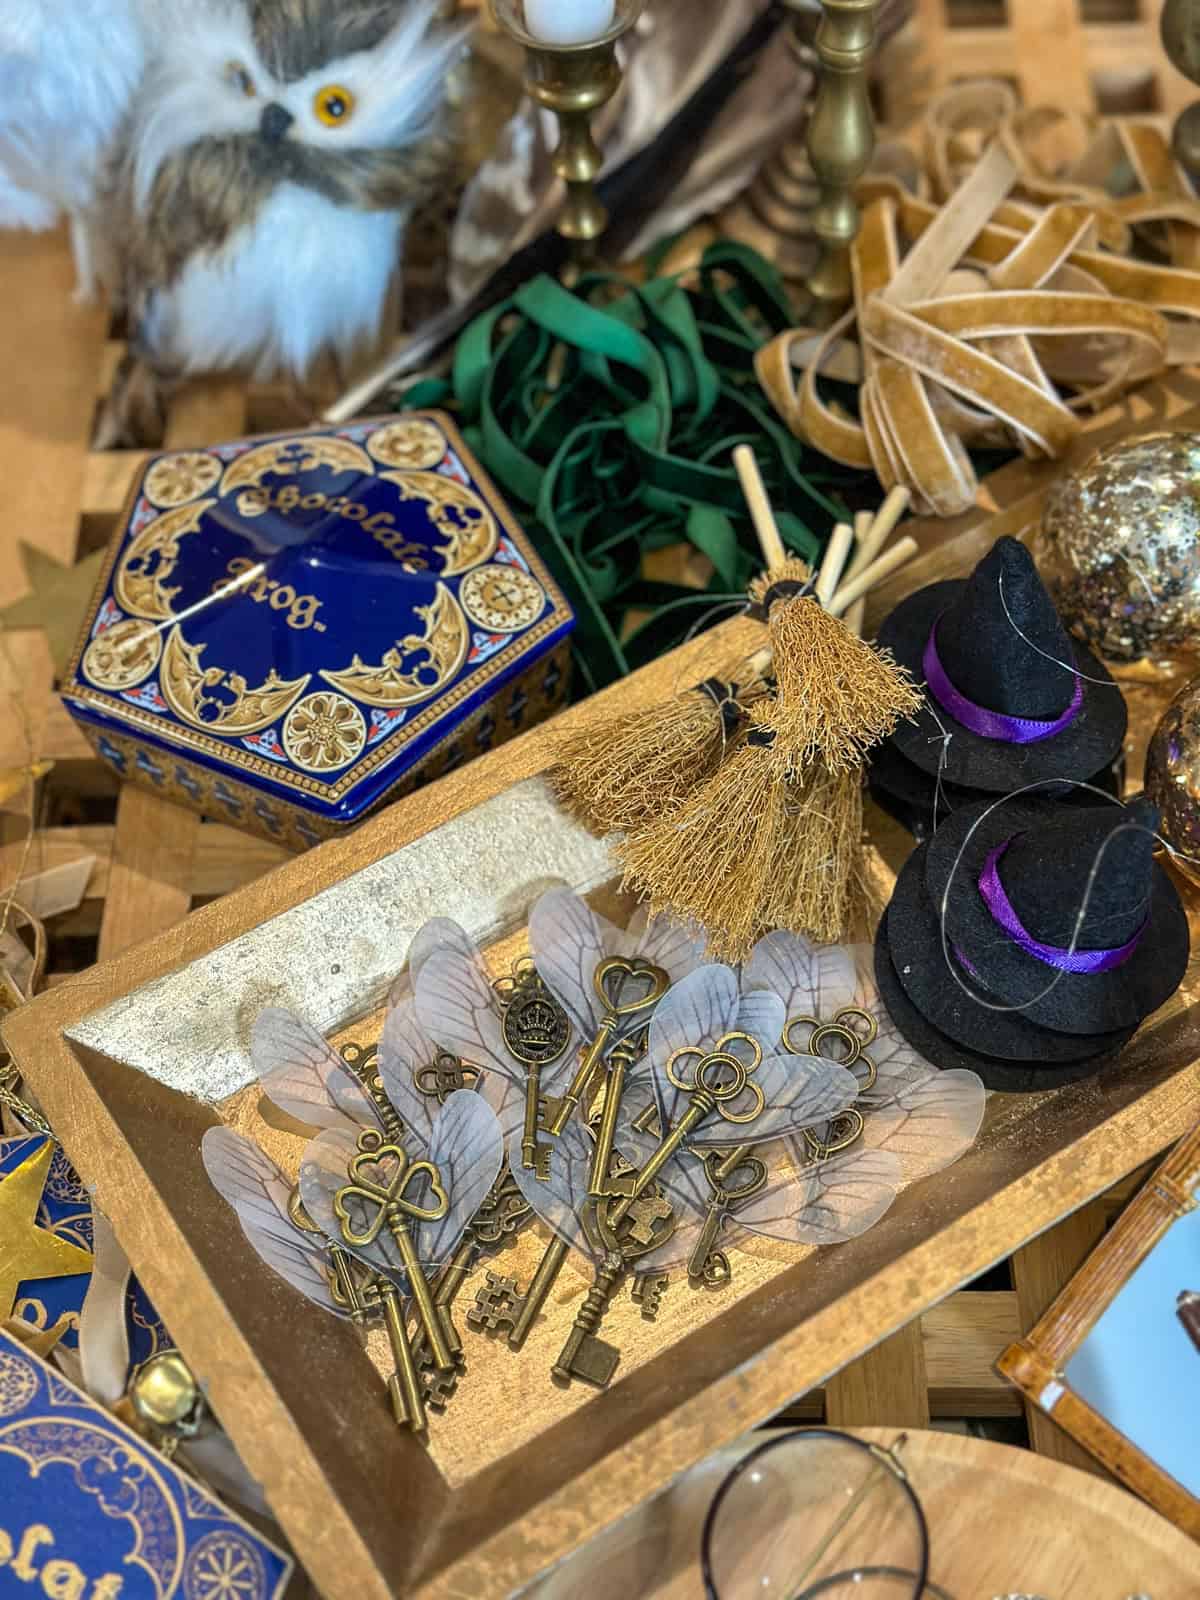
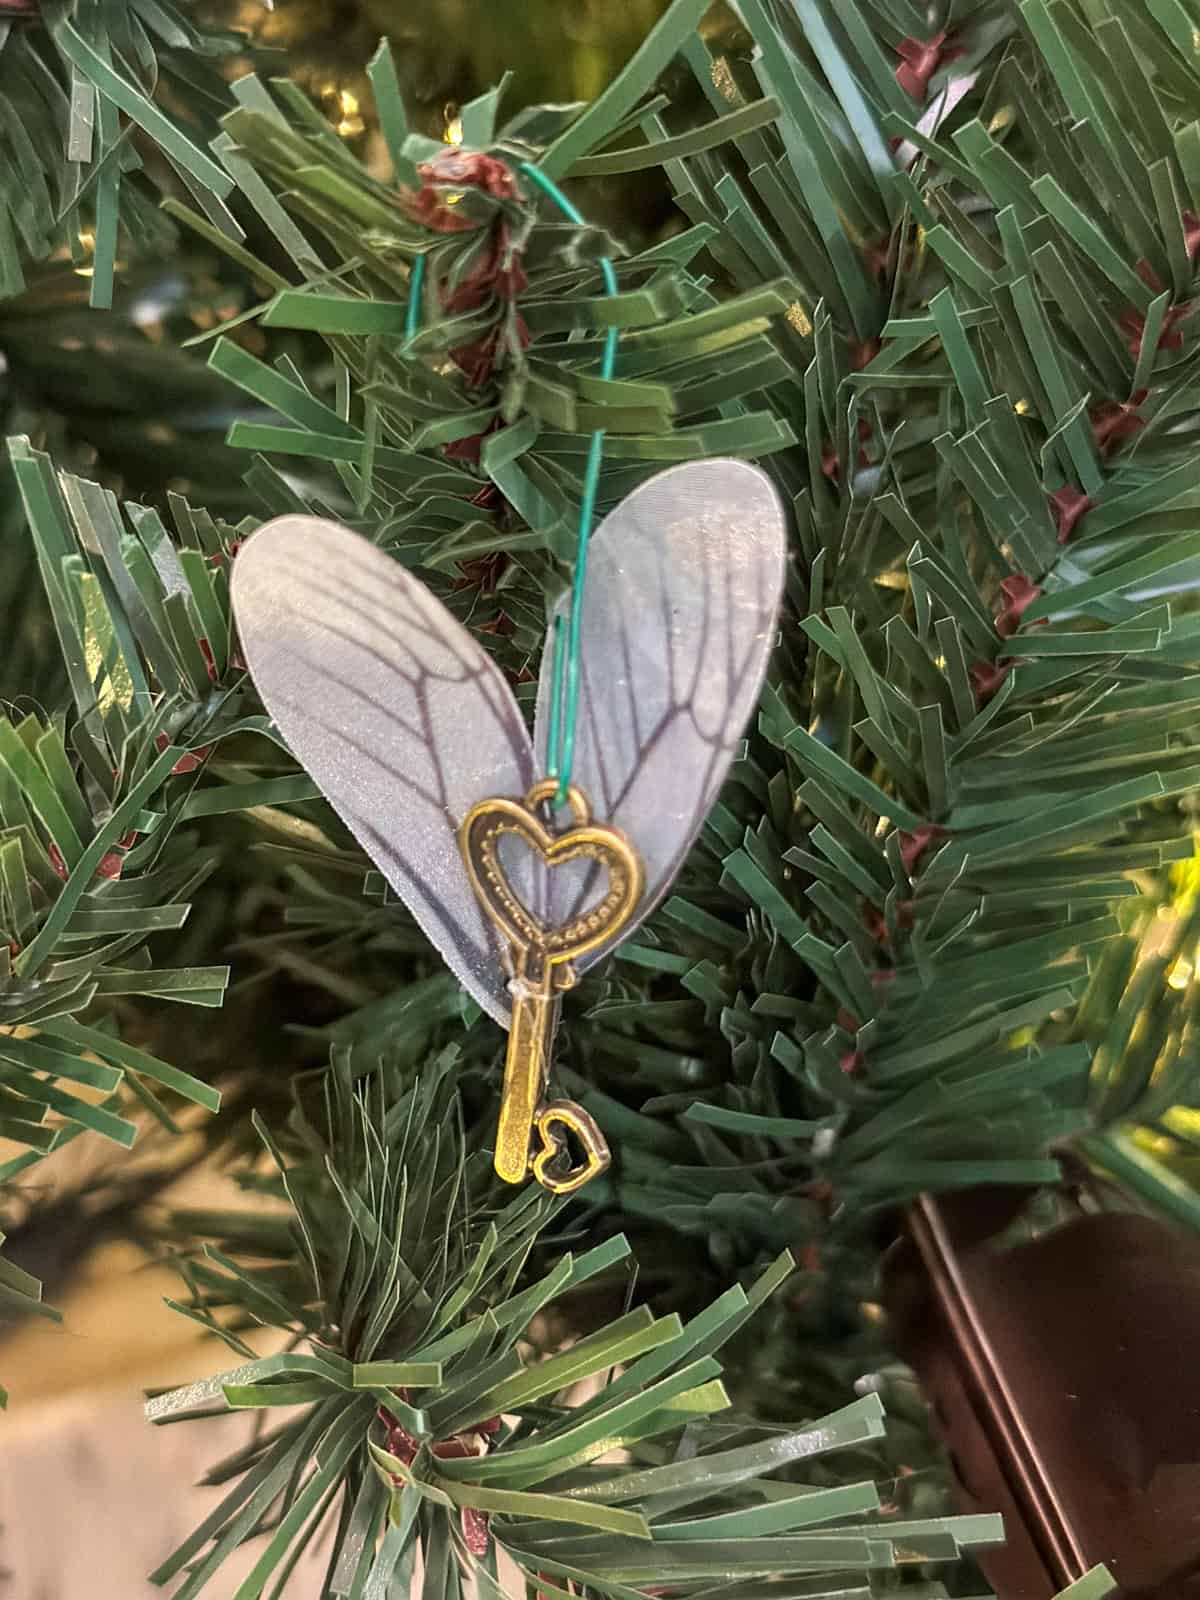
Flying Keys
I ordered an easy kit that came with gold keys, and wings from Temu, check any where online. Use the included fishing line to tie wings on to the keys, and hang. Tip: If the wings come creased, use a warm iron to flatten them before attaching them to the keys. (Less than $0.50 each | 24 piece set)
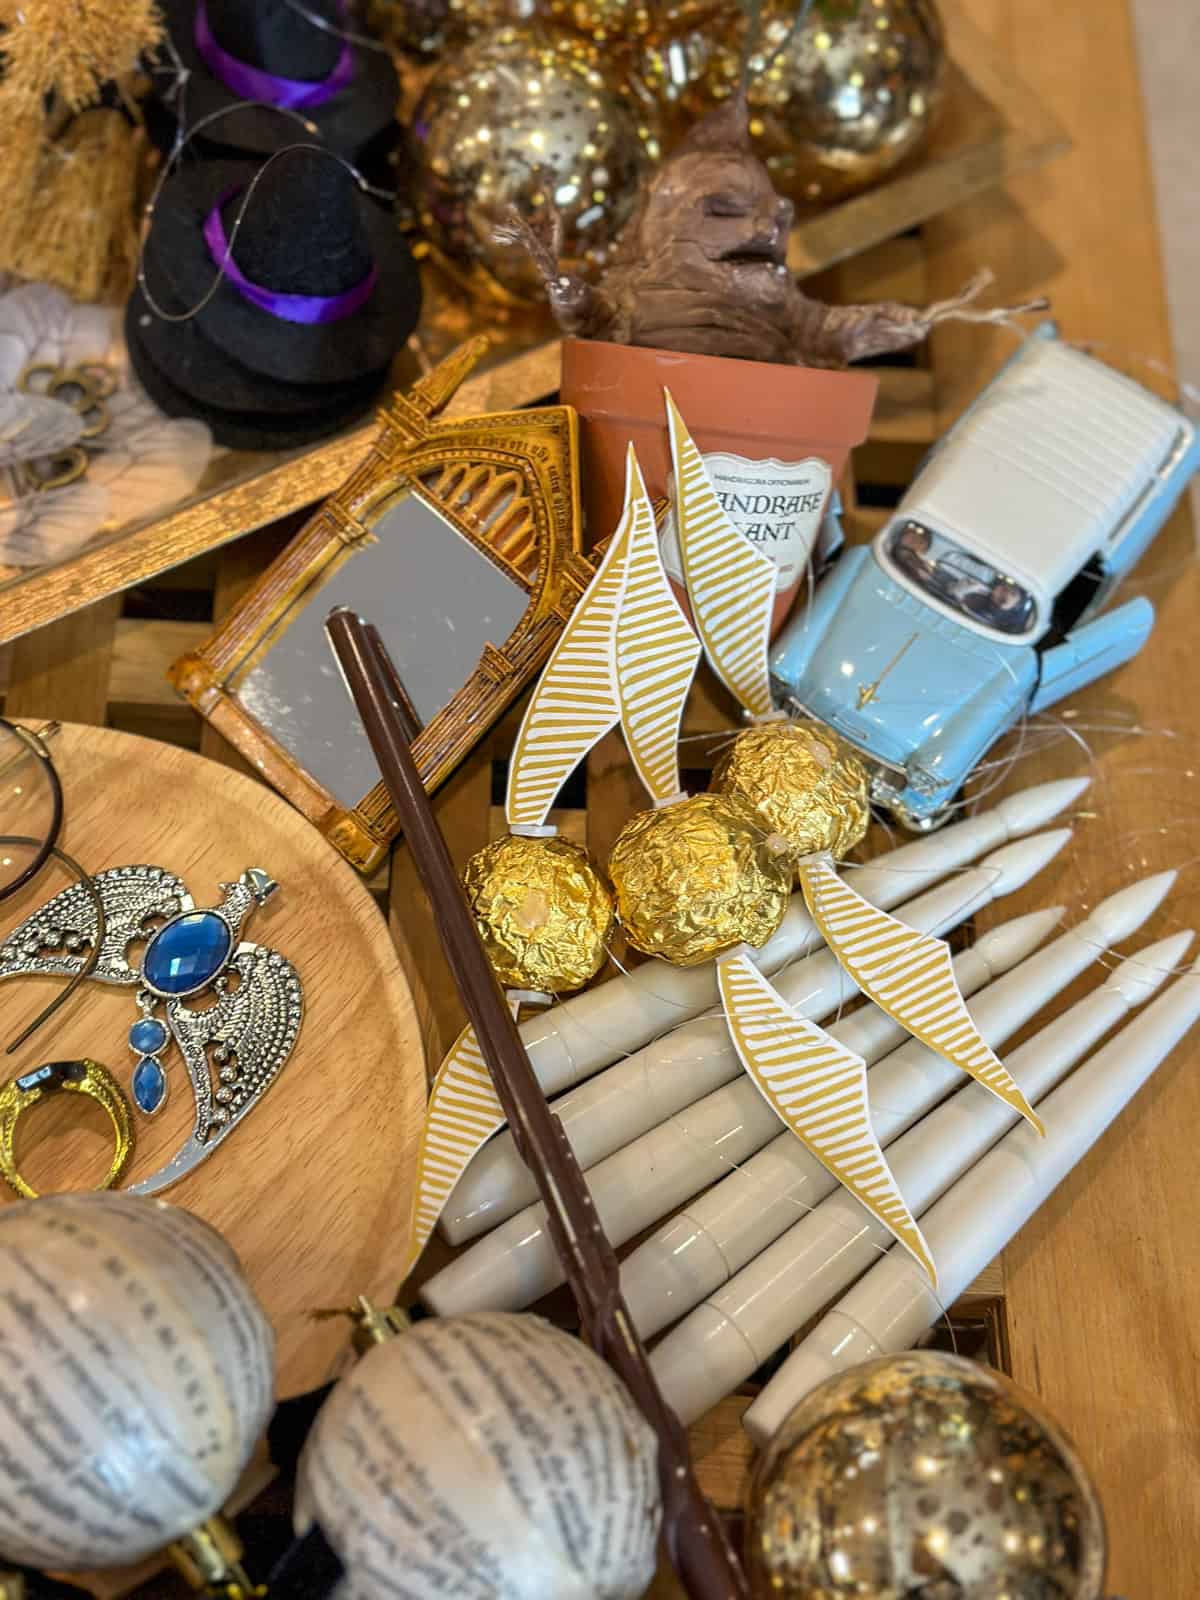
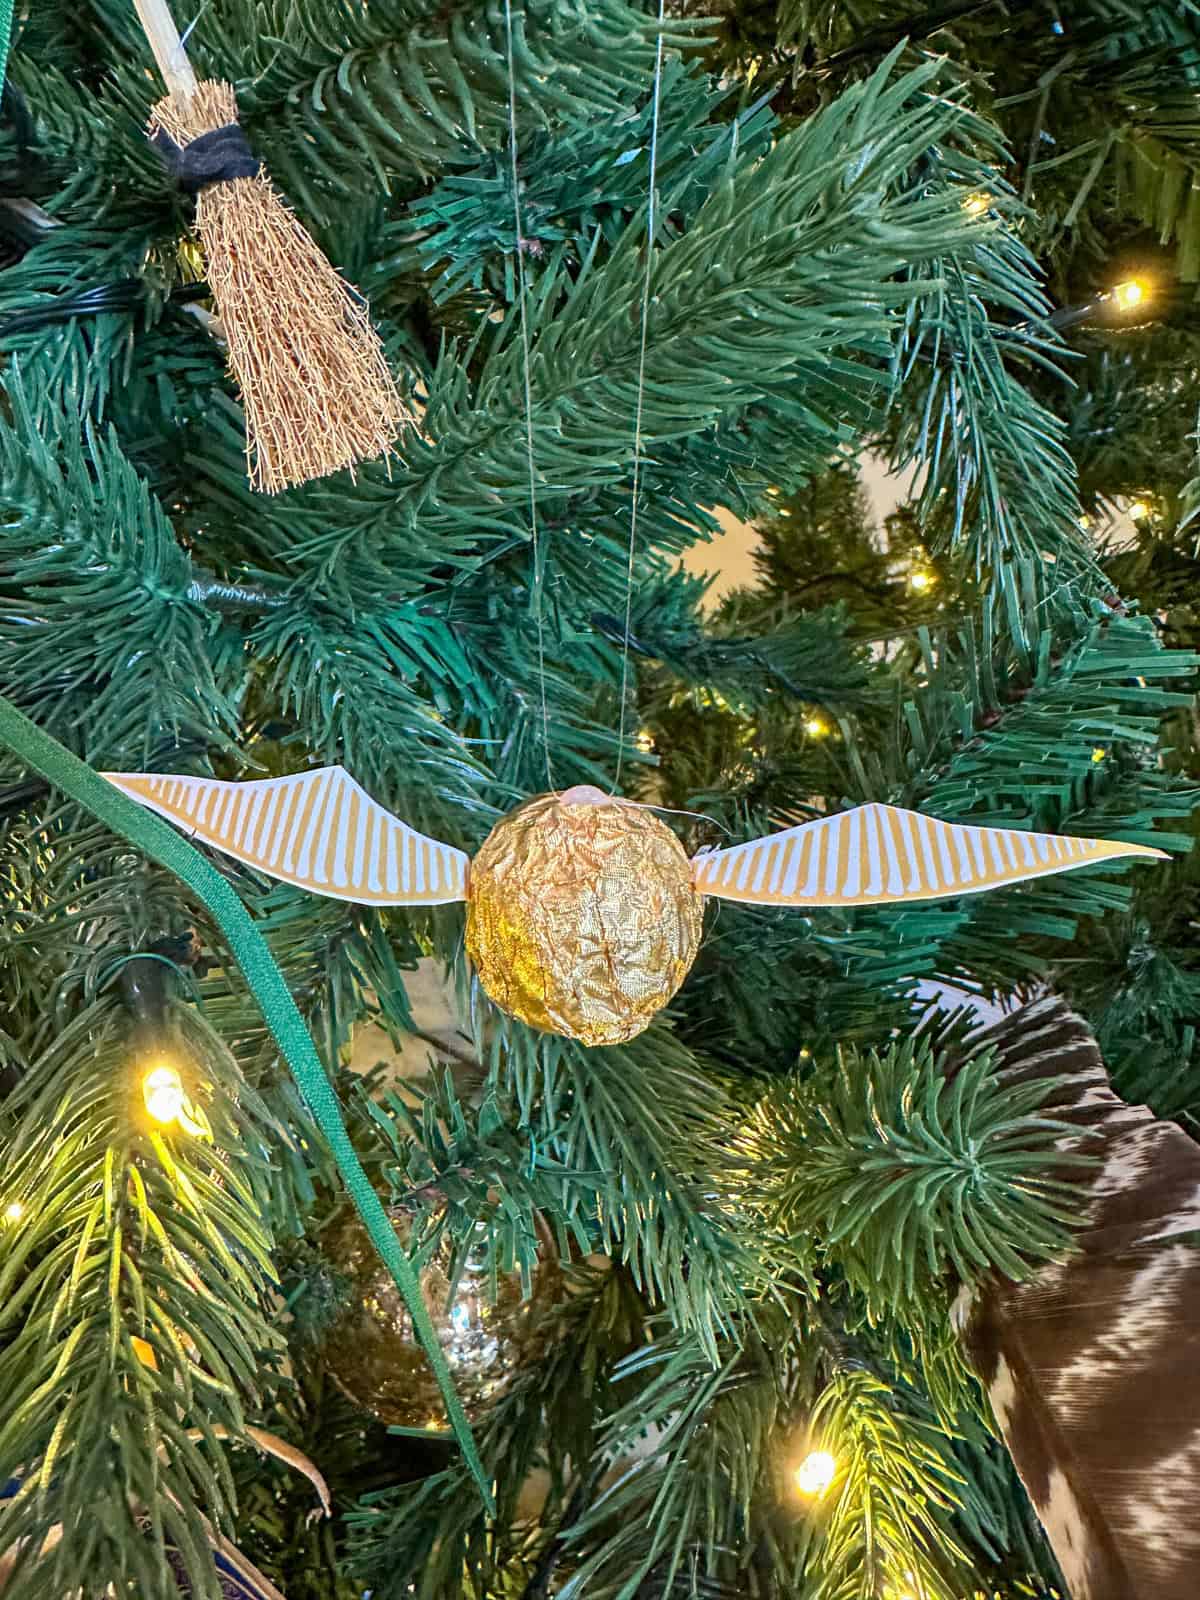
Golden Snitch Chocolates
Ferrero Rocher chocolates with our free printable wings. Just print, cut them out, and attach with tiny dot of hot glue. Add a fishing line hanging sting with hot glue also. When I was a kid we used to get chocolate ornaments that were bells and Santas in foil, and the rule was after Christmas Day, you could eat them. Use the same rule for these cute treats. ($1 each)
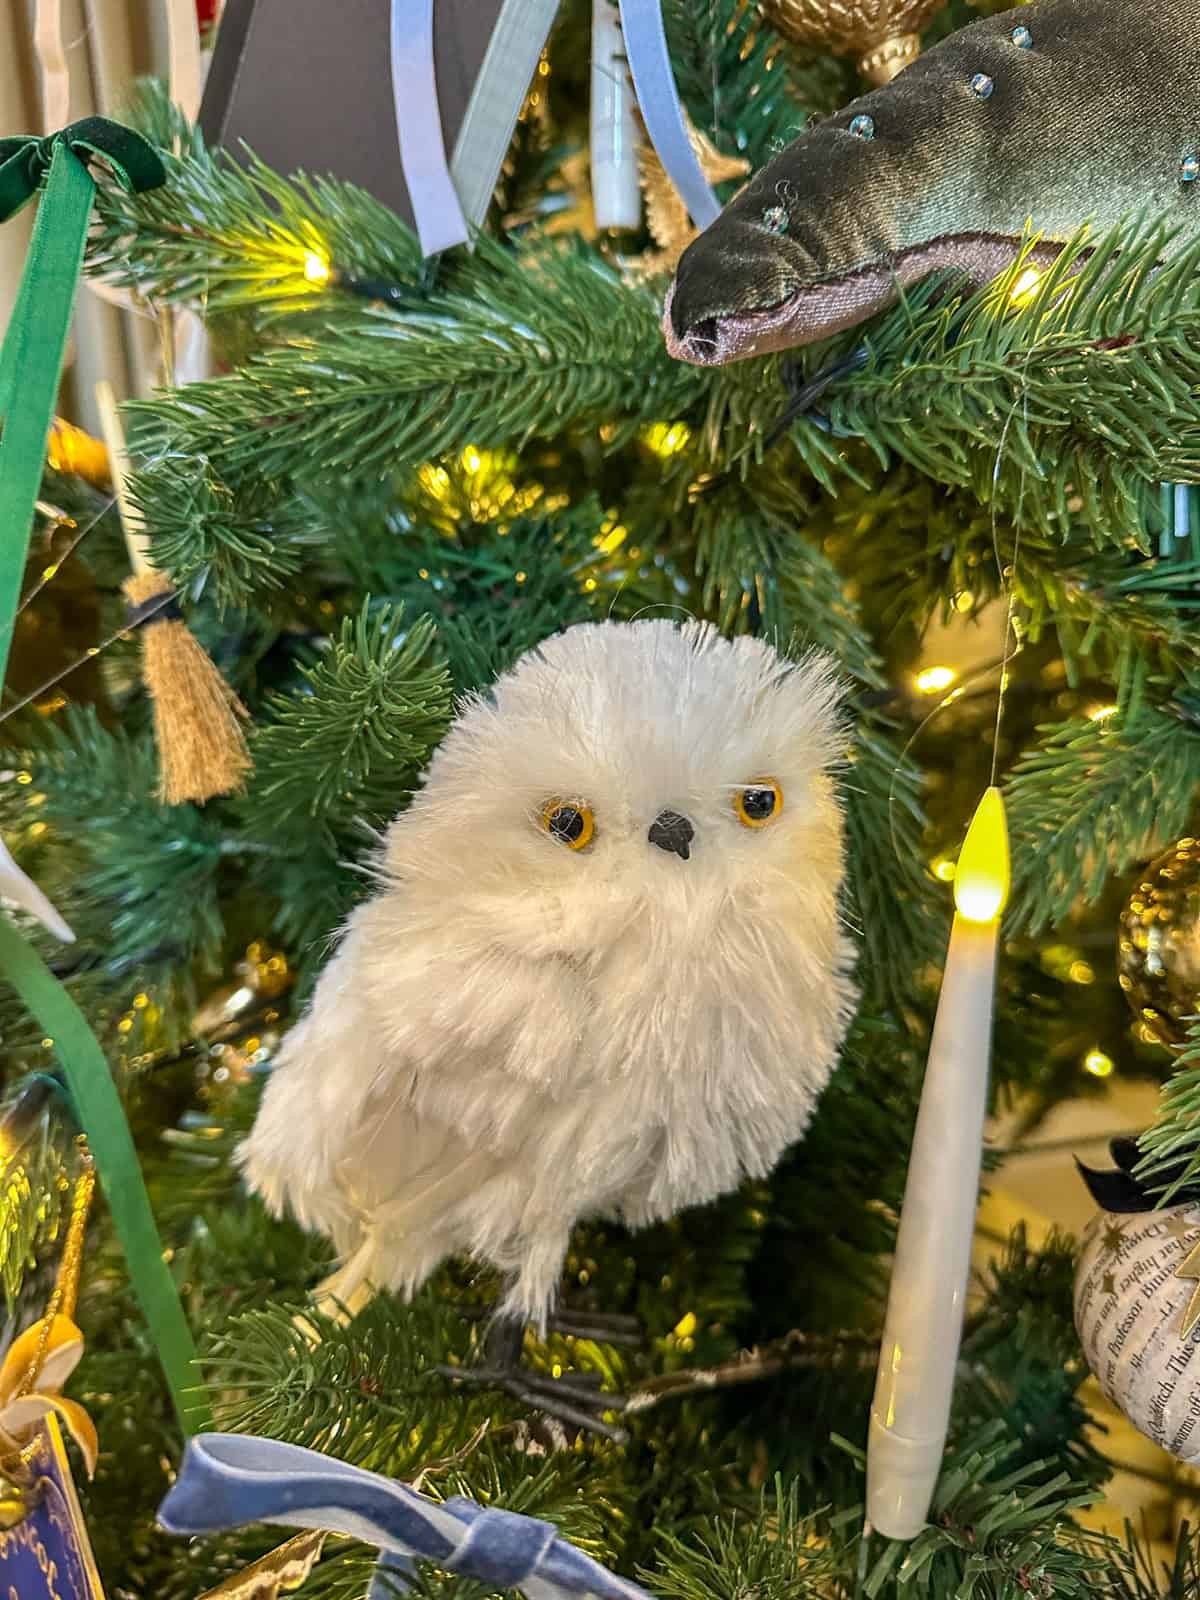
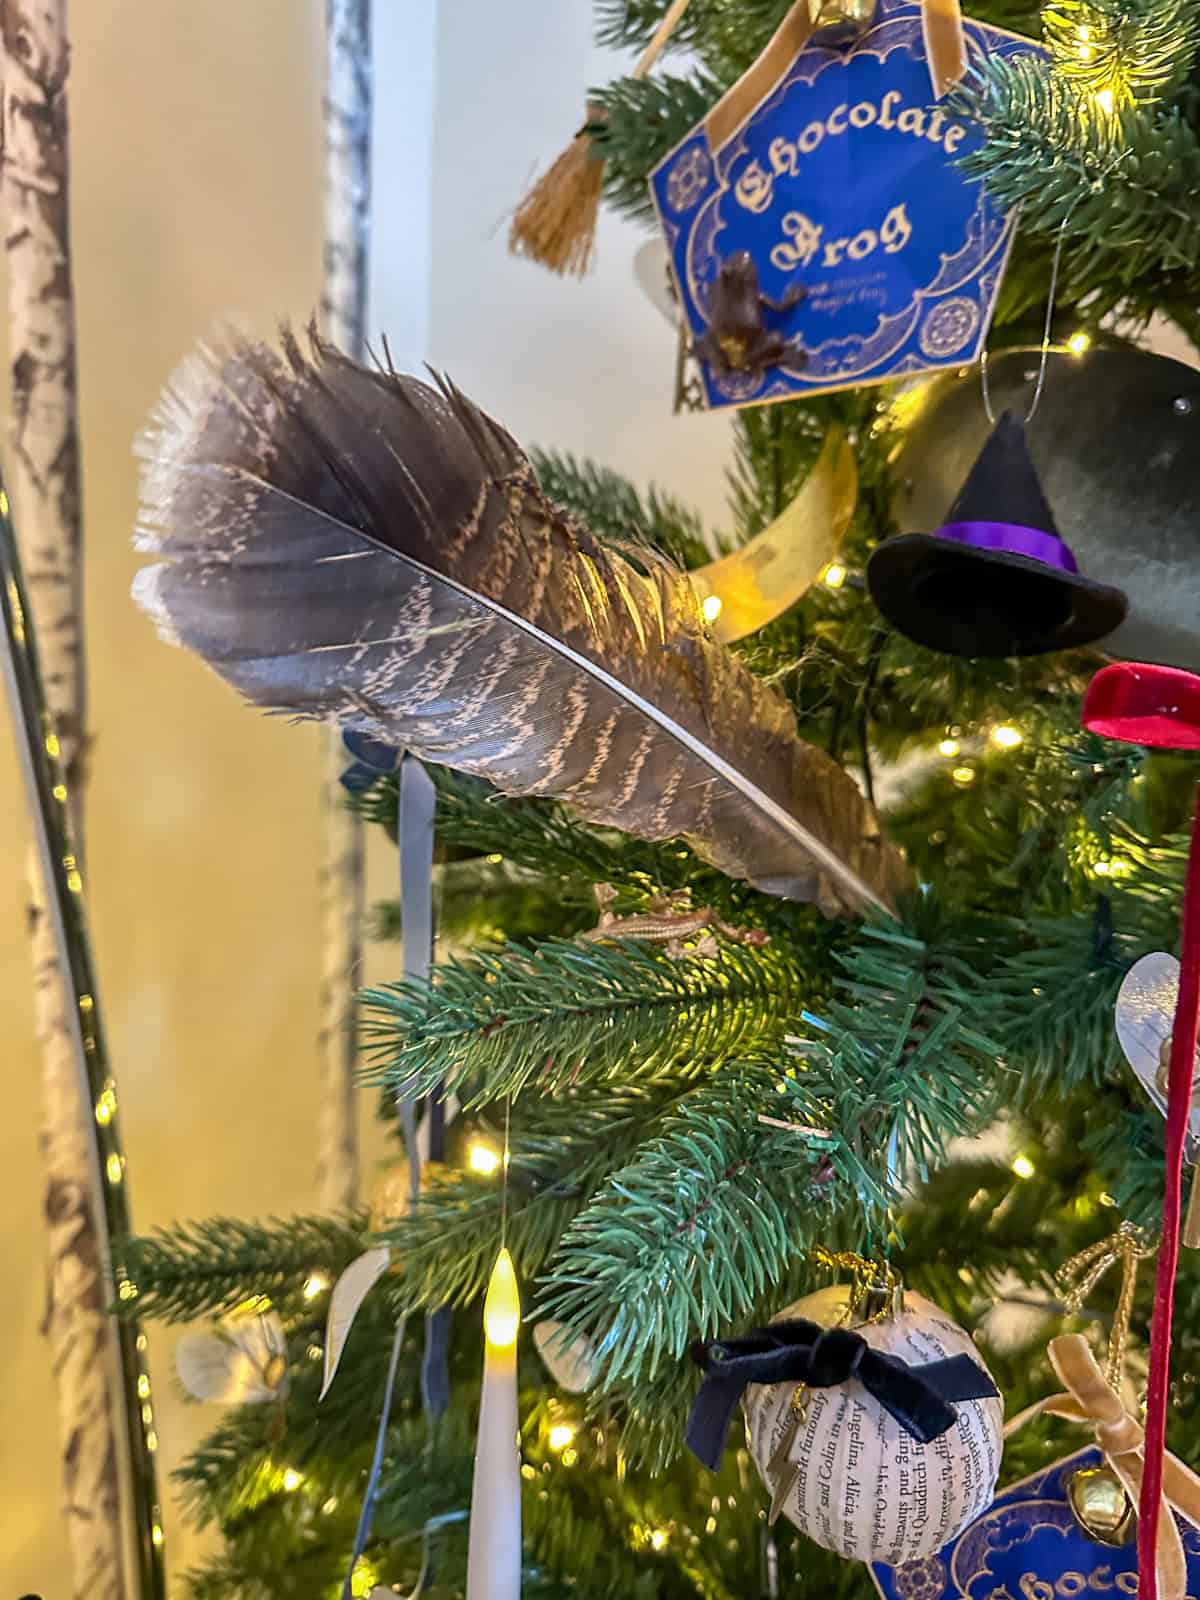
Owls and Feathers
Various small owl figurines plus loose feathers tucked in branches.
Movie Moments Additional Ornaments
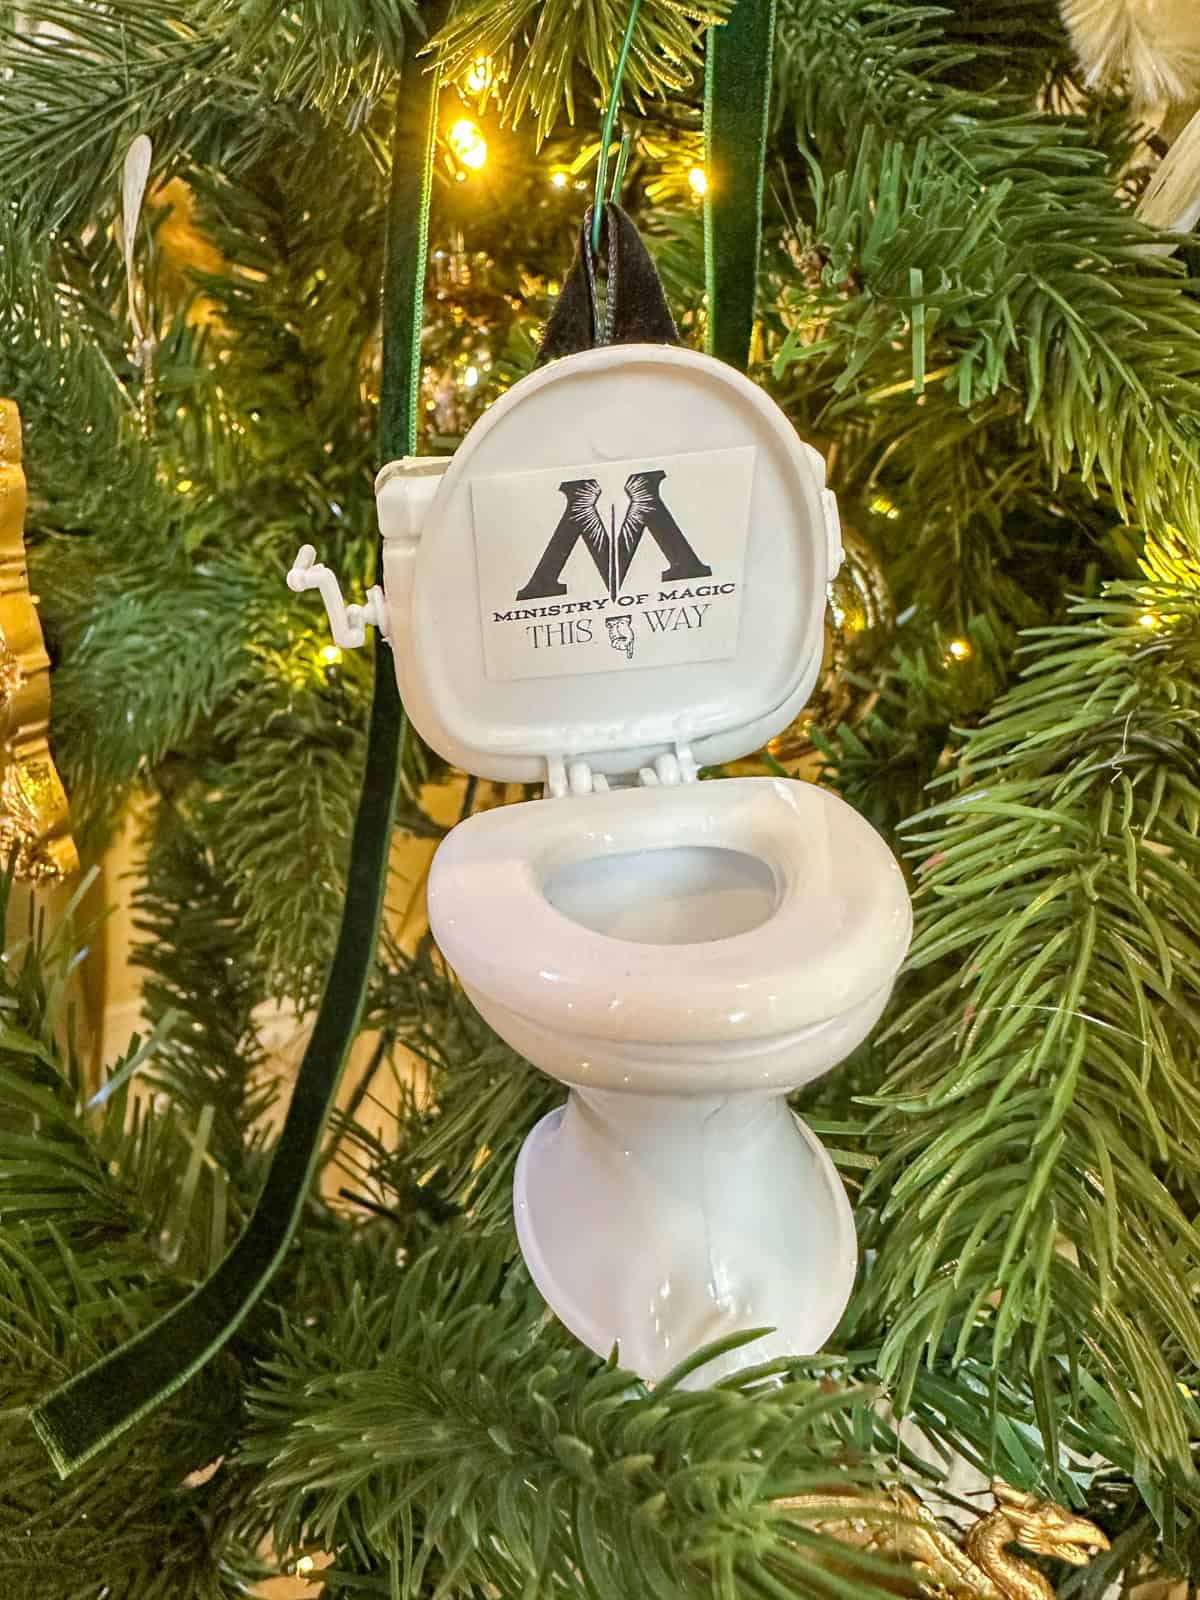
Ministry of Magic Toilet
Tiny dollhouse white toilet with printable sign - always makes people laugh!
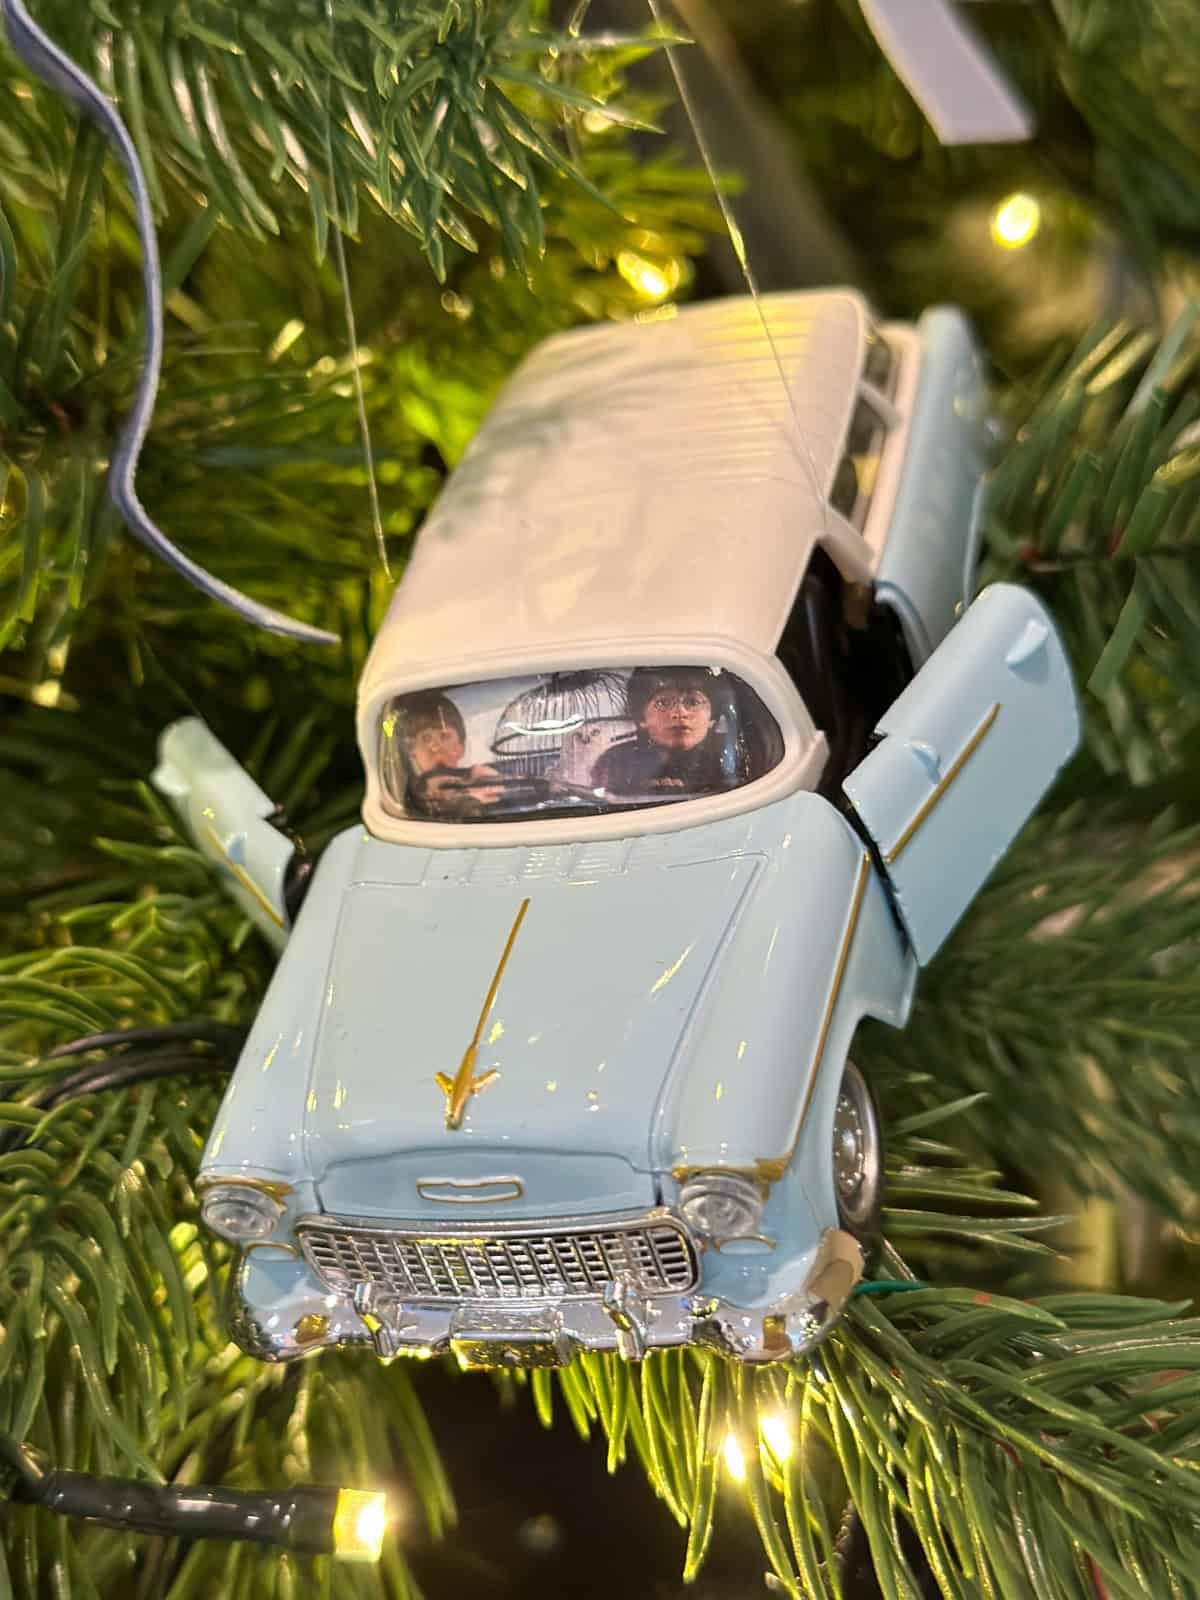
Flying Car
Small toy car with tiny Harry and Ron cutouts in the windshield. Use our free printable to make your own.
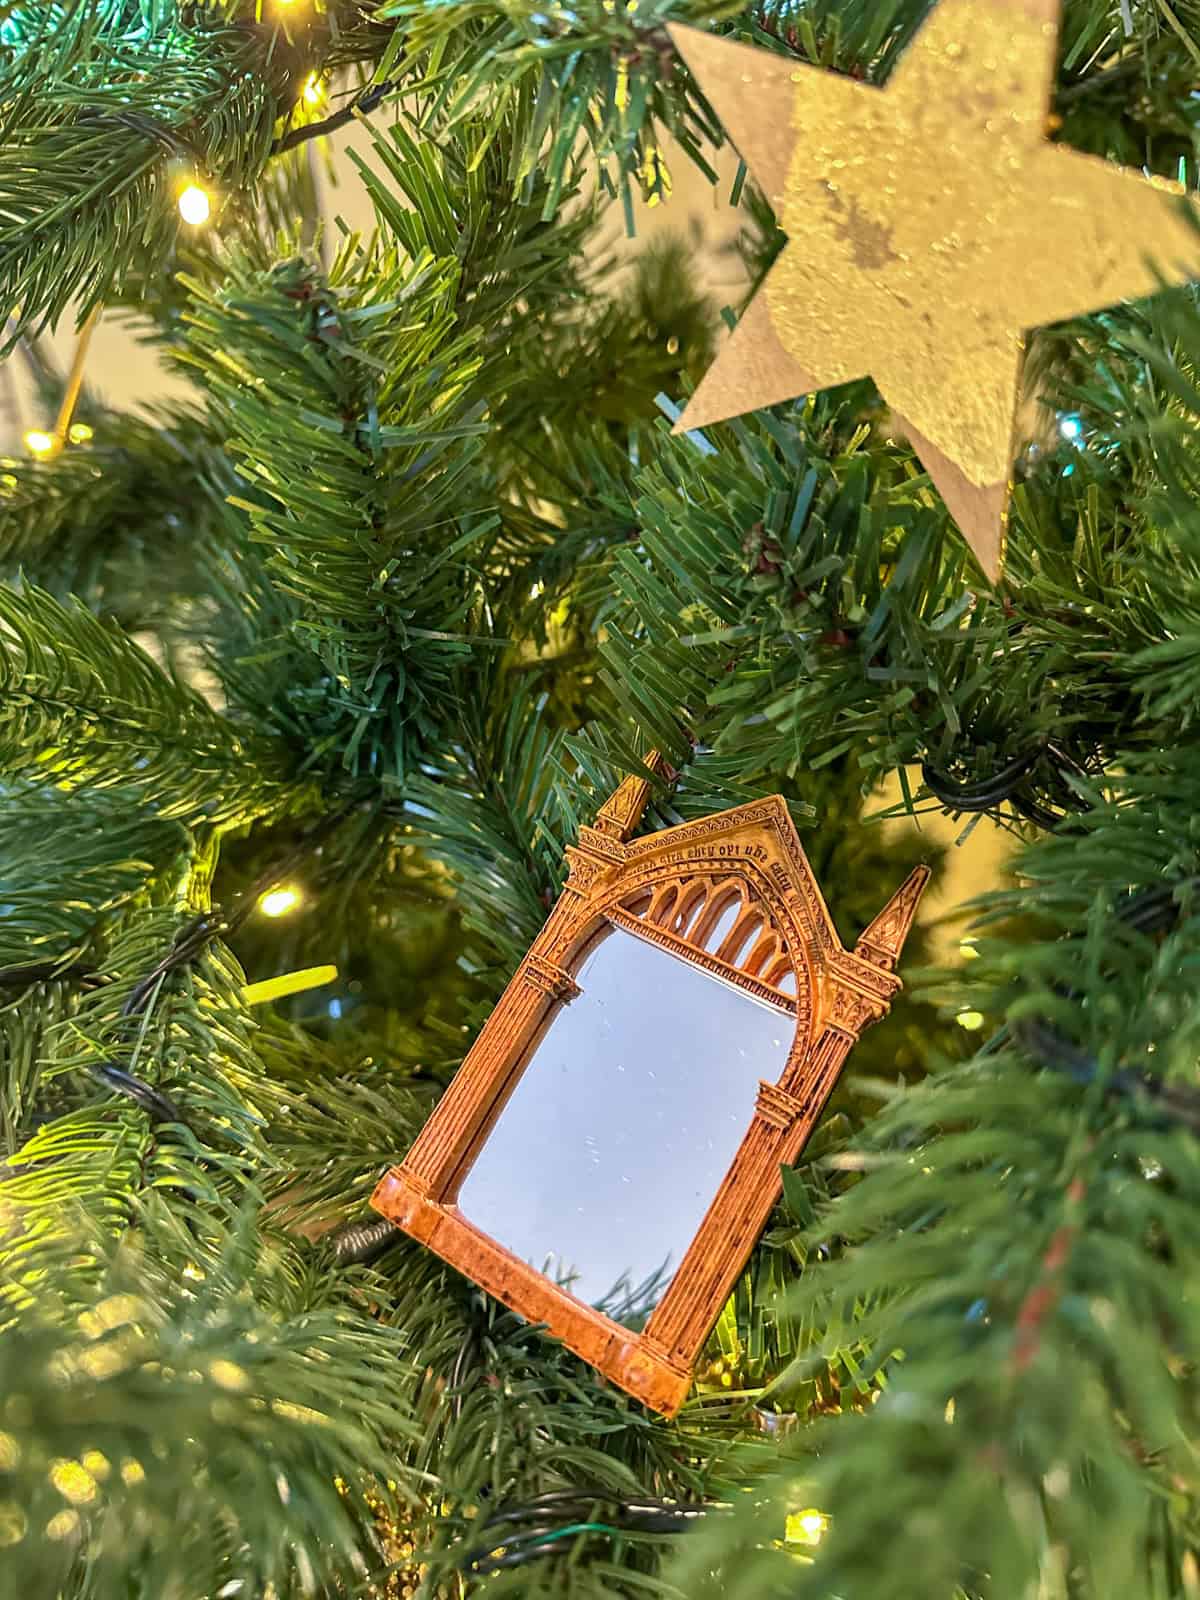
Mirror of Erised
I found this inexpensive Mirror of Erised online and thought it was a great additon.(Cost $5)
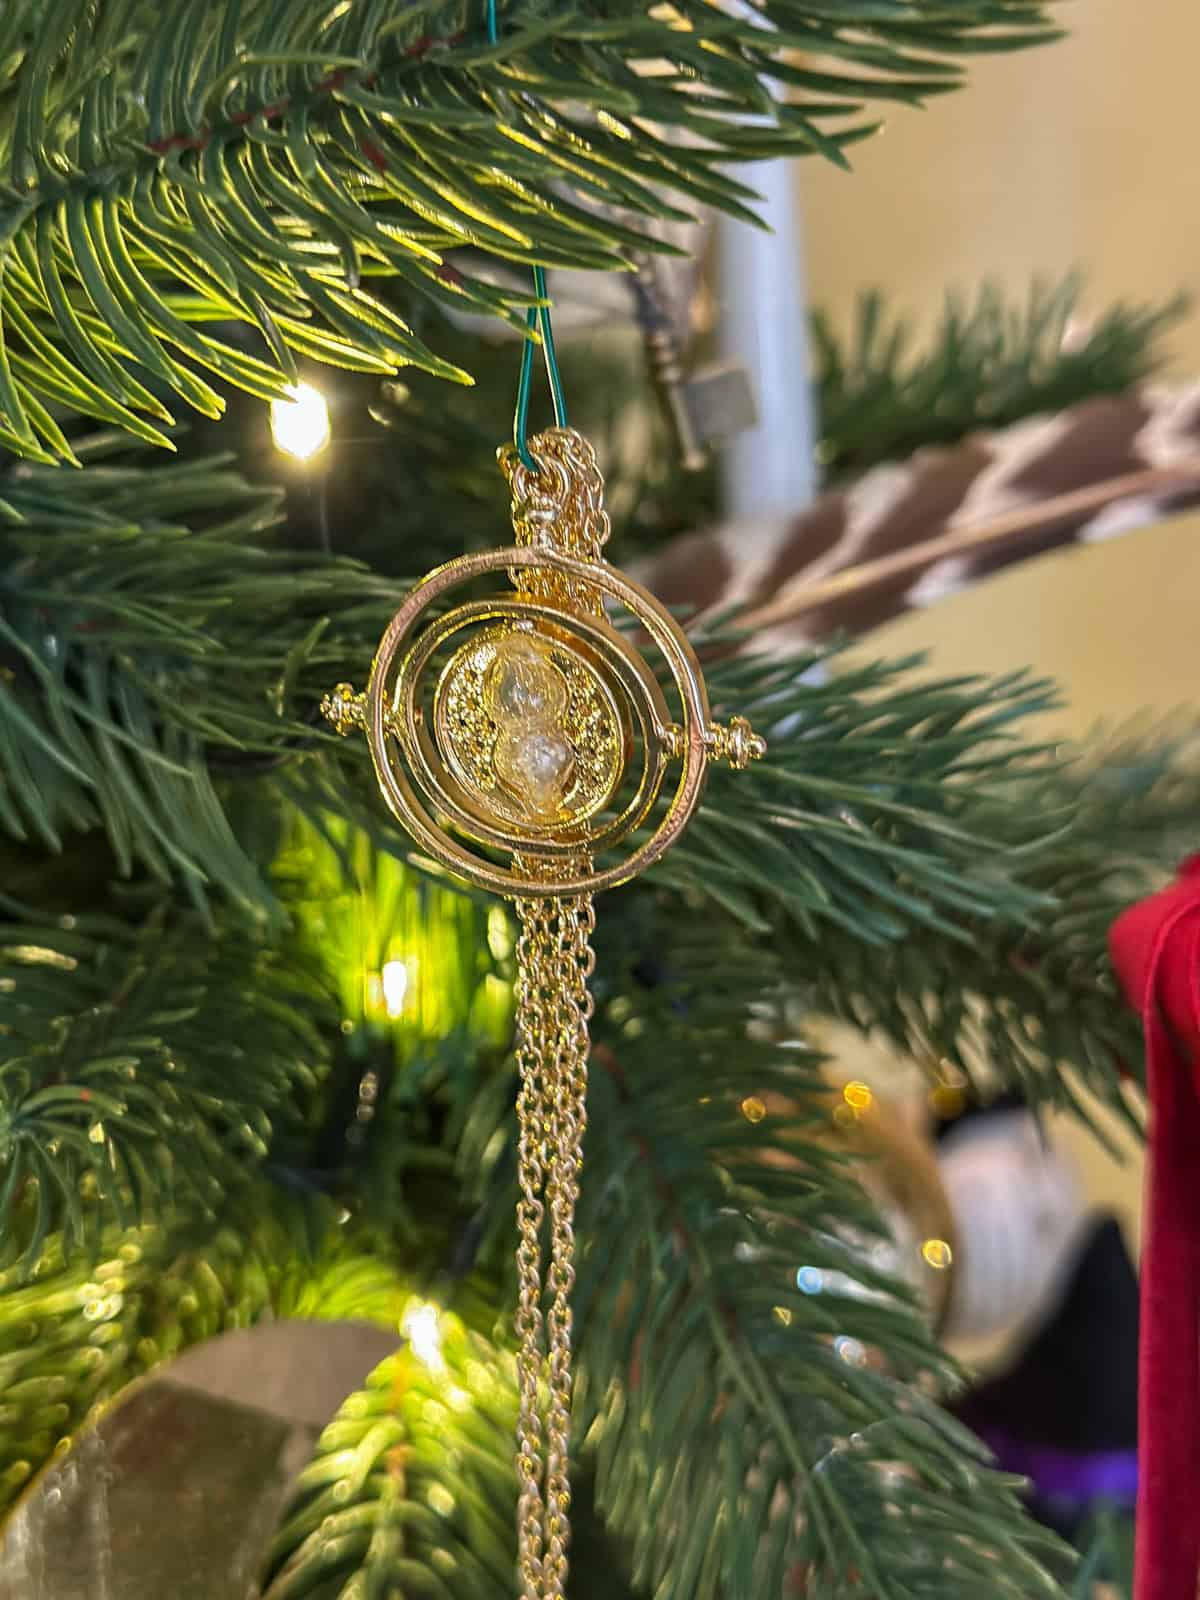
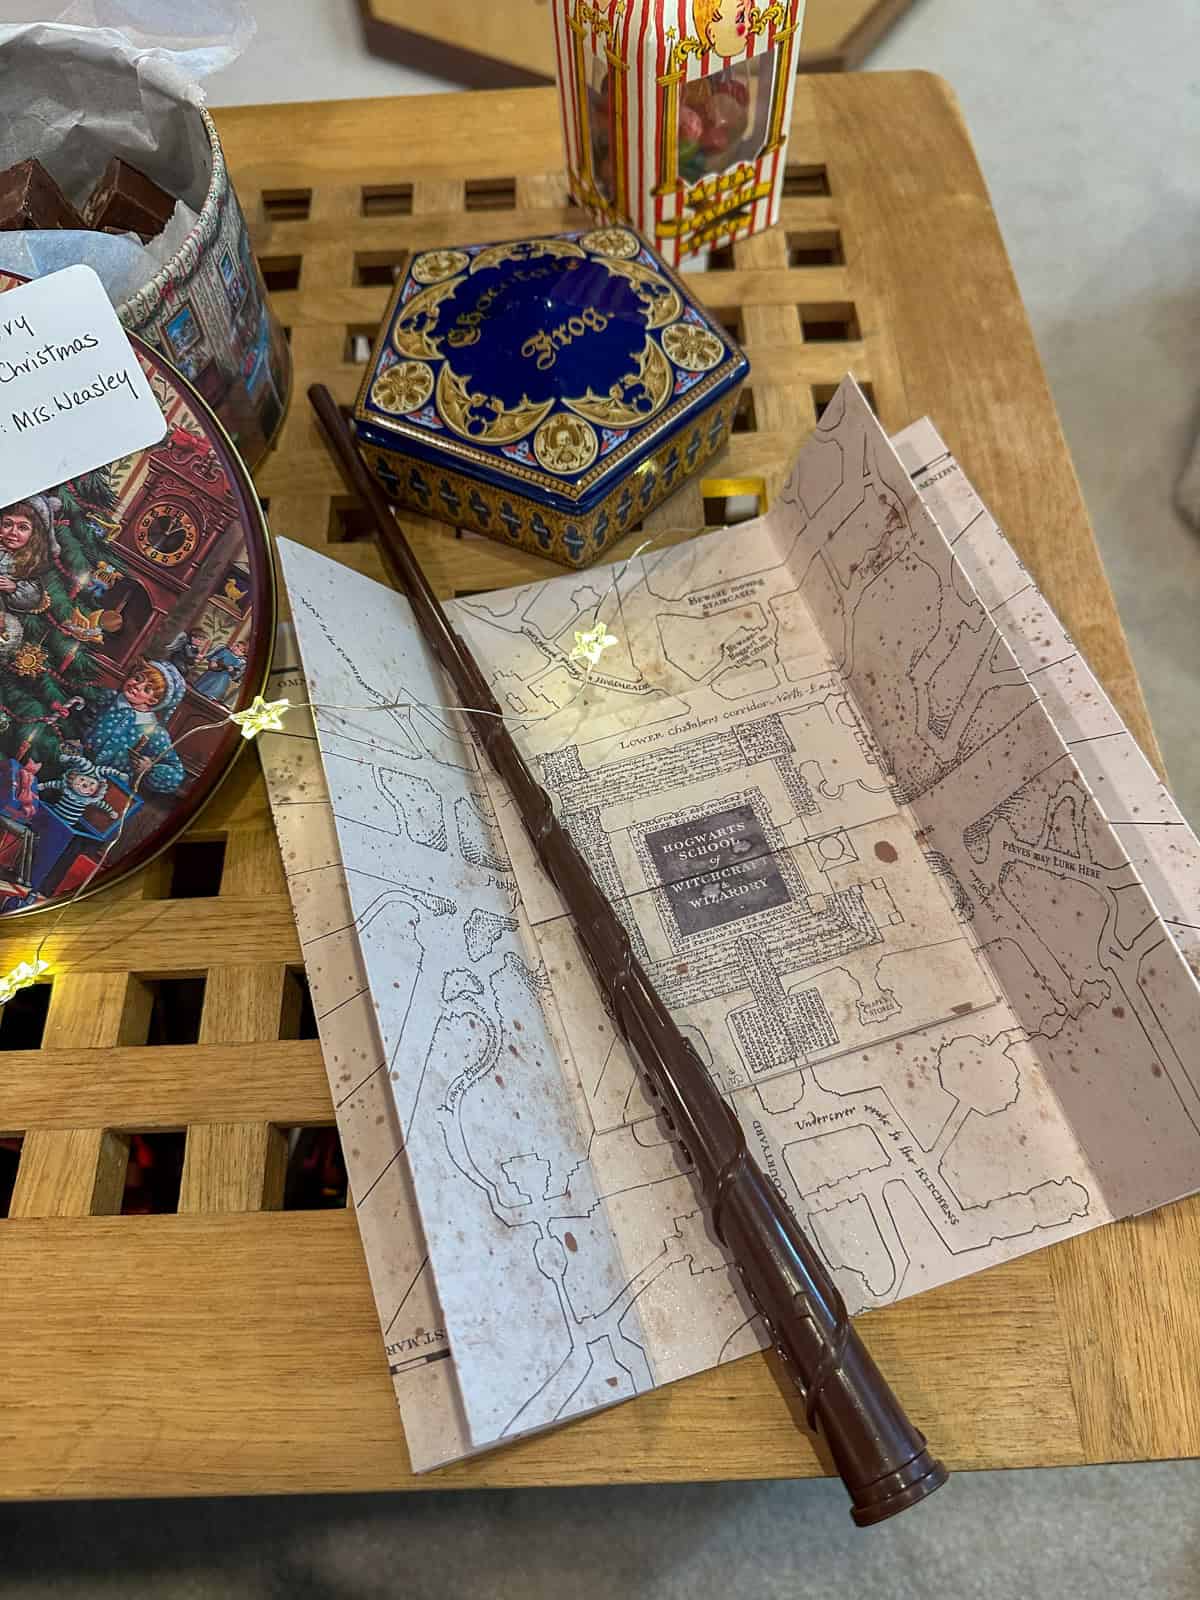
Time Turner
Look for inexpensive ones on-line at places like Temu, Alliexpress, or Amazon. (Cost $5)
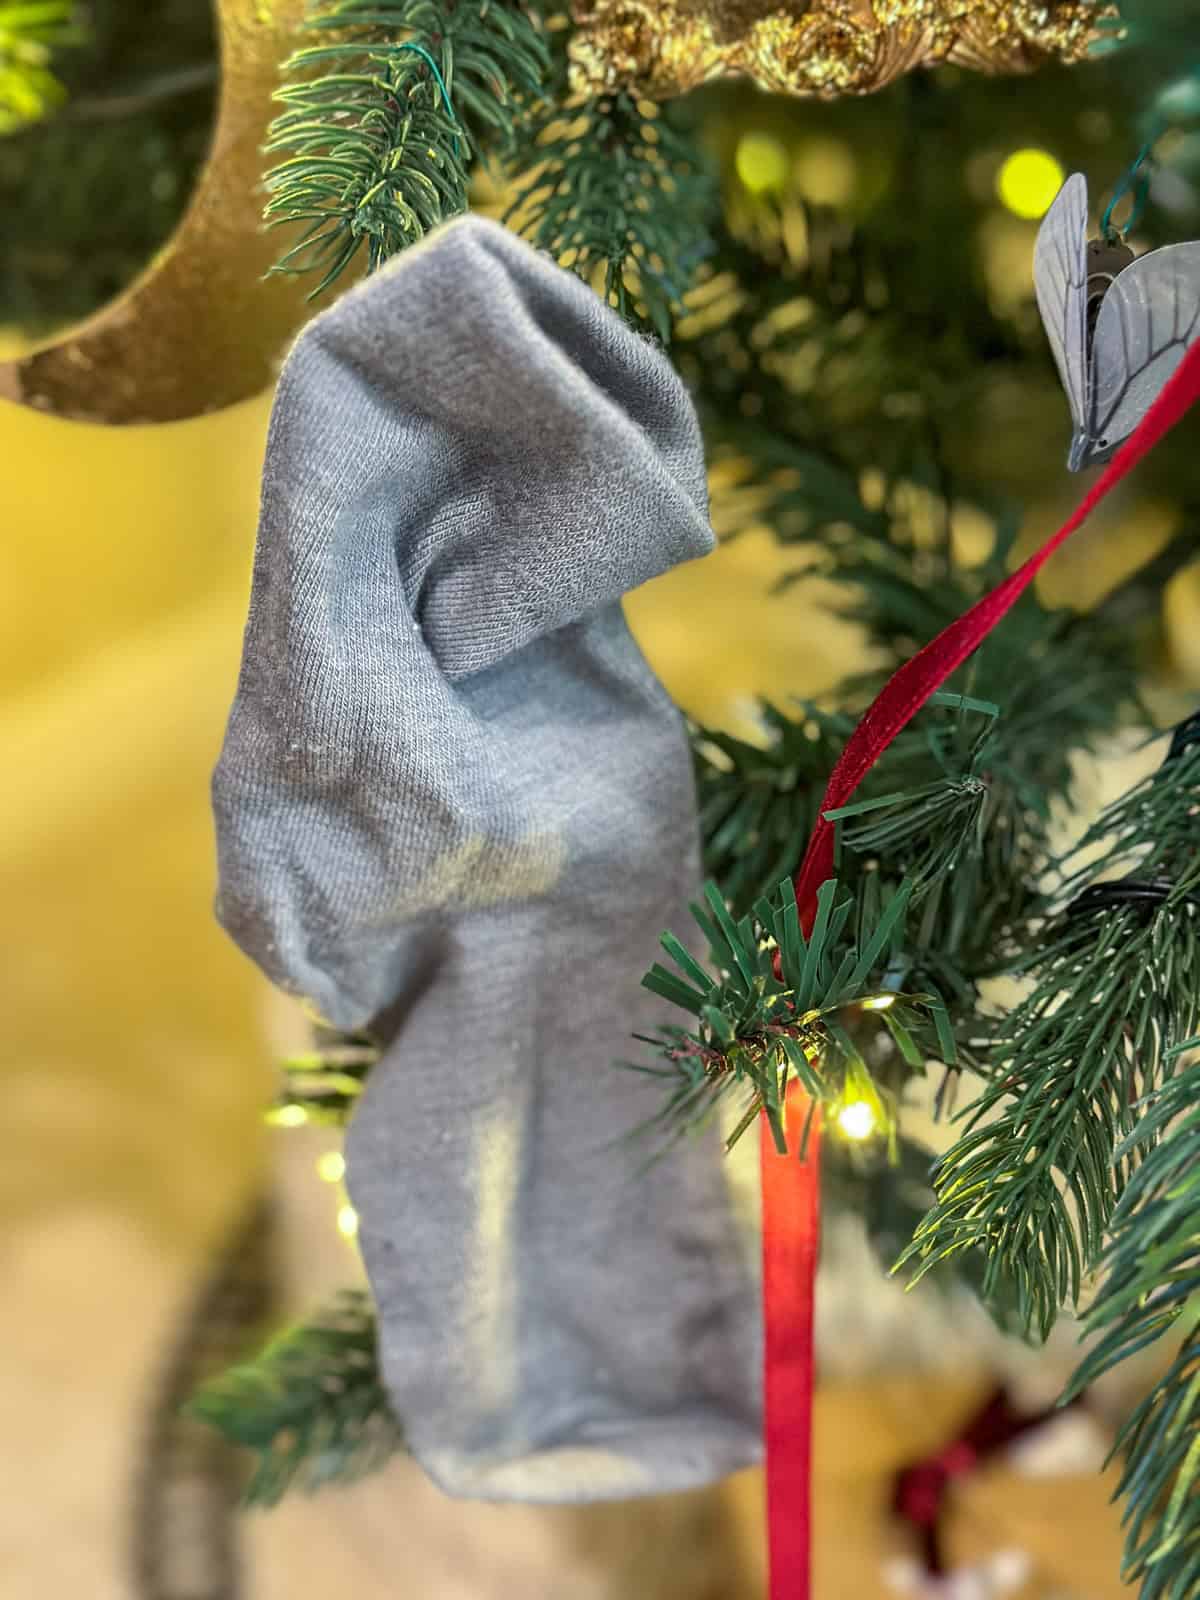
Dobby's Sock
Small sock on the tree representing freedom -watch everyone say awe as they notice it and remember Dobby.
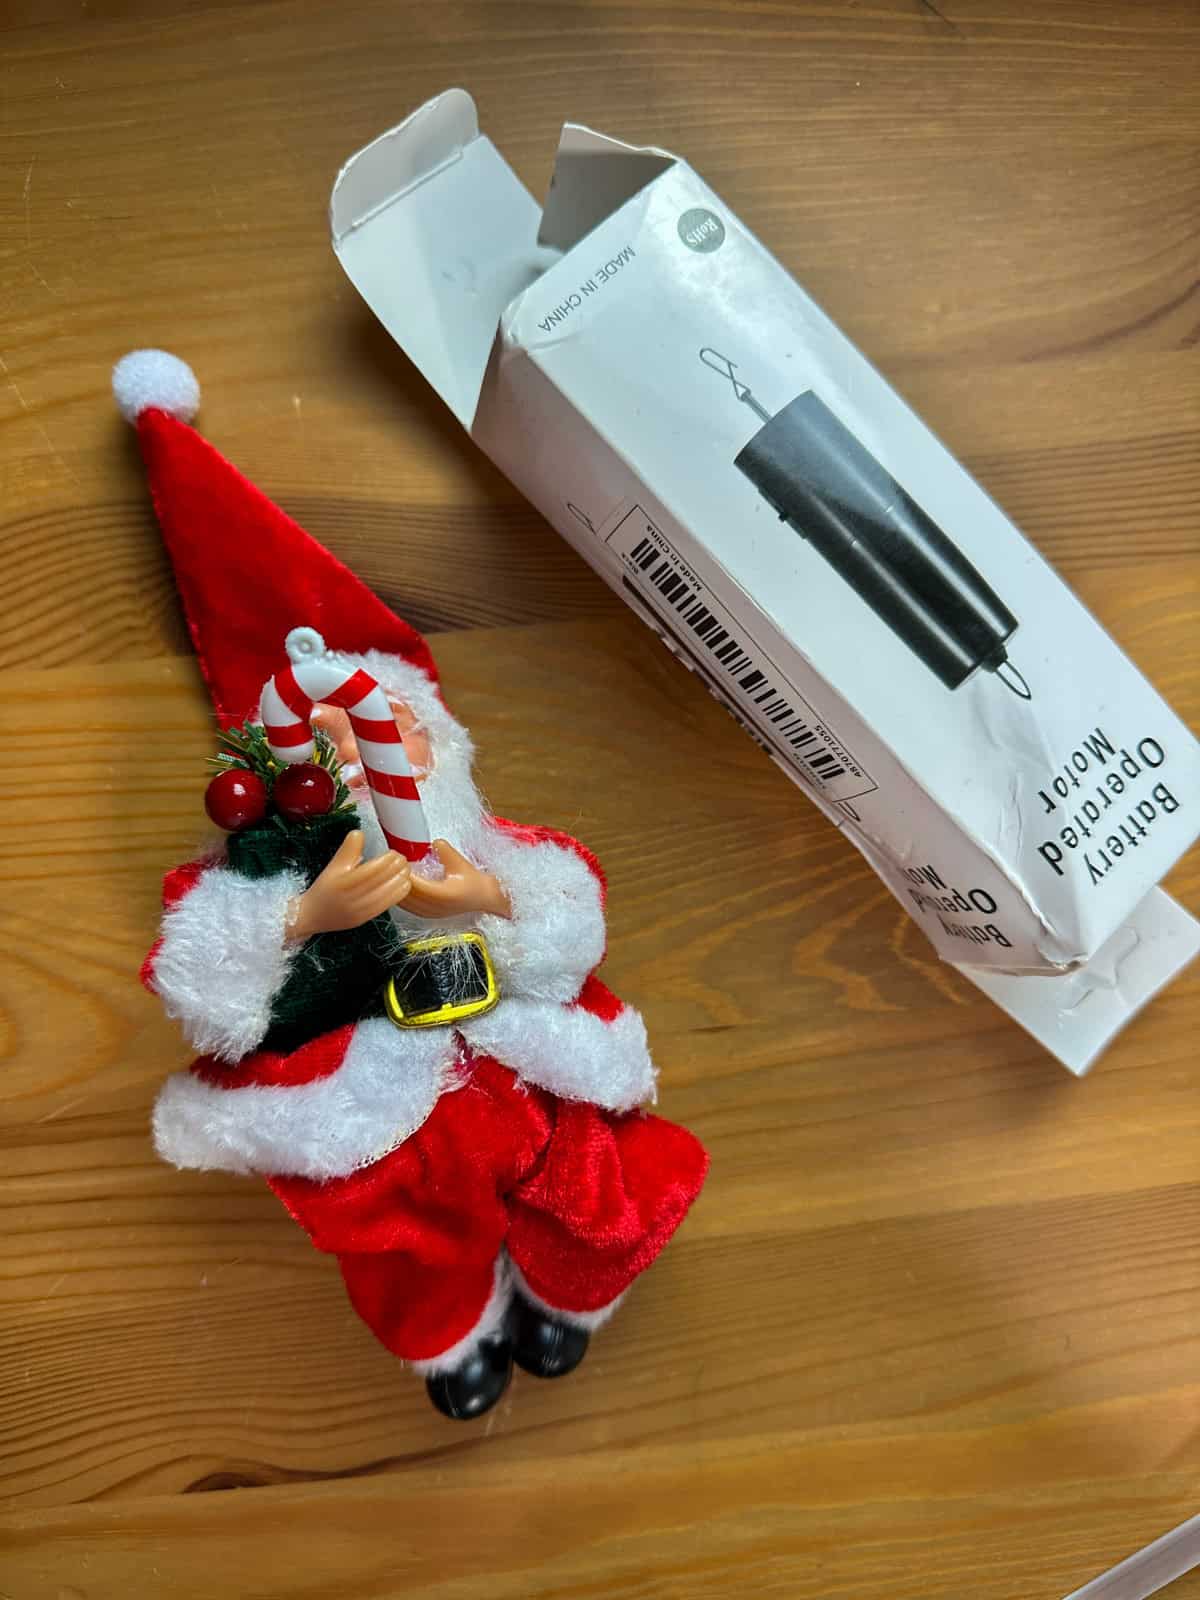
Tree Topper: Flying Santa on a Broomstick
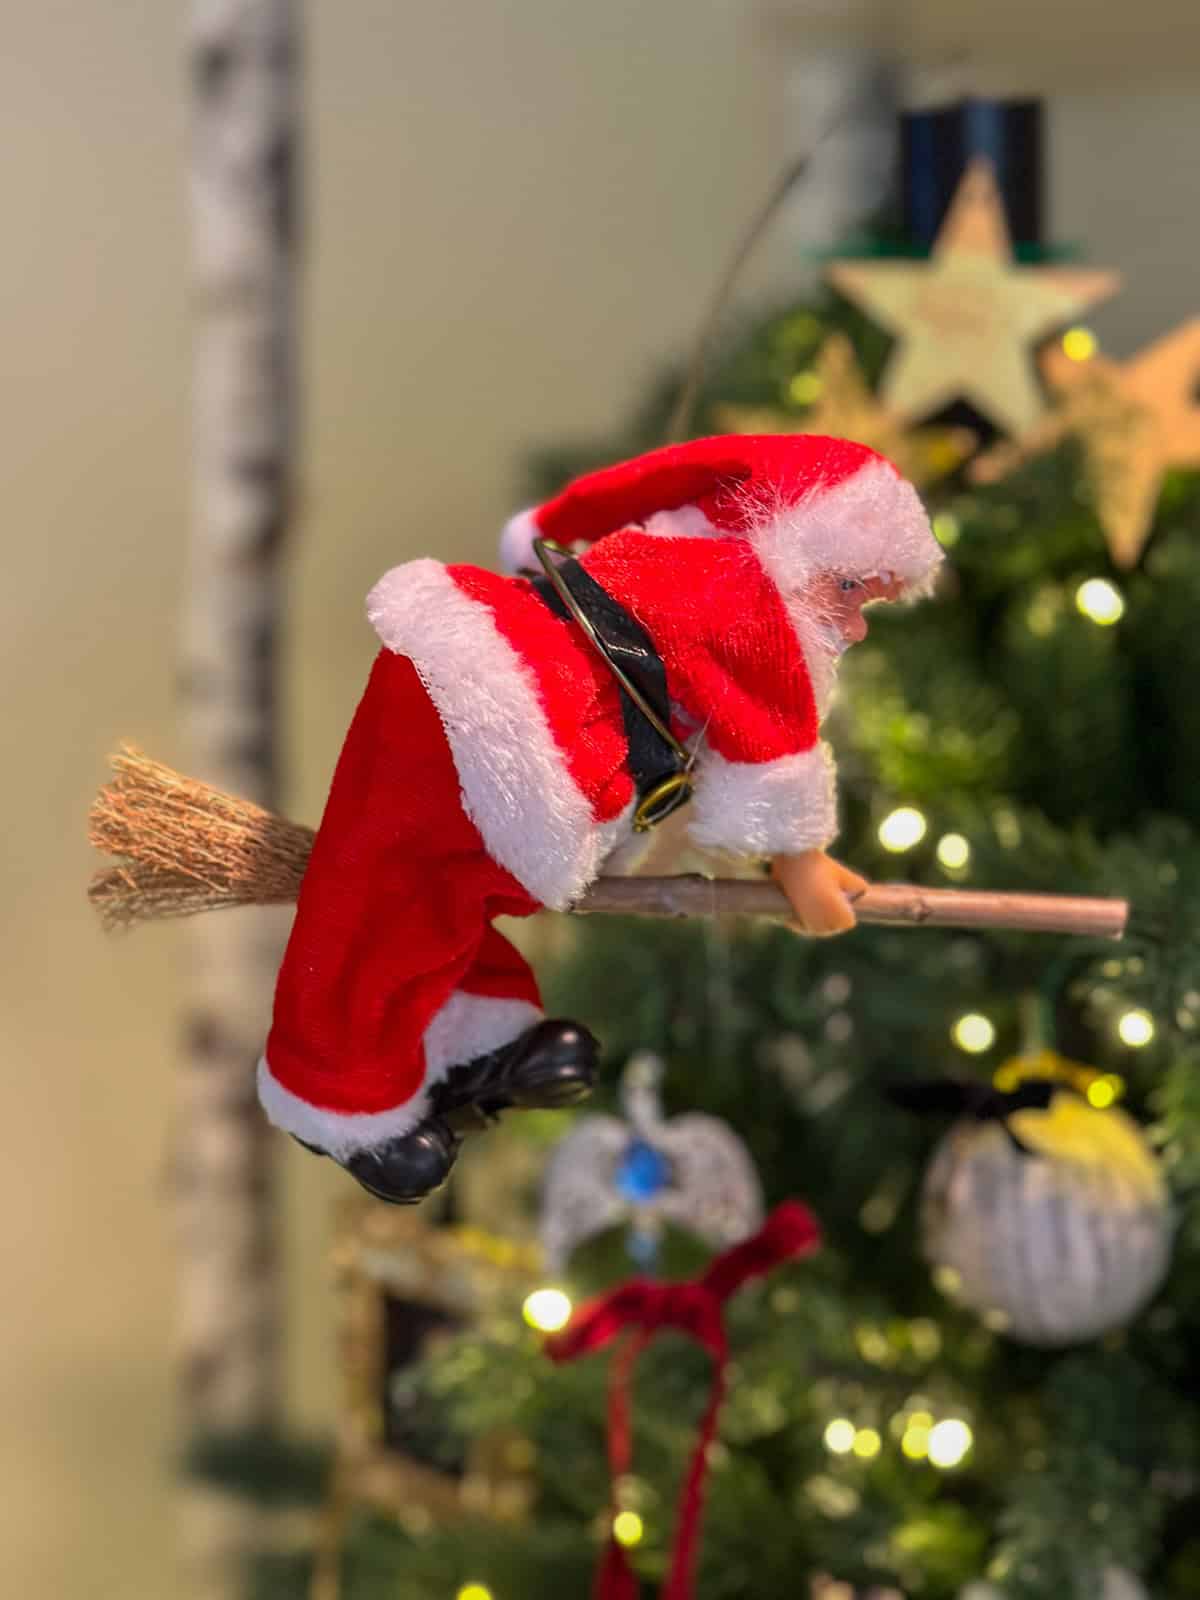
This is the most unique element! I haven't seen anyone else do this! And it was fairly simple to make and works perfectly.
We had the pleasure of going to the Harry Potter London experience last Christmas where you got to see the actual set where they filmed the movie with all the props. It was really great, and especially great to visit in December and see it all decorated for Christmas. When you first enter you get to see the great hall, and it's all set up for a Christmas feast, including all the Christmas trees. The tree toppers are witches that fly around the tops of the trees on little brooms. They're so cute -and inspiring!
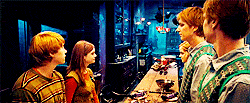
I was also inspired by the scene in Harry Potter and the Order of the Phoenix, at Grimmauld Place with Harry, the Weasleys, Hermione and Sirius Black. The flying Santa is a magical Christmas decoration that flies on a broomstick. Remember the scene -you'll have to go back and look for it. 😉
I thought it would fun to combine both ideas and a make a Santa flying on a broom stick that went around the top of the tree with a little motor.
I found the Santa on-line. If you want to make one too, be sure to look for one with movable legs, so you can sit him on the broom. I made the broom with a stick and a stick and one of the minature brooms I used as ornaments. The motor is a disco ball rotator. I was able to turn it upside down and attach it to my tree with some ziptipes. I then connected a stiff wire -an old coat hanger and attached Santa on his broom!
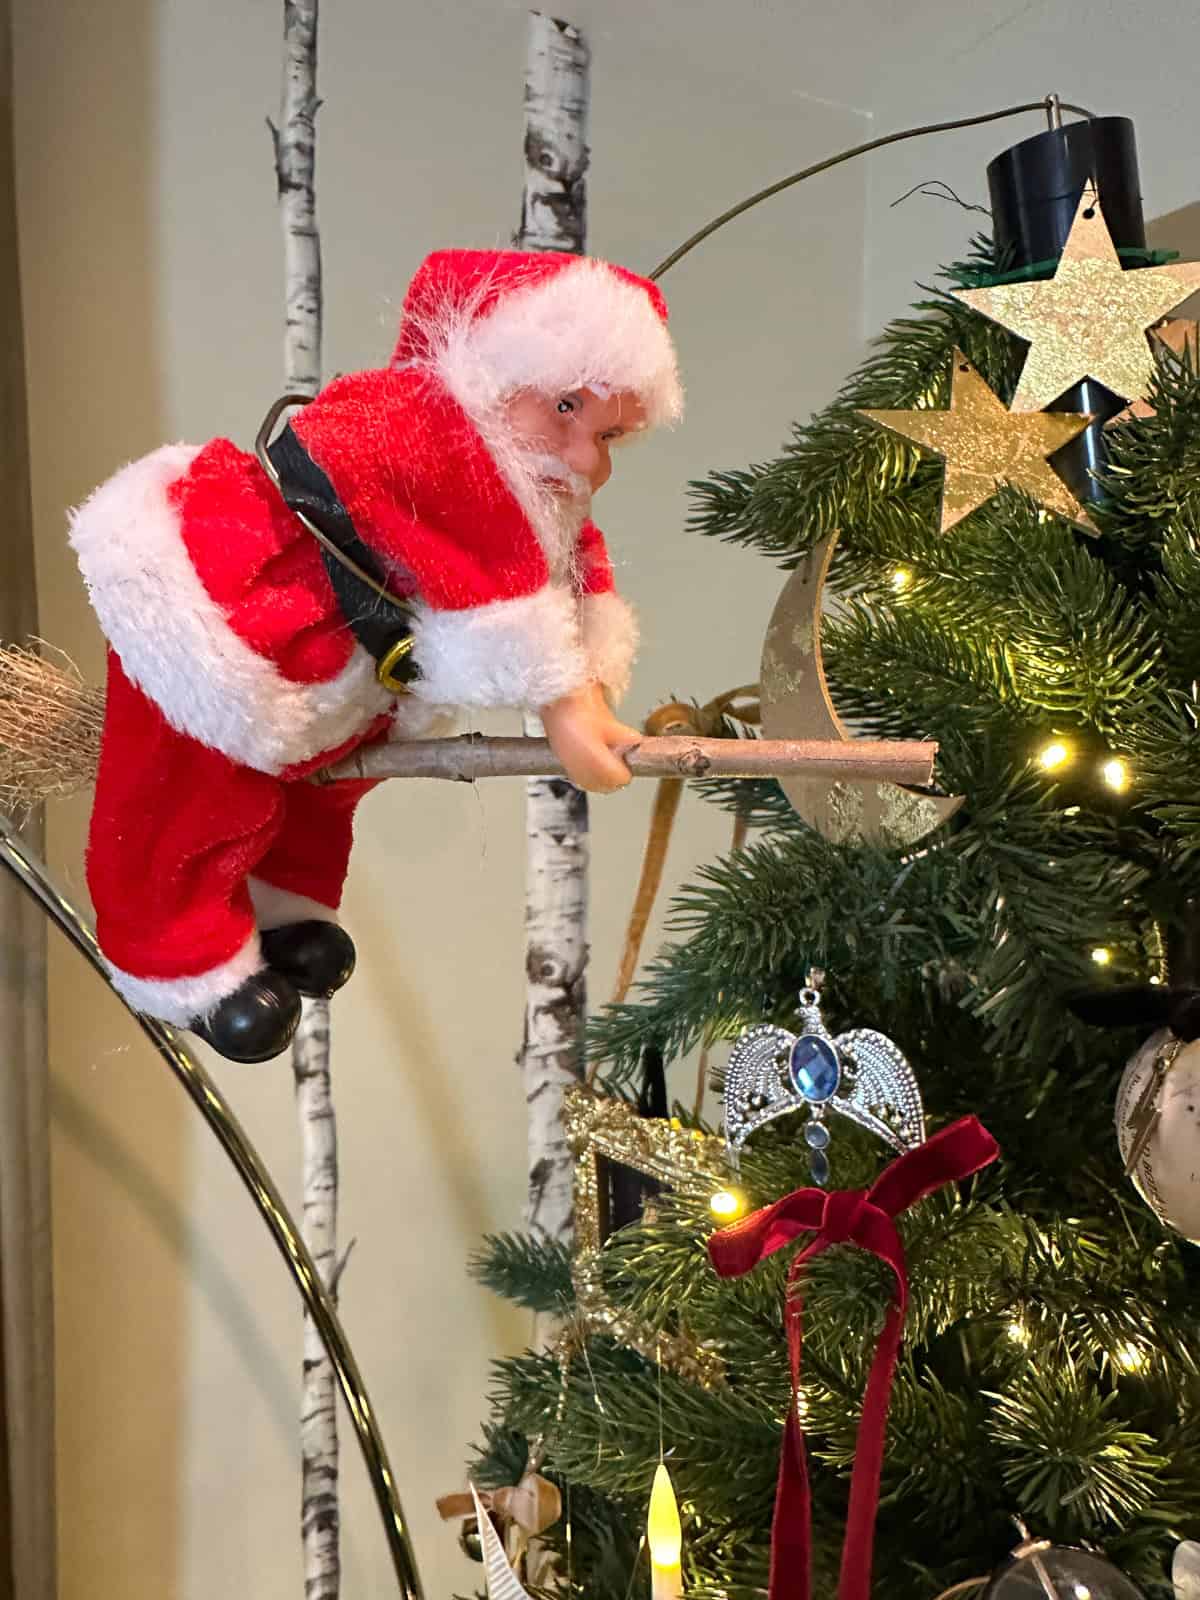
When turned on, Santa slowly circles the top like he's flying around it!
It's so magical I love it!
- Alternative toppers: Sorting hat, Golden Snitch with large wings, Deathly Hallows symbol.
- Materials: Disco ball spinner (be sure to buy one that has a hole in the bottom to insert the wire, and not one that has a chain hanging down), small Santa figurine (6-8 inches), decorative broom, wire, hot glue.
- Cost: $10 for motor, $5-10 for Santa and broom
Styling Your Harry Potter Christmas Tree
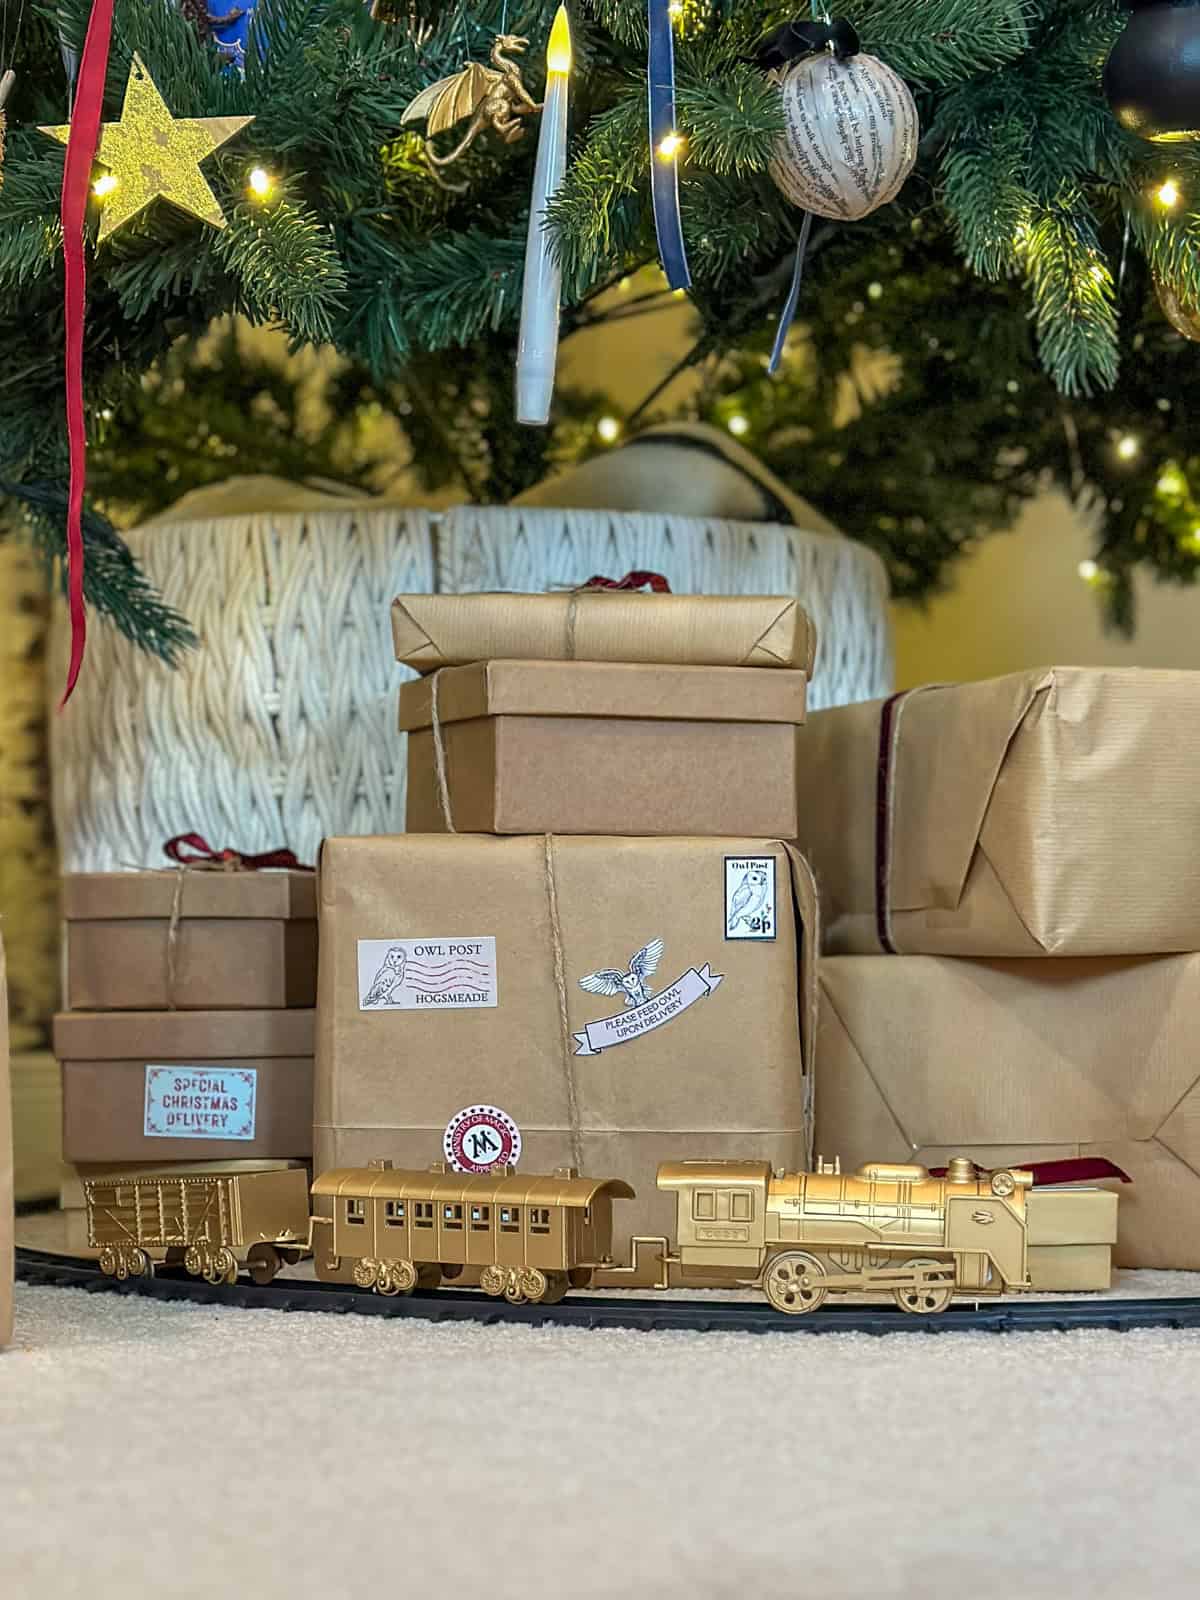
Tree Base
Hogwarts Express Train: A gold toy train circling the base. I spray painted an inexpensive train set gold to match my color scheme.
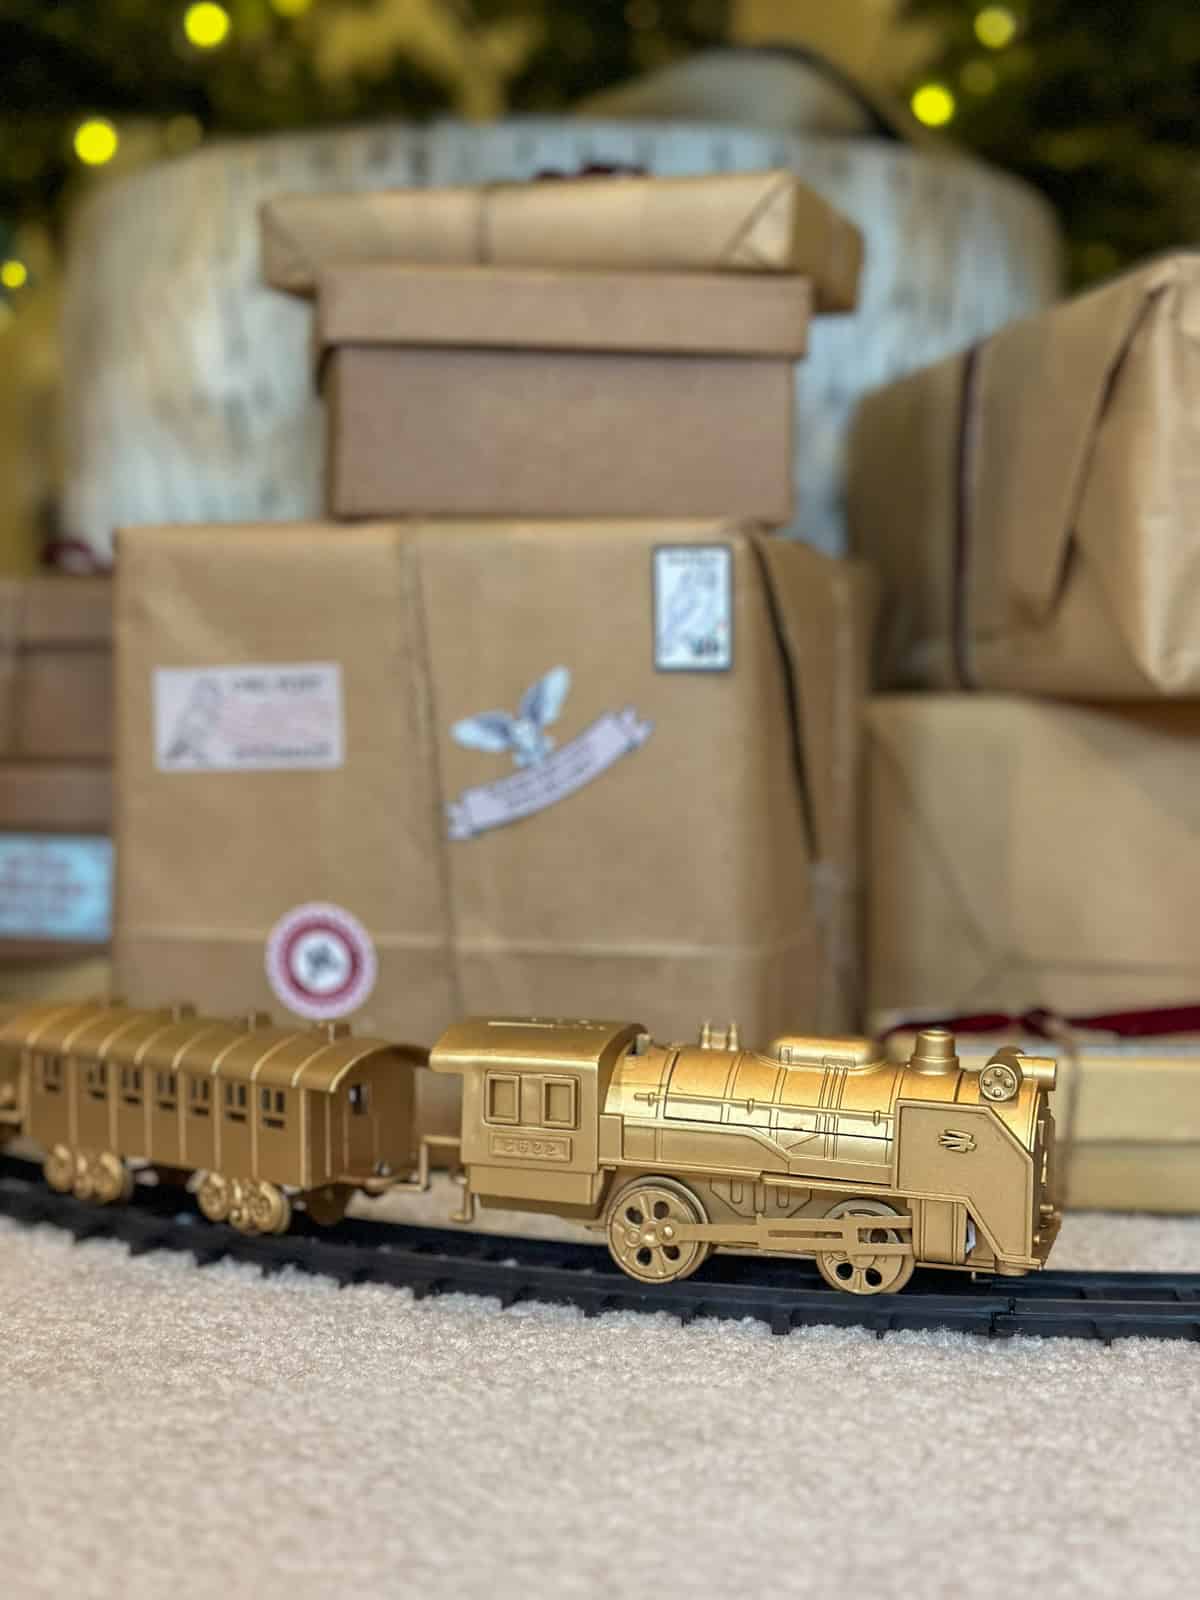
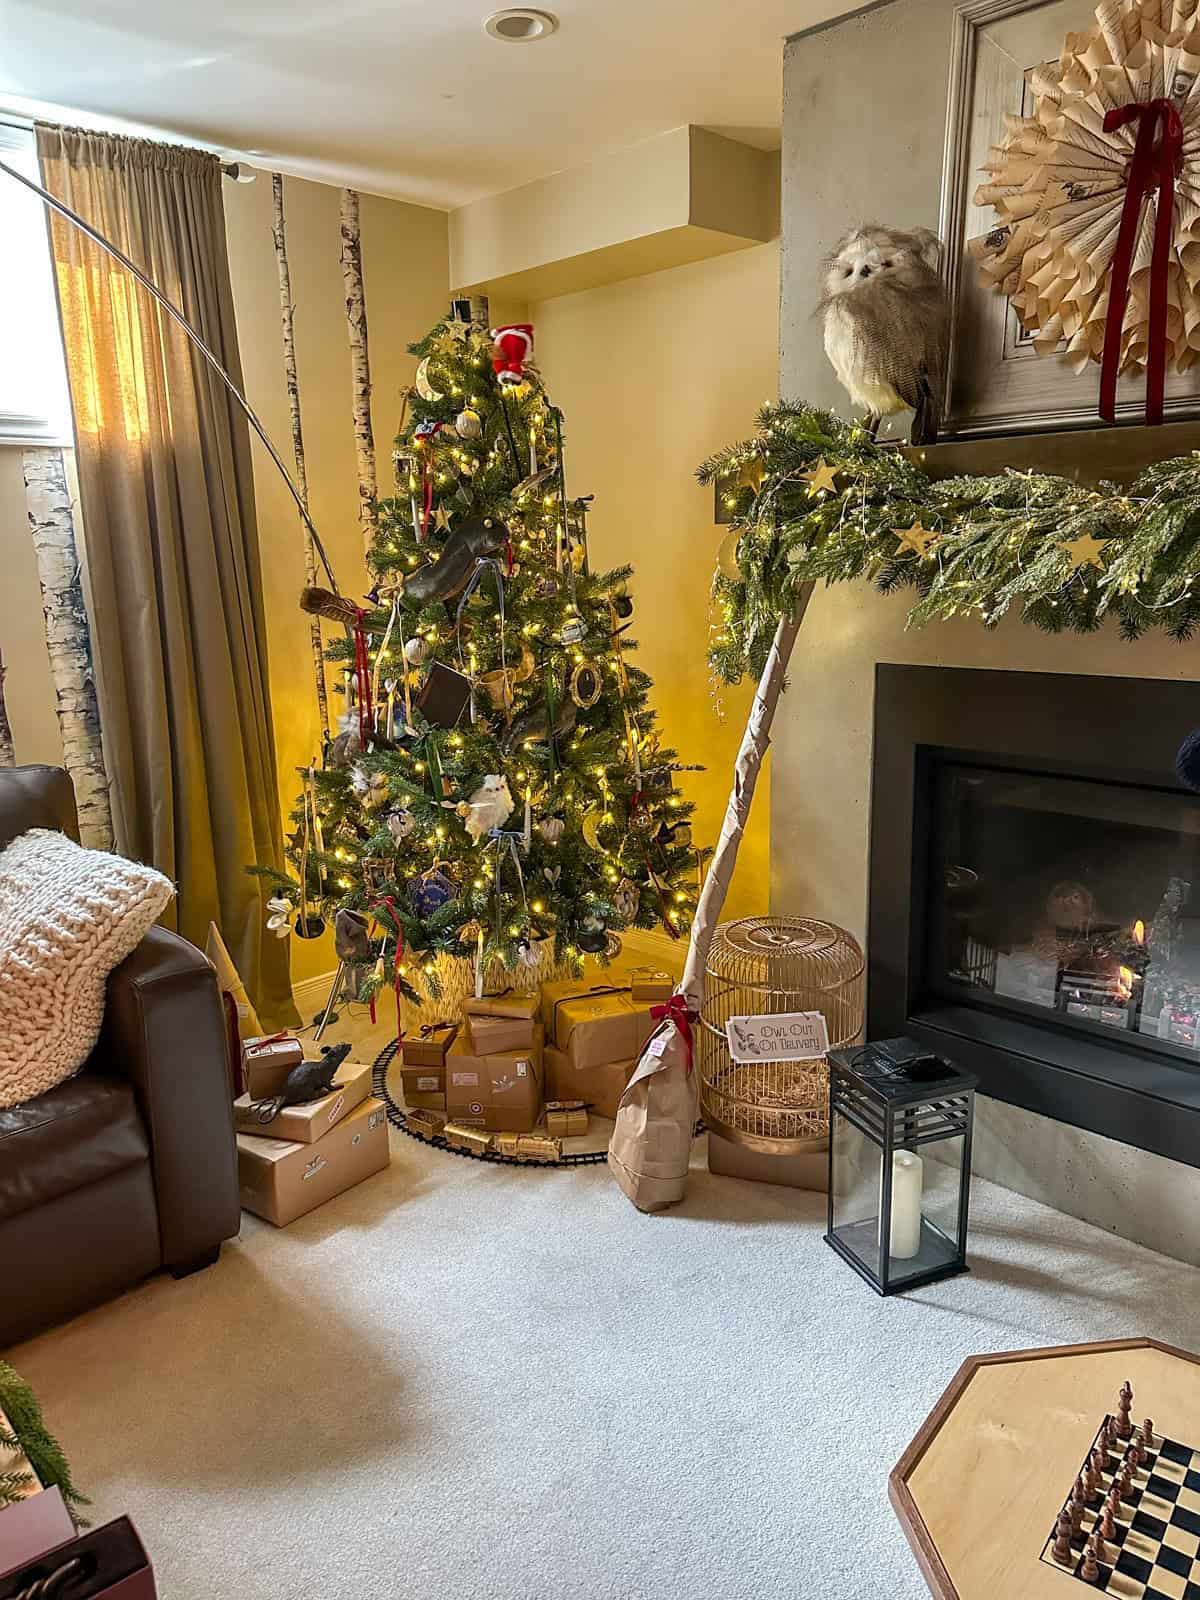
Owl Post Packages: Brown paper-wrapped packages with vintage stamps and "owl post" labels stacked around the base. Wrap boxes in kraft paper, tie with twine, add stamps and character name tags. Use our free printables!
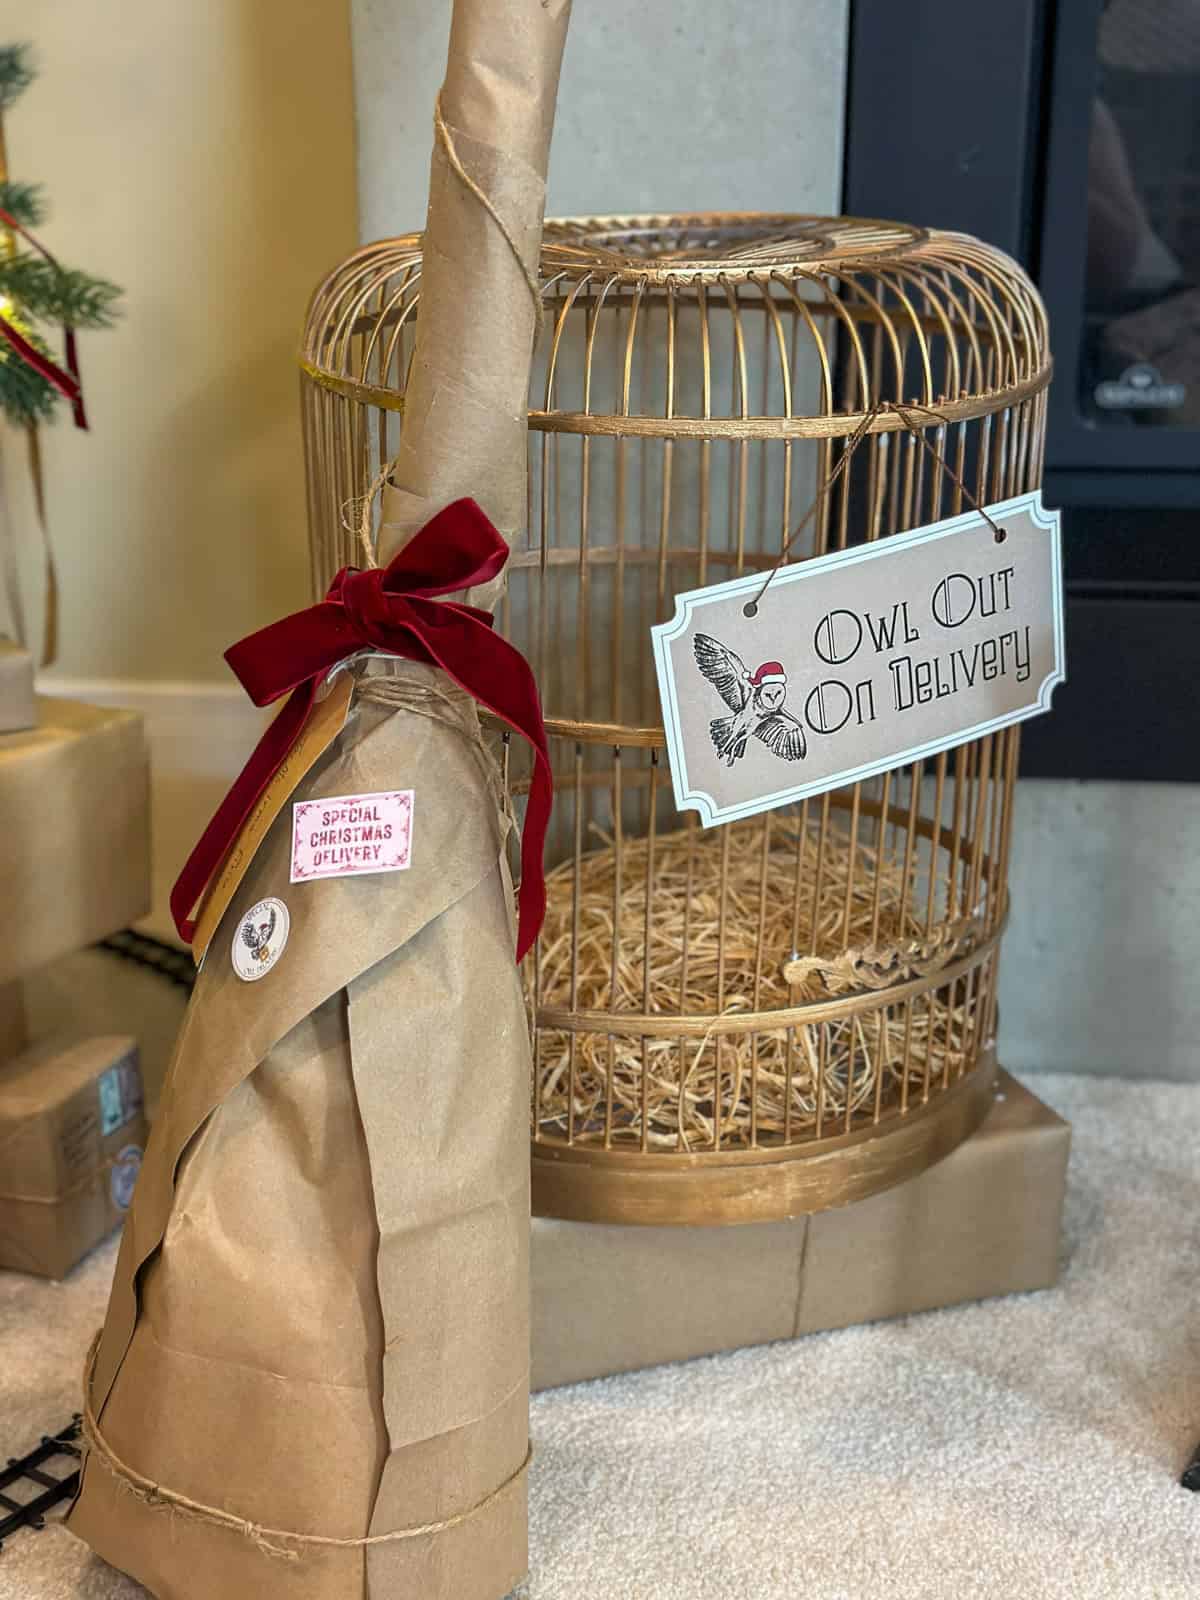
Vintage Birdcage: Gold birdcage with door open and free printable "Owl out for delivery" sign. Found mine at a thrift store for $10, and spray painted it gold.
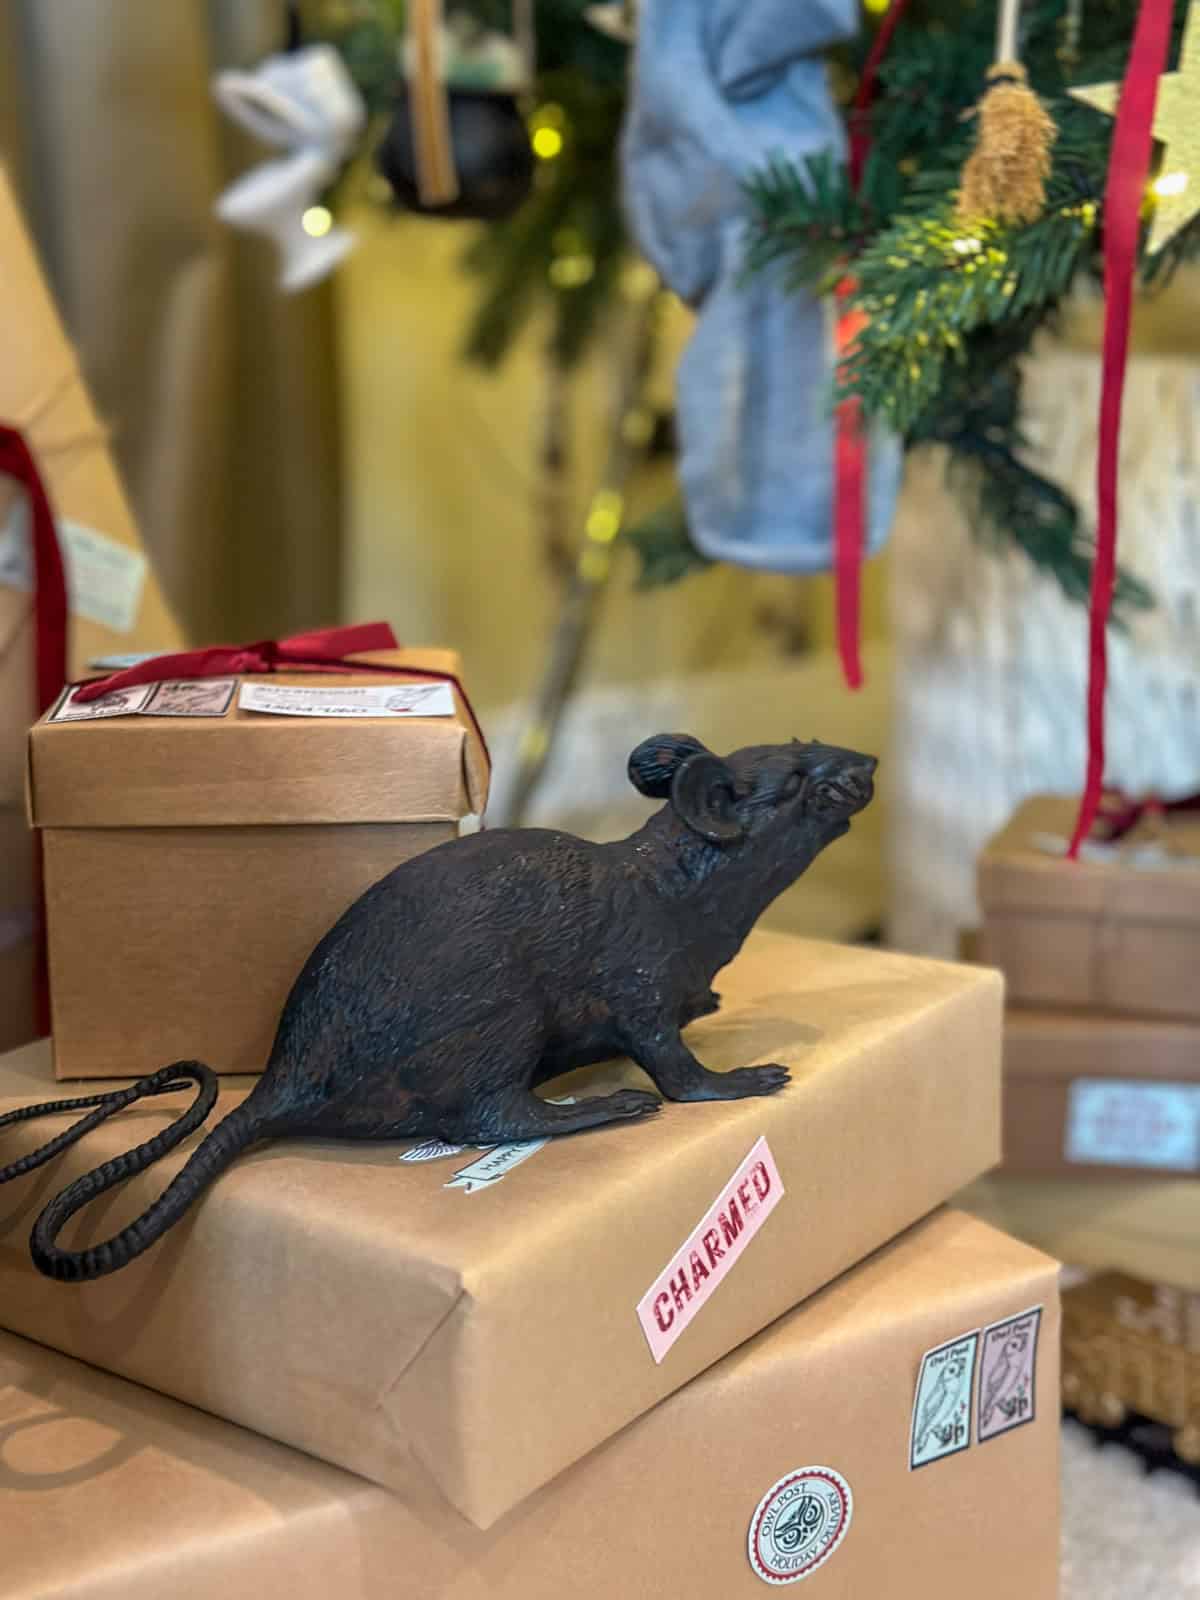
Scabers: Look for a rat Halloween decoration, and don't forget to remove a toe. 😉
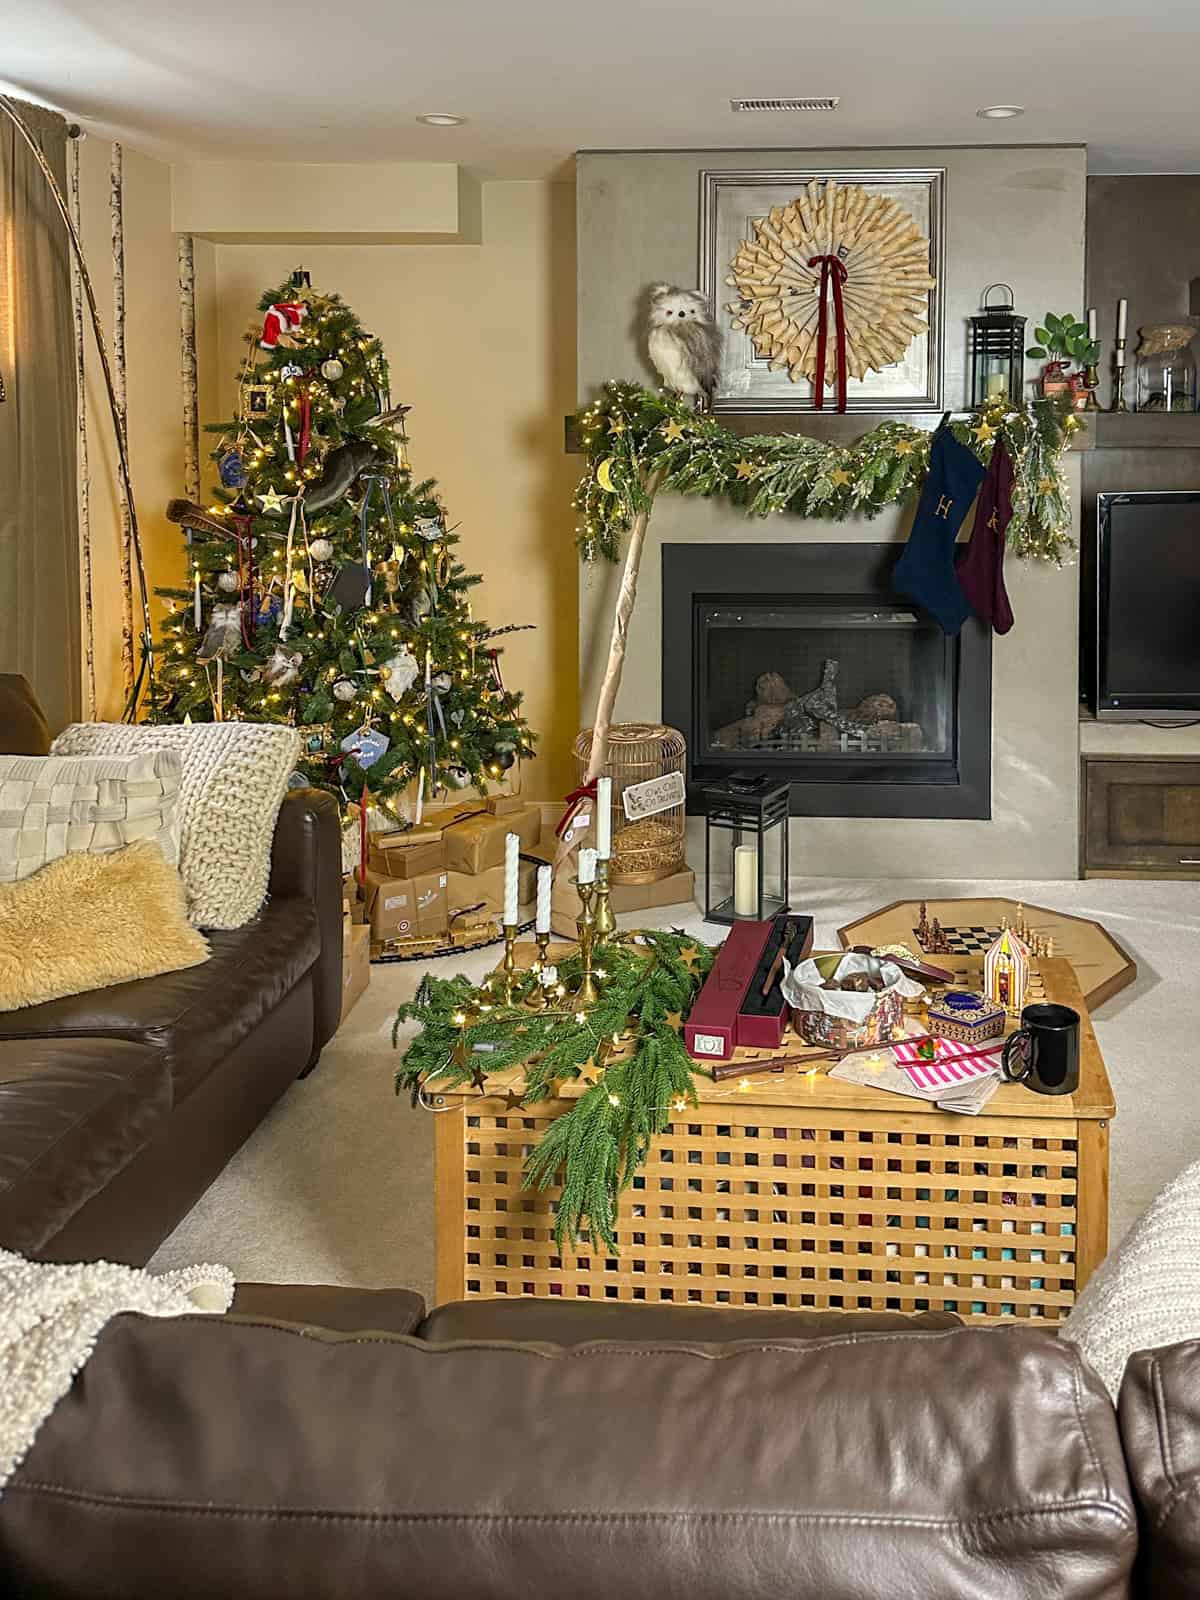
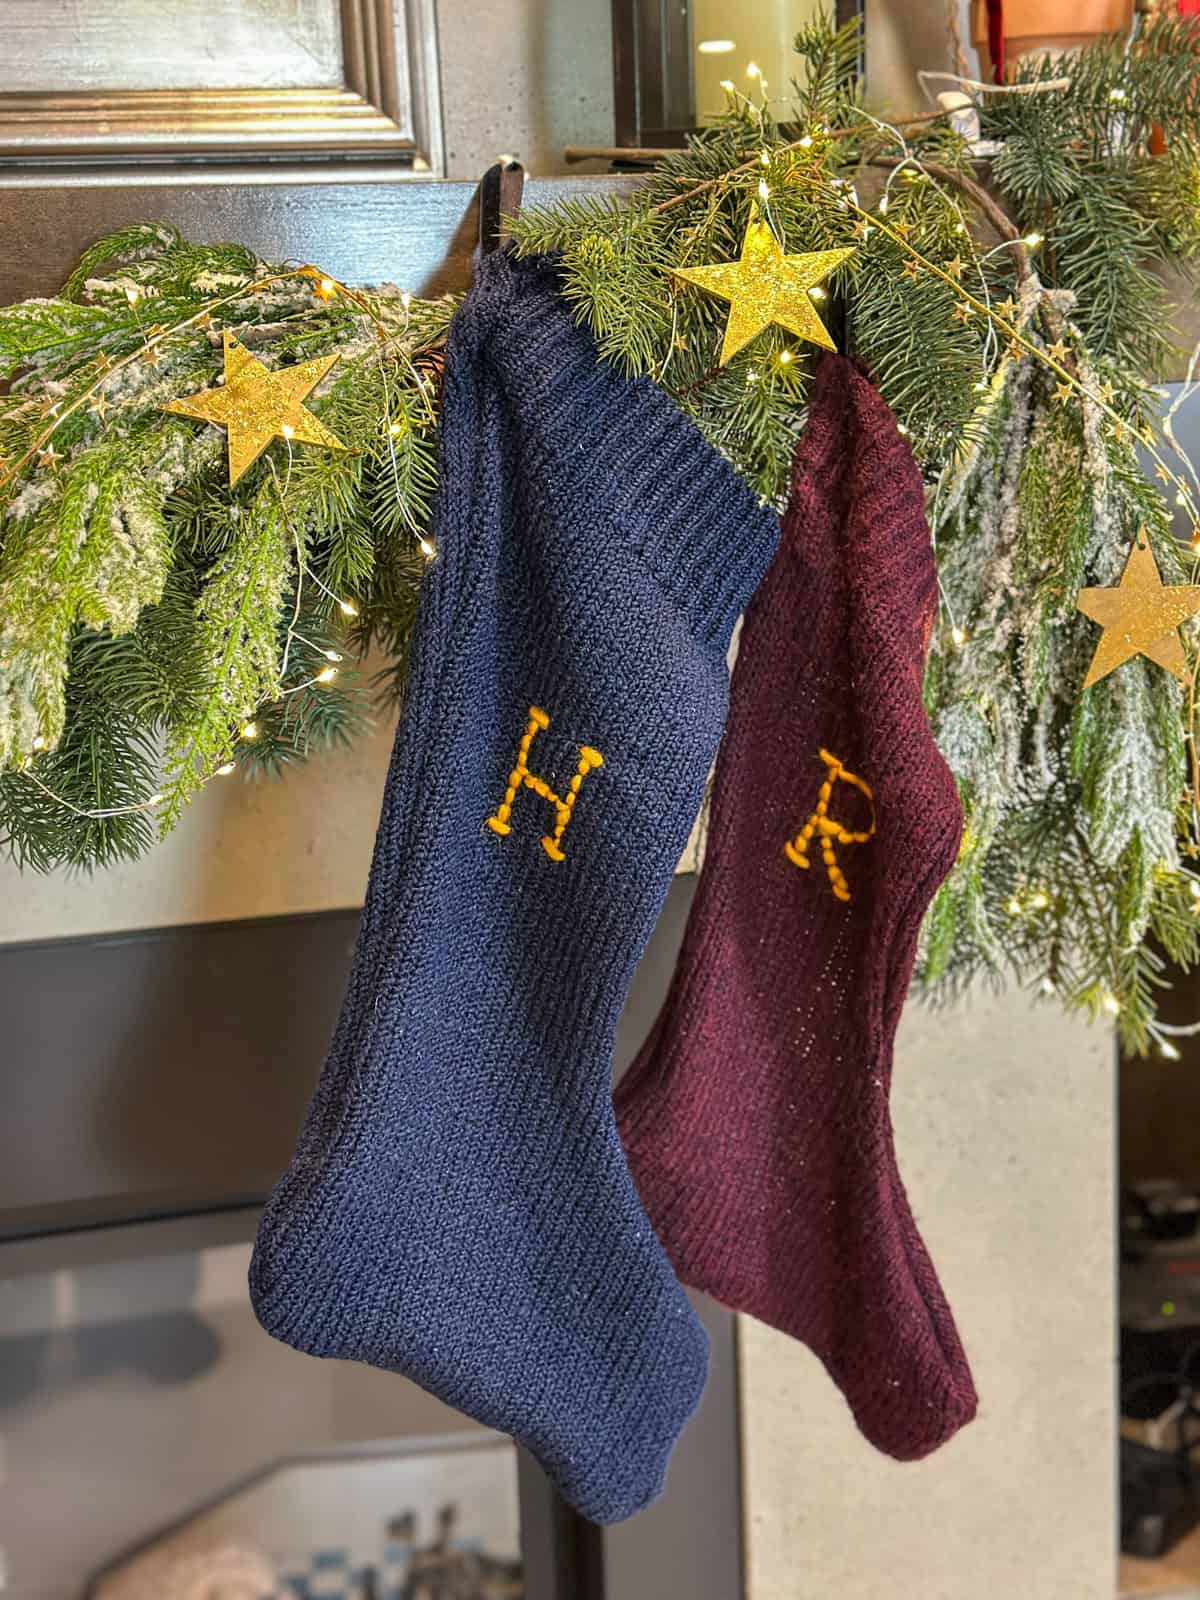
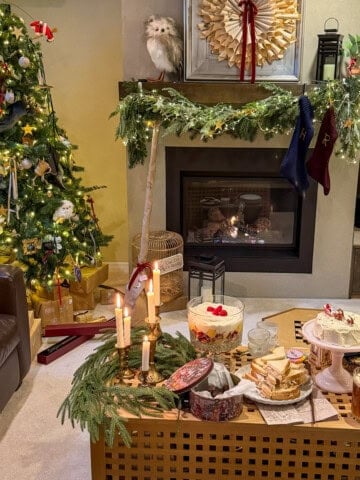
Harry Potter Christmas Mantel Decor

I had so much fun decorating our Harry Potter Christmas tree, that of course, I had to extend the decor to the rest of the room. We love our cozy fireplace, and I wanted to match it to our tree. We started by layering garland on the front, and adding Christmas lights, then we decorated it with gold star ribbon, and more of our gold leafed star and moon ornaments. Then we added our Harry Potter book wreath, and what is a Christmas mantel without stockings? We also layered in a large owl, and our DIY Mandrakes.
DIY Weasley Sweater Christmas Stockings

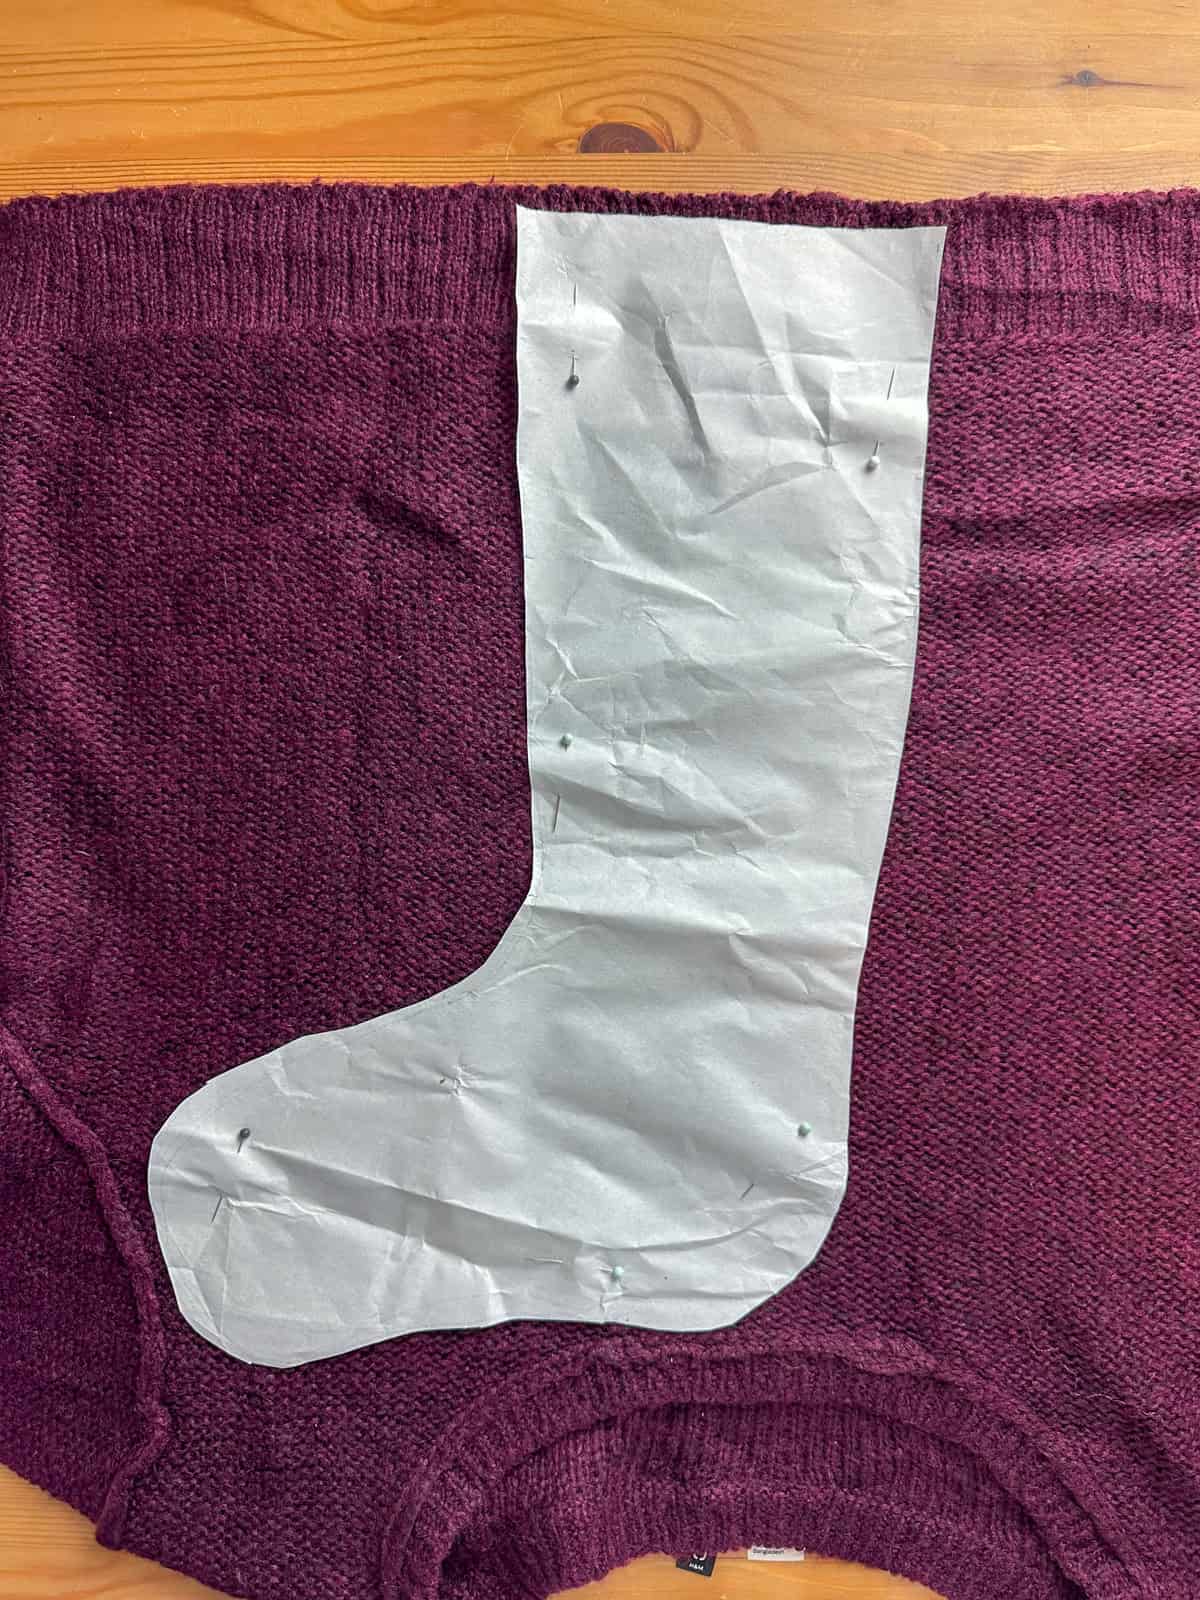
What is a Christmas mantel without stockings? These are one of my favorite projects! They were inspired by the handmade sweaters that Mrs. Weasley makes for Ron and Harry in the first book.
I don't knit or crochet, so I found a cheater's way to make them. These are made from thrifted sweaters with stitched initials. I created one in maroon with "R" for Ron and one in blue with "H" for Harry. You could make stockings for your own family with their initials.
Find thrifted sweaters in Weasley colors ($5-8 each). Find or create a stocking pattern (free patterns online, trace an existing stocking, or freehand it on some large paper). Cut pattern pieces from sweaters, lining up the top cuff of the sweater with the ribbed edge of the bottom of the sweater. Remember, you'll need front and back. Then stitch the stocking together with your sewing machine.
Do be careful when working with the cut sweater pieces, as they can begin to unravel at the edges. Pin front and back pieces together with right sides facing. Sew around the stocking using a zigzag stitch (since sweater fabric stretches). Turn right-side-out, and add a hanging loop from ribbon.
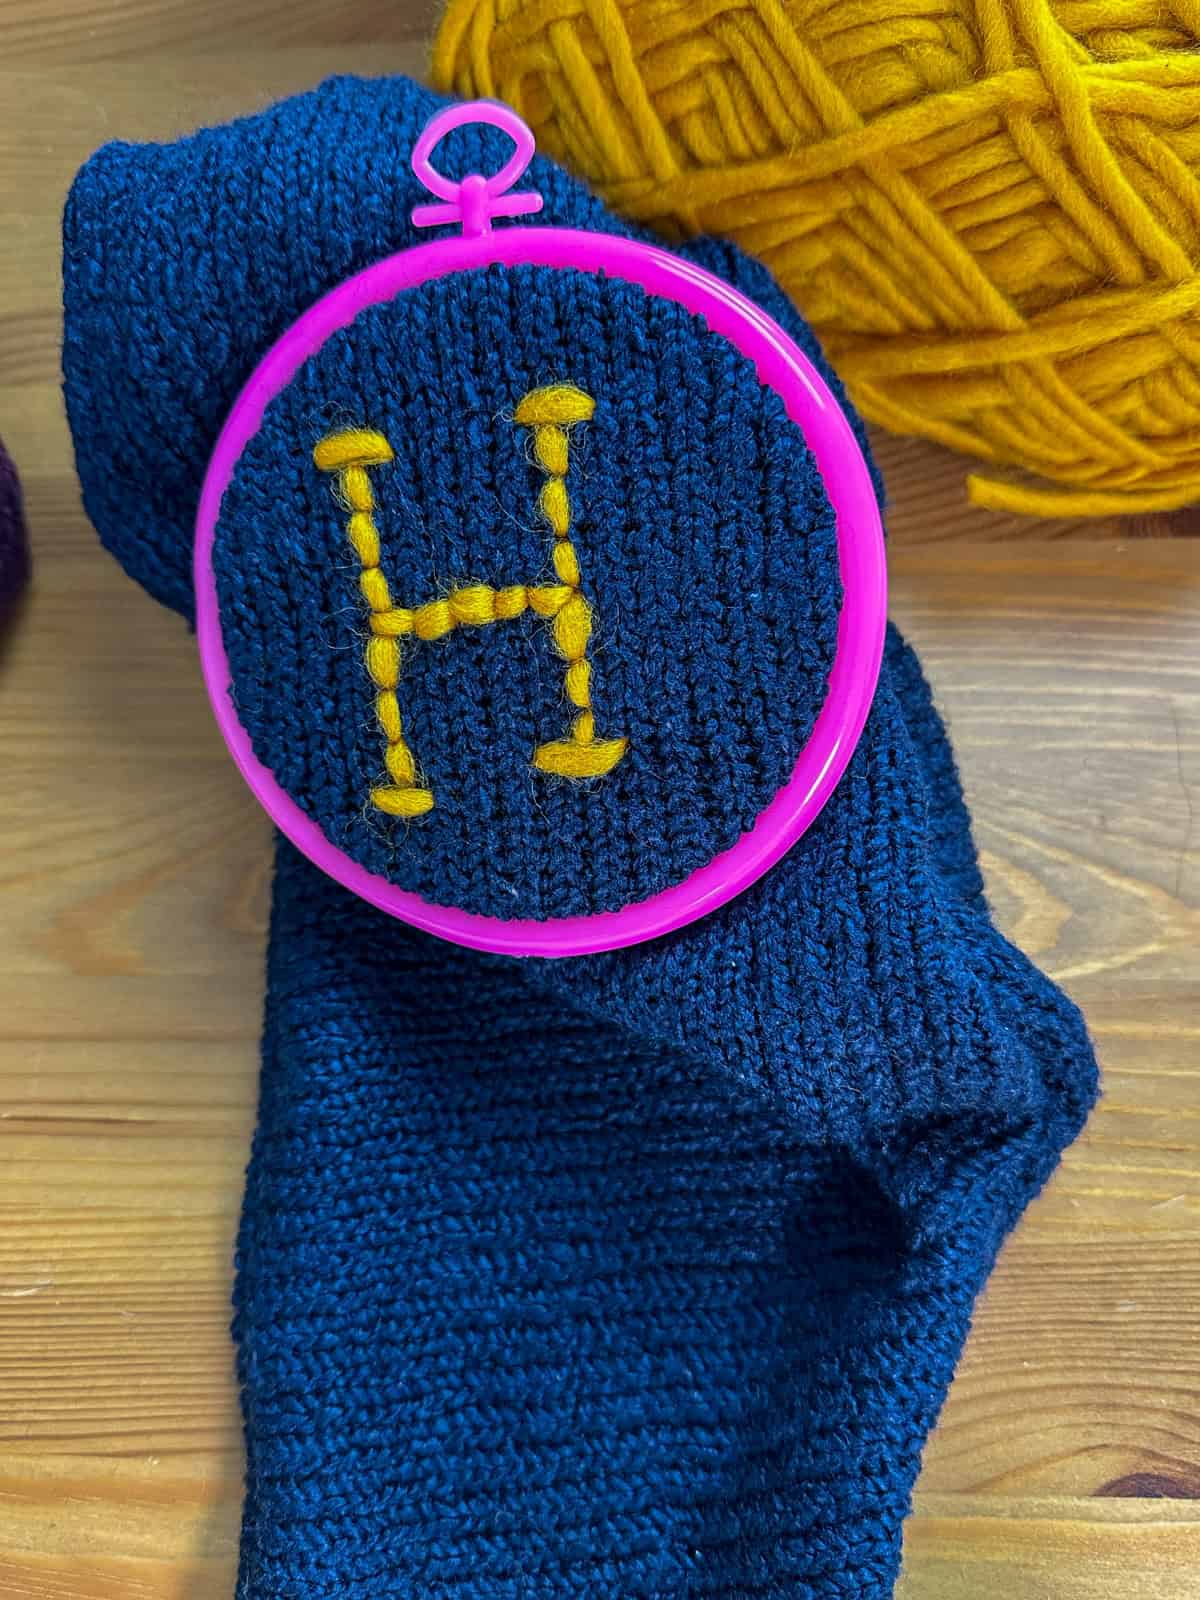
For the initial, use a small embroidery hoop on the front of the stocking, and stitch your letter with gold yarn and a darning needle using a simple back stitch, being careful not to stitch through the back piece by accident.
- Materials: Thrifted sweaters in maroon and blue, sewing machine, thread, gold yarn, embroidery hoop and needle, scissors, pins, ribbon.
- Time: 30 minutes each
- Cost: $5-8 each
- Difficulty: Intermediate
DIY Harry Potter Book Page Wreath
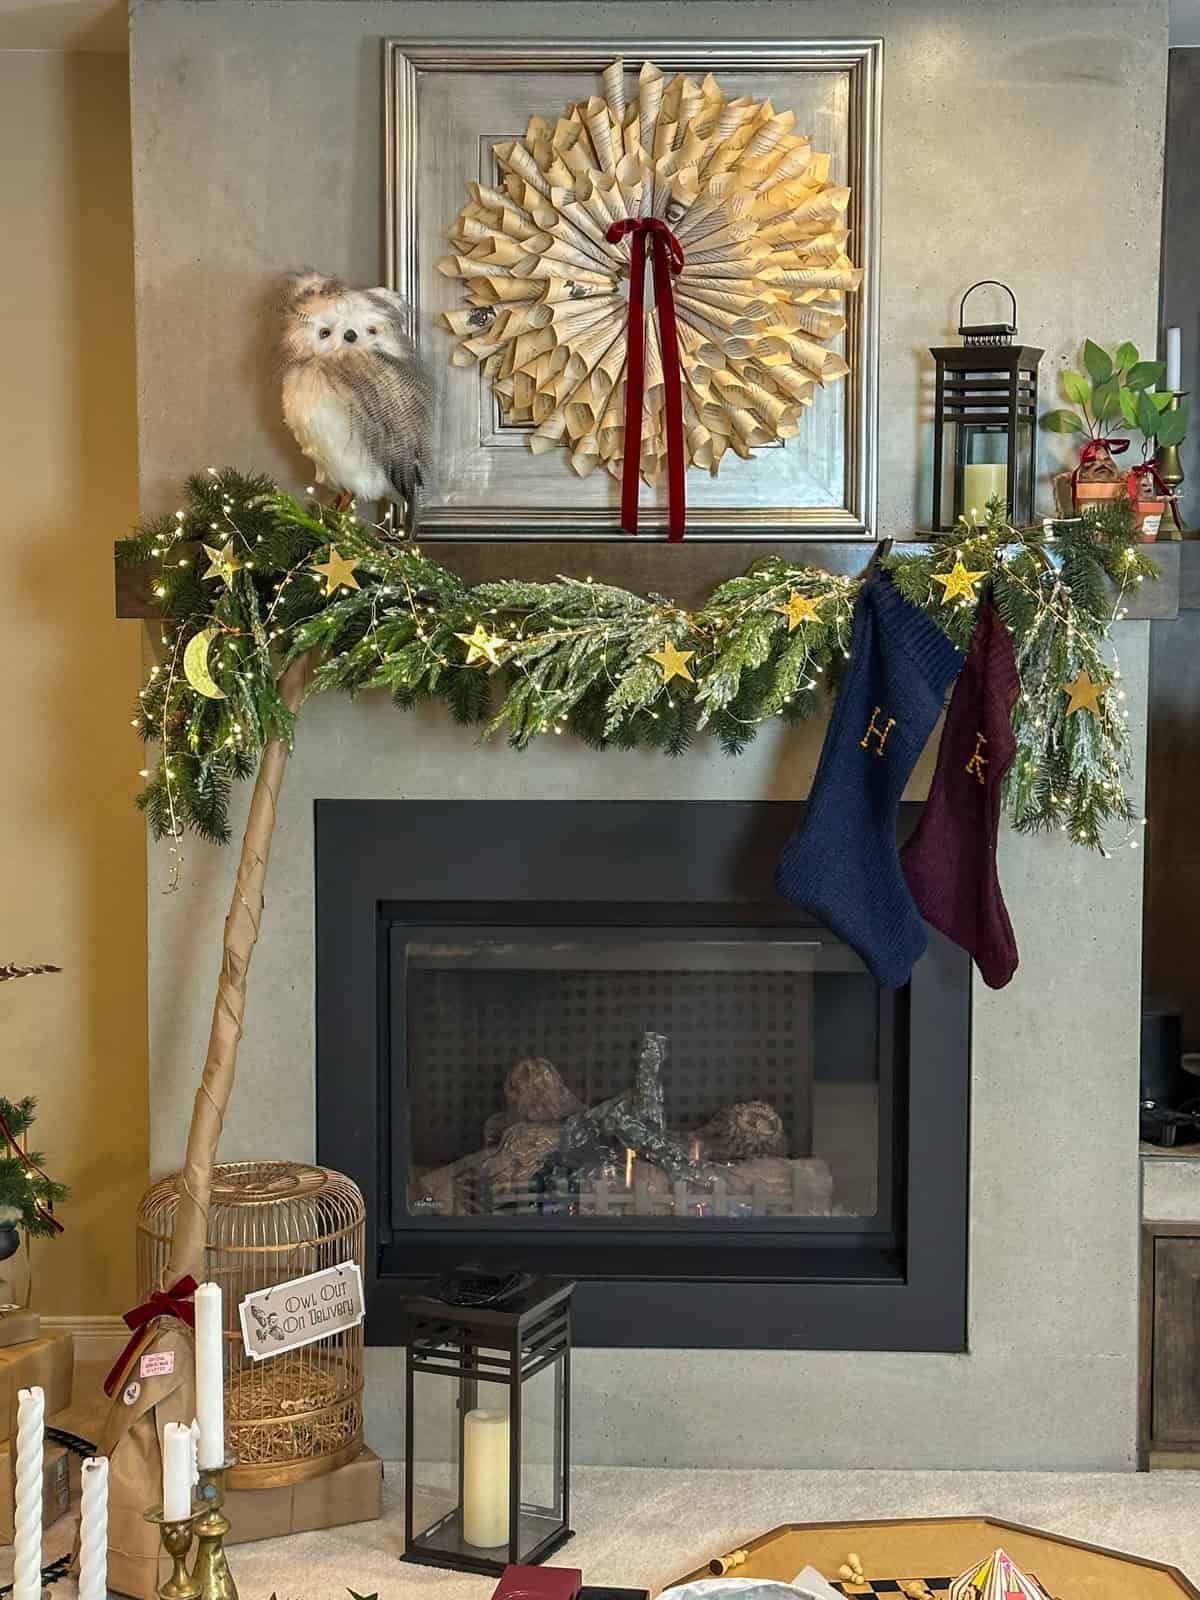
This book page wreath is stunning and simple! Using pages from an old Harry Potter paperback creates a beautiful vintage focal point.
Create or purchase a wreath base (cut a ring from sturdy cardboard or use foam form, about 12-14 inches outer diameter). Tear pages from the Harry Potter book. Roll each page into a tube, keeping one end tighter to create a cone shape. Secure with a dot of hot glue. Starting with the outer edge, hot glue rolled pages side by side around the circumference with tight ends toward center. Continue adding rows, working toward the inner circle, nestling each row into the previous. Cover the entire front until no cardboard shows. Tie a large red velvet bow and hot glue to the bottom or top. Attach a wire for hanging.
This uses a LOT of pages, so put on a Harry Potter movie while you roll!
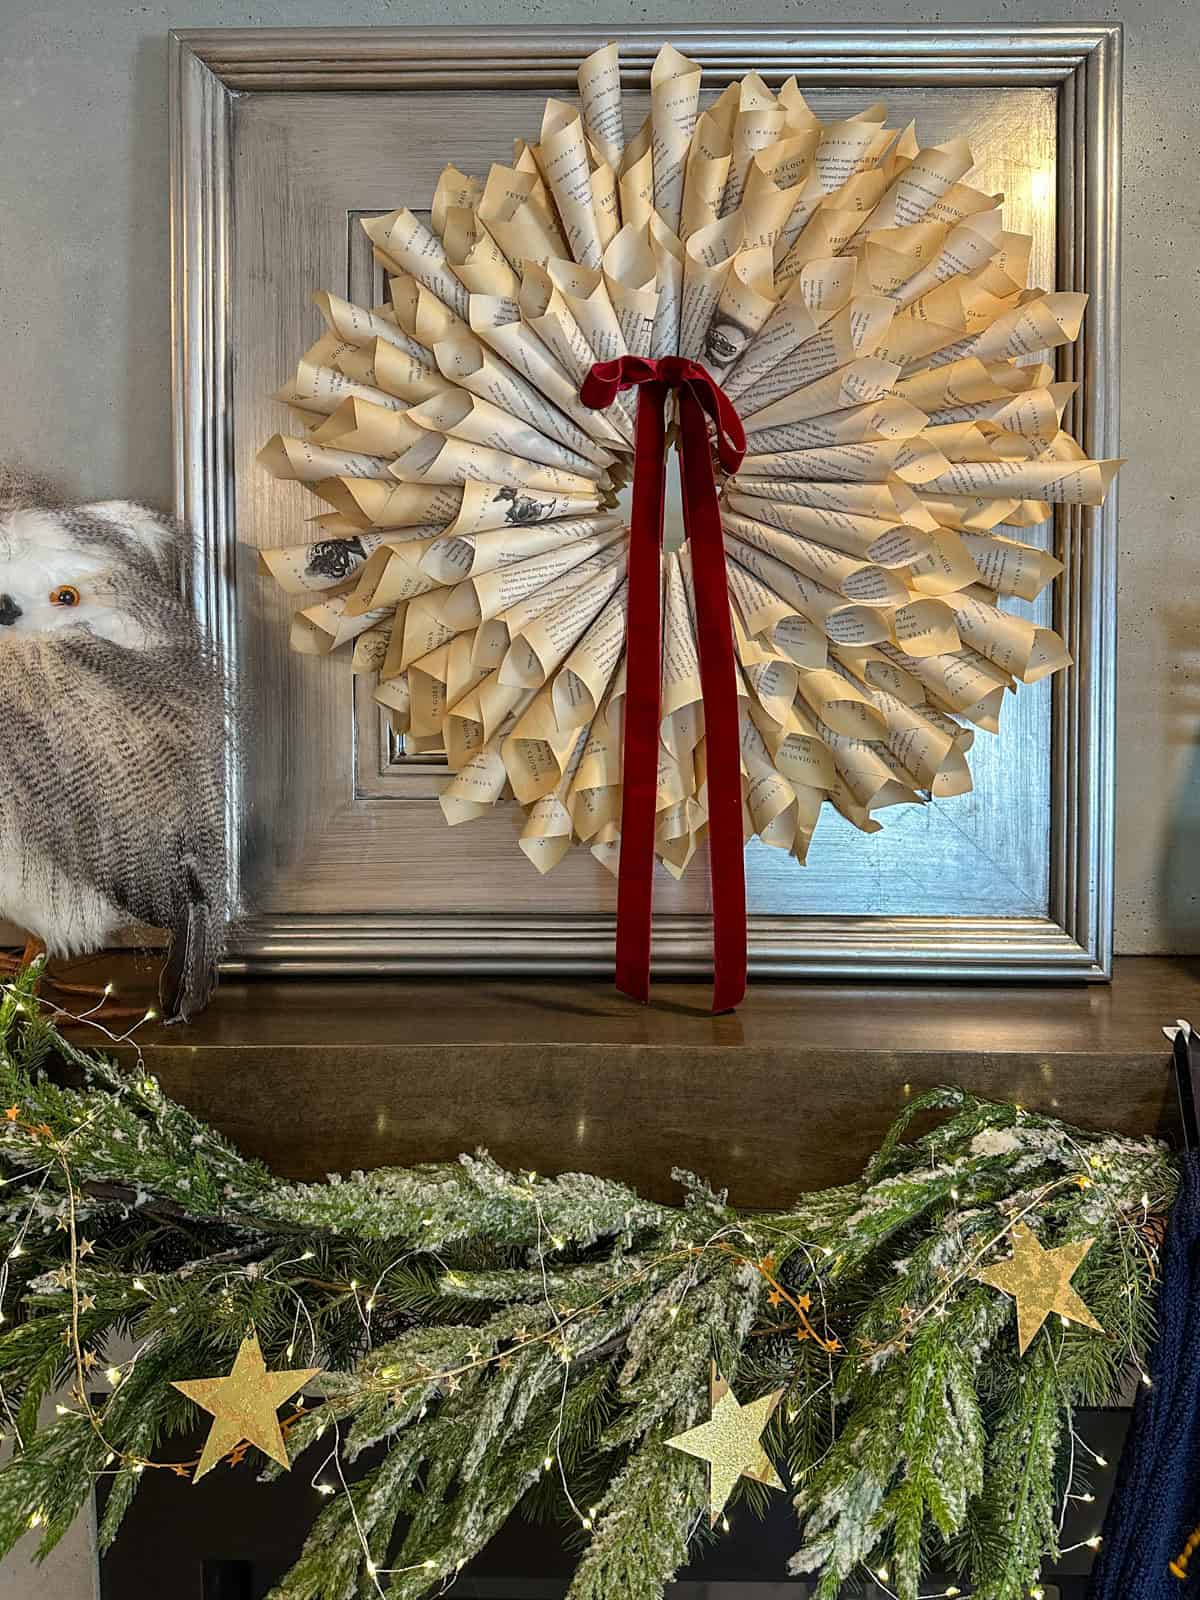
- Materials: Cardboard wreath base or foam form, old Harry Potter paperback ($3 thrift store), hot glue gun, red velvet ribbon.
- Time: 2-3 hours (mostly rolling!)
- Cost: ~$5
- Difficulty: Beginner
DIY Mandrake Plants
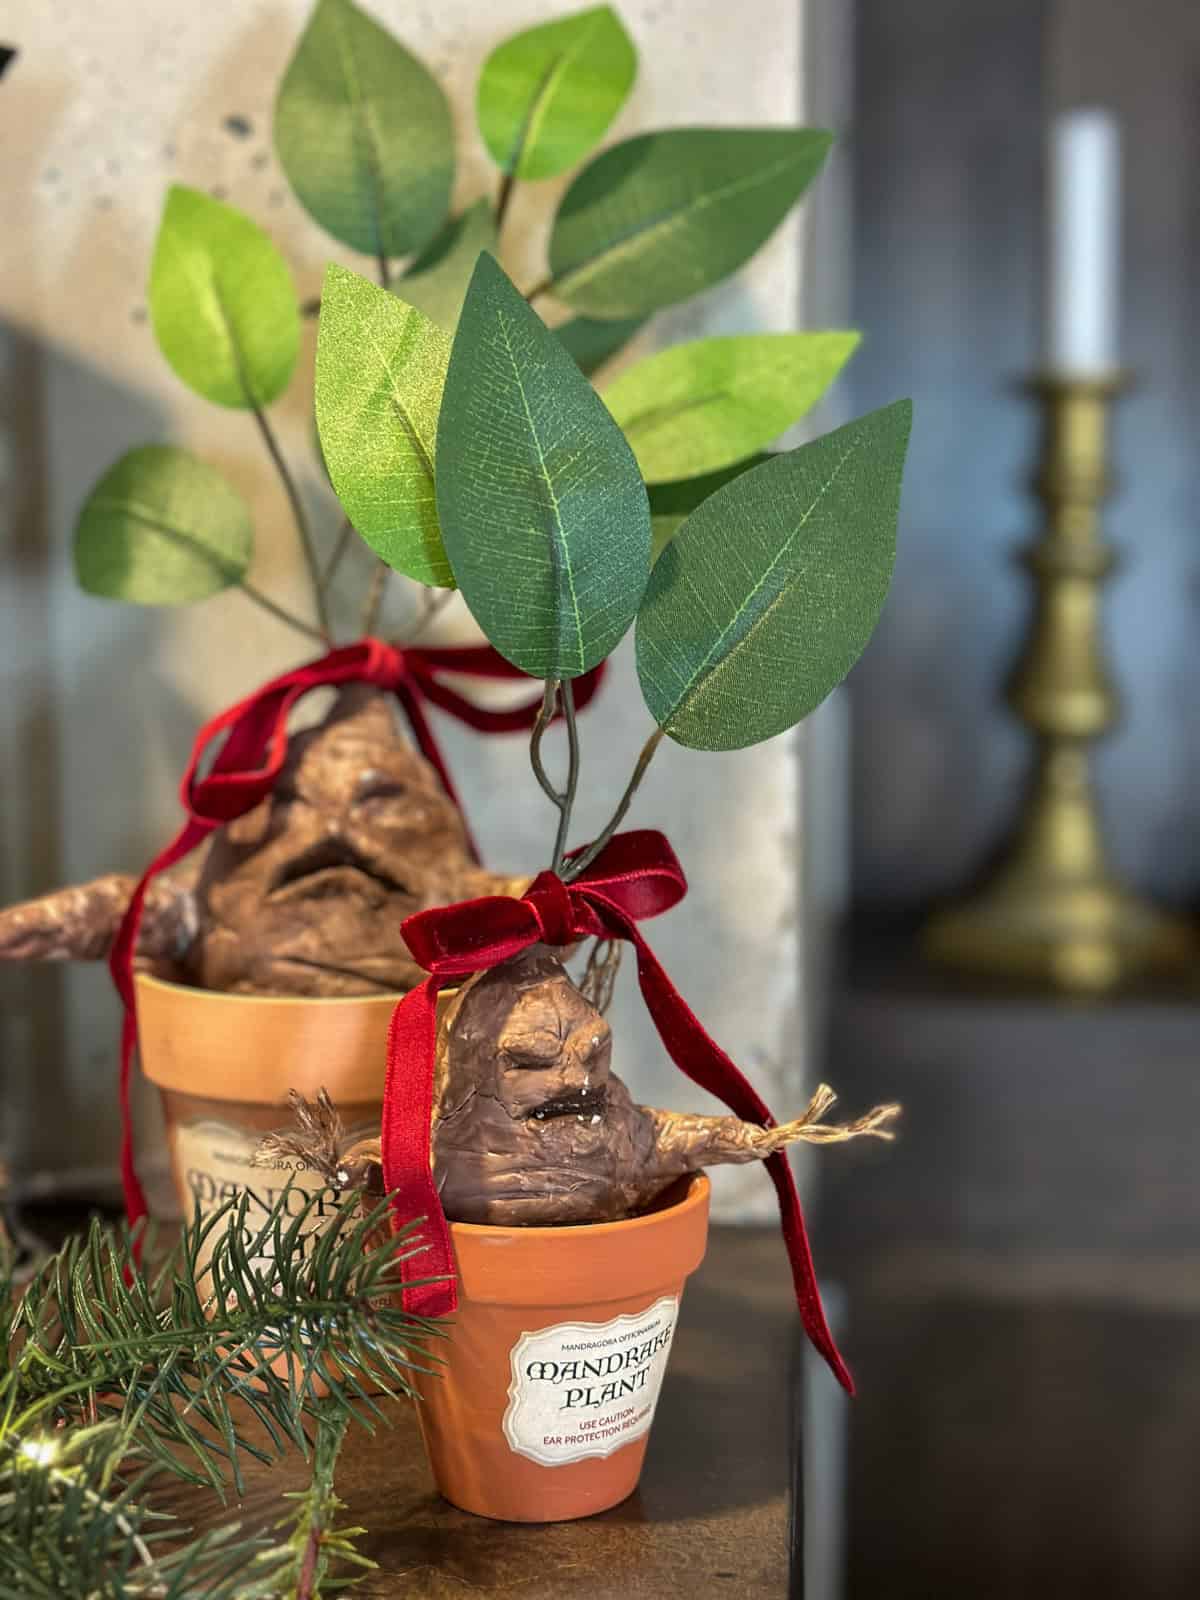
The mandrakes were a project I made for our DIY Harry Potter decor a few years ago. They're made out of air dry clay, that I moulded around a tin foil base, with pieces of twine for root like hands, and some faux leaves at the top. They're painted with acrylic paints and nestled into some little terra cotta pots, with free printable mandrake plant labels. For Christmas, we just added a red bow.
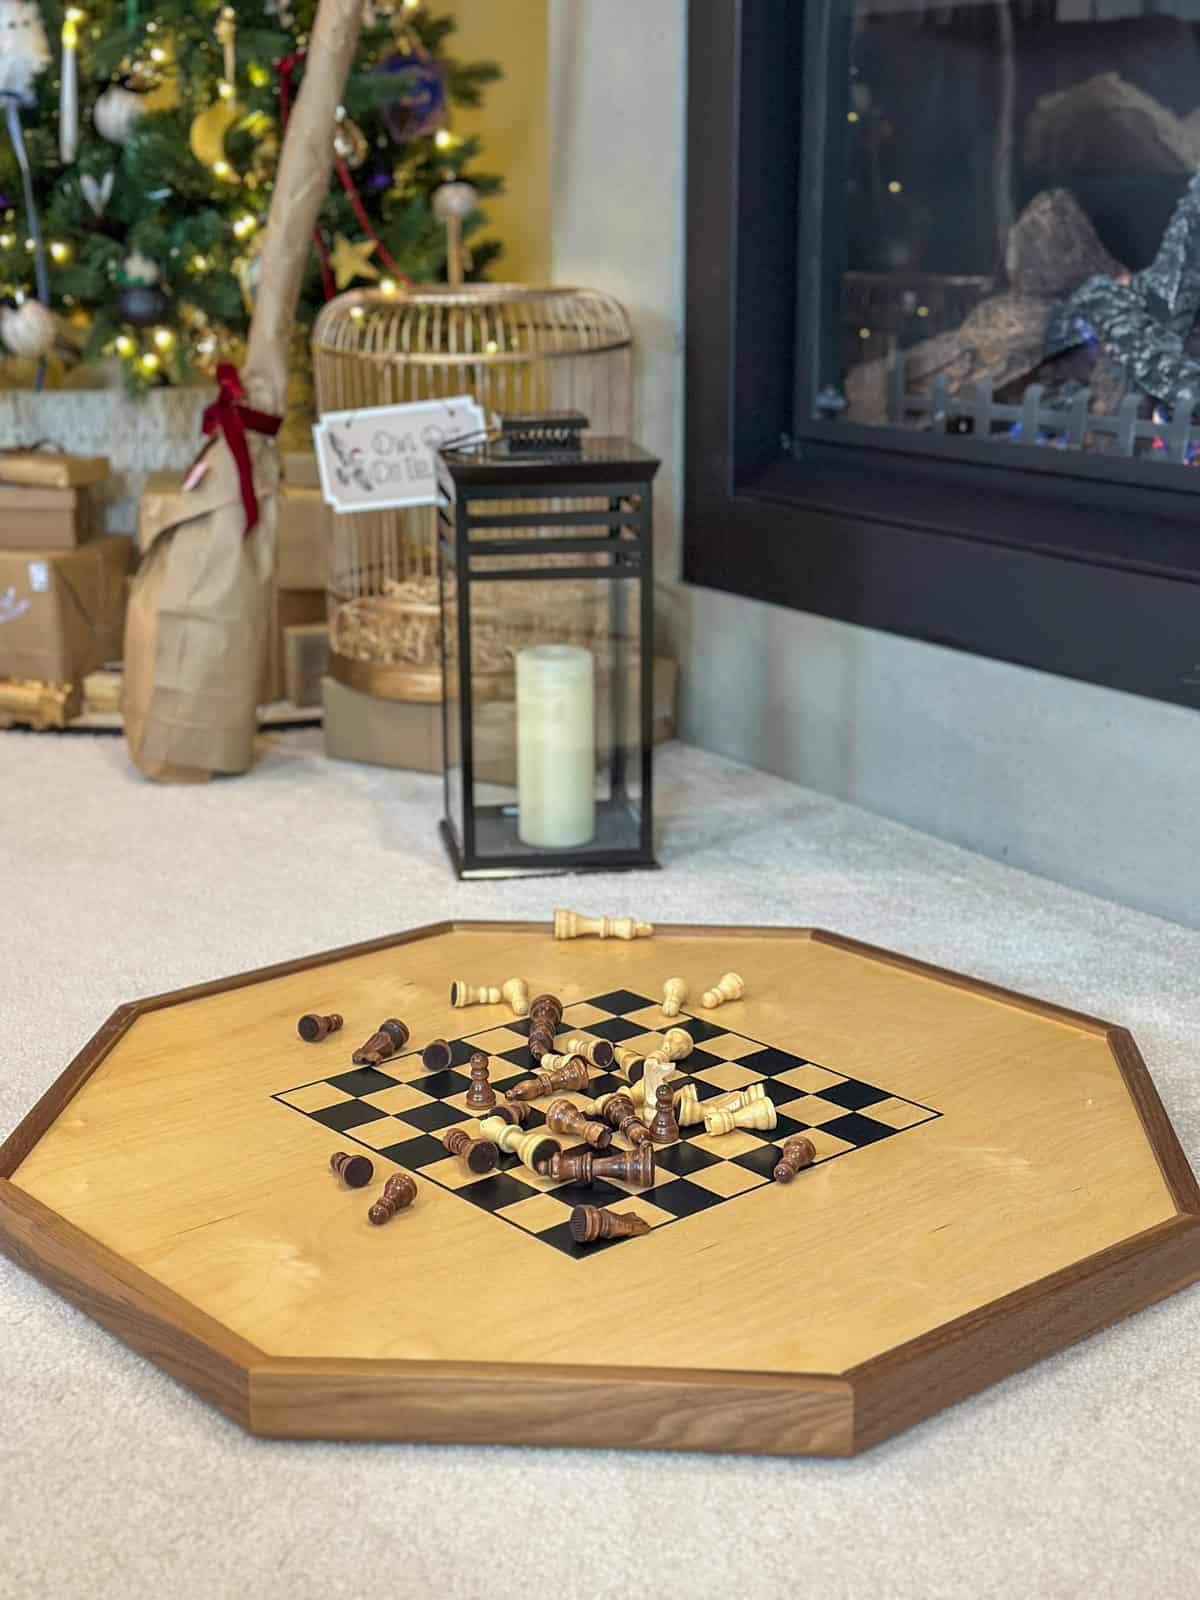
Wizards Chess: In front of the fireplace, we had to set up a game of Wizards' chess, or just regular chess in our case. We just love the scene in the first book, Harry Potter and the Sorcerer's Stone, where after their big Christmas feast in the great hall, and then playing in the snow, they come in and spend Christmas evening by the fire in Gryffindor common room playing chess and having a cozy dinner.
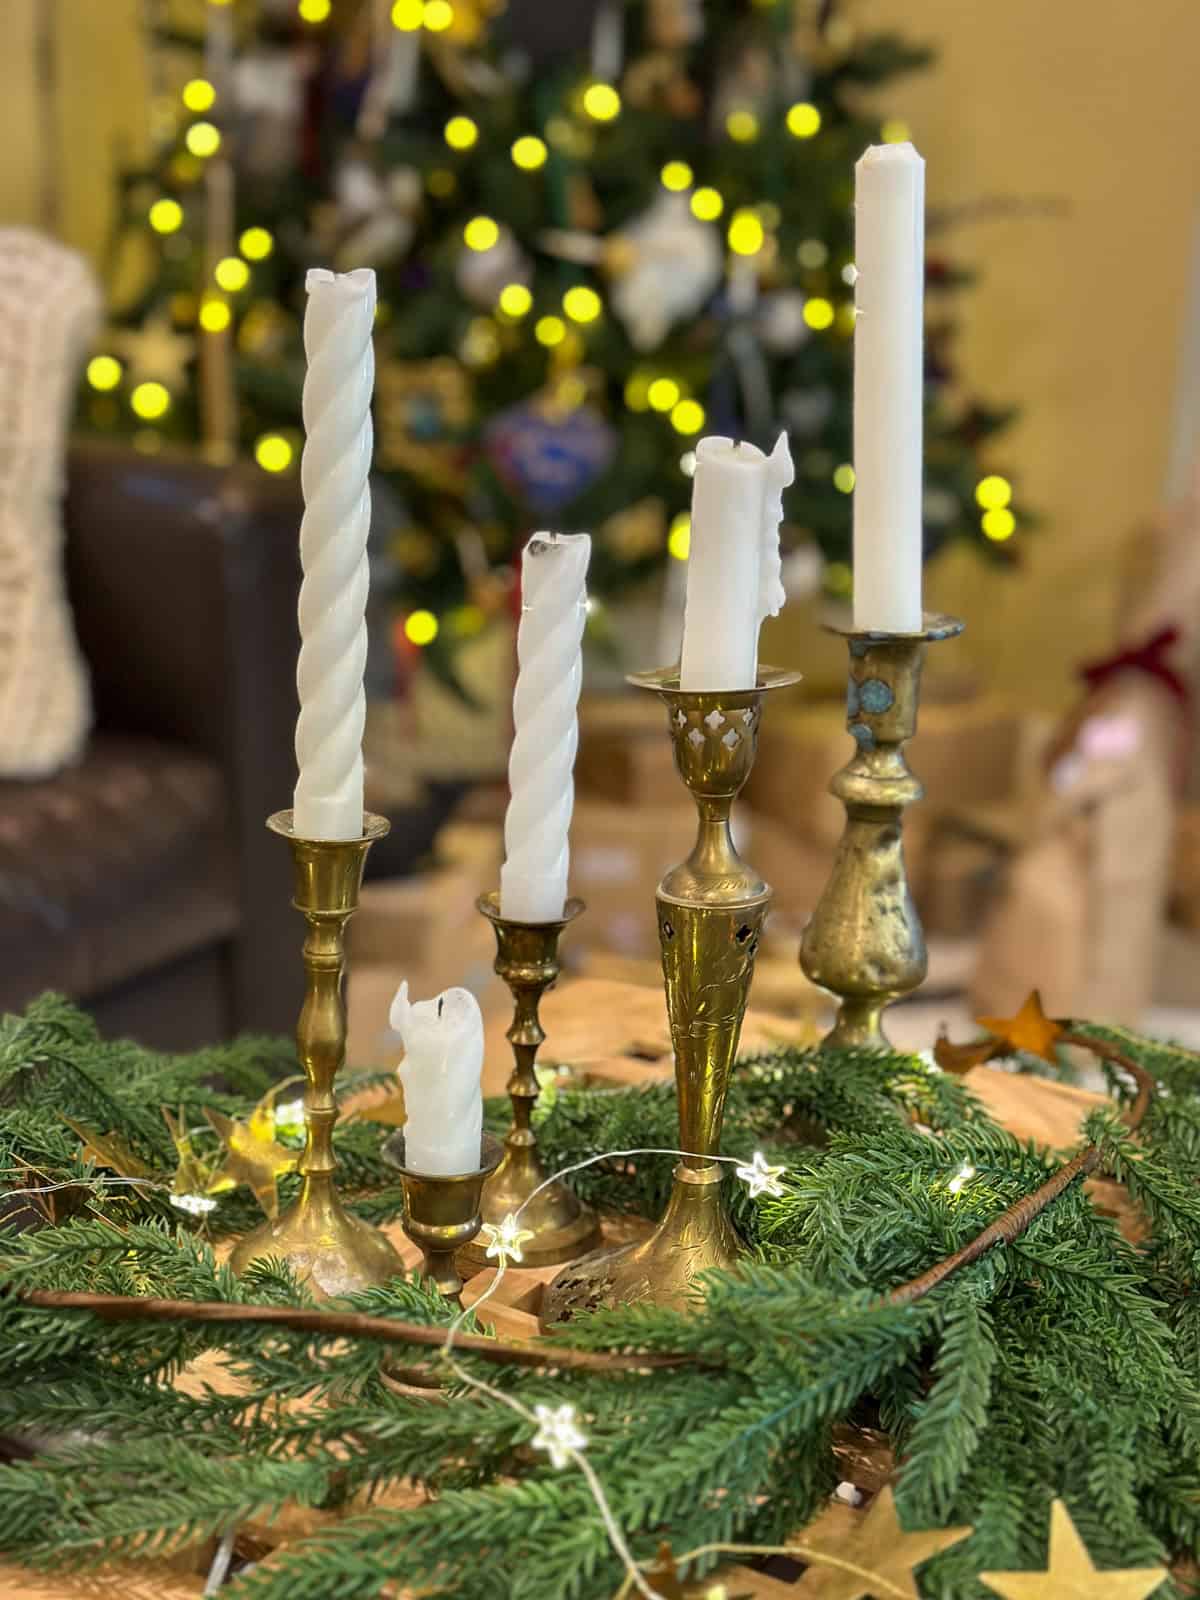
On built-in shelves: Vintage books, brass candlesticks at various heights, a pet spider in a vintage jar, and a mini dragon skeleton from the dollar store Halloween decoration, dressed up for Christmas with another red bow.
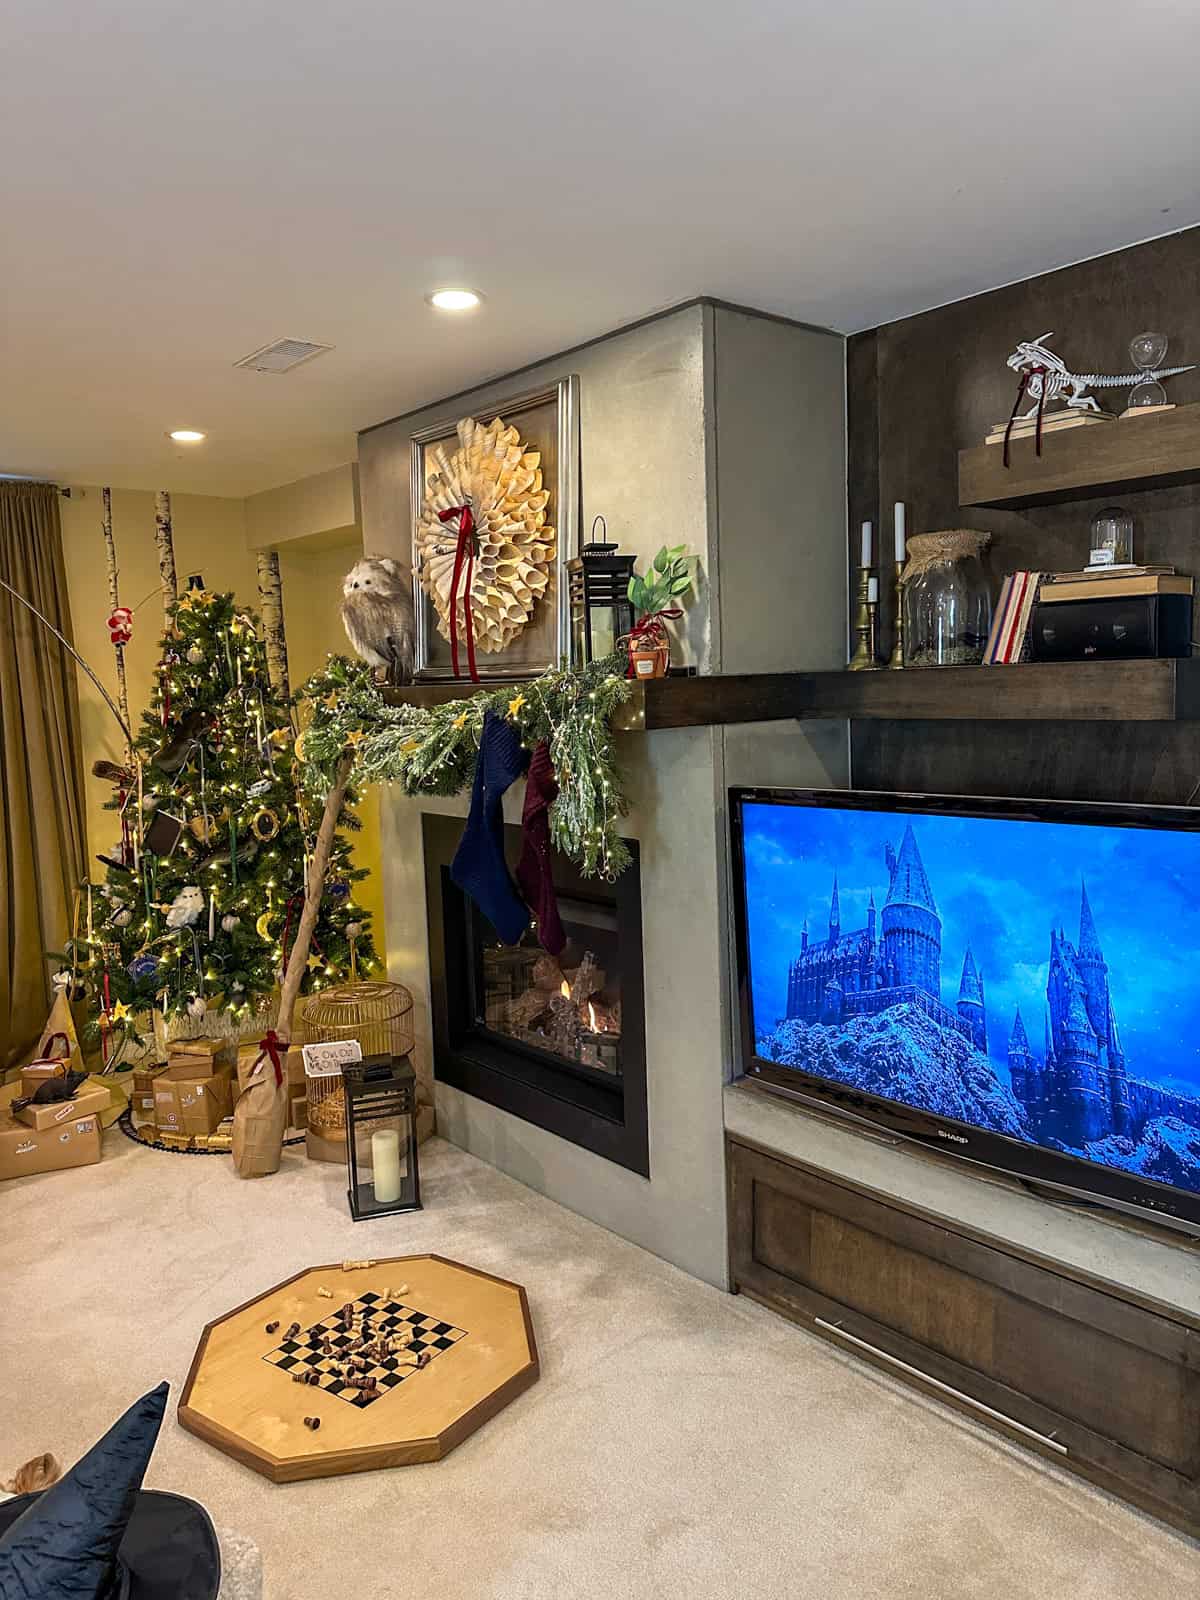
Coffee table: Over on the coffee table, we added more brass candlesticks, stars and garland. Someone is getting a new wand in an Ollivander's box for Christmas, which was actually a purchase from our visit to Universal Studios years ago. There's also a ceramic chocolate frog box with a few homemade chocolate frogs inside, a box of Bertie Bott's Every Flavour Beans, and Mrs. Weasley's fudge in a vintage tin. We also included a Mauder's Map, ordered online. We liked how it had different fold-out parts. And resting on top of it is the wand to turn the floating candles on and off on the Christmas tree.

Mrs. Weasley's Fudge
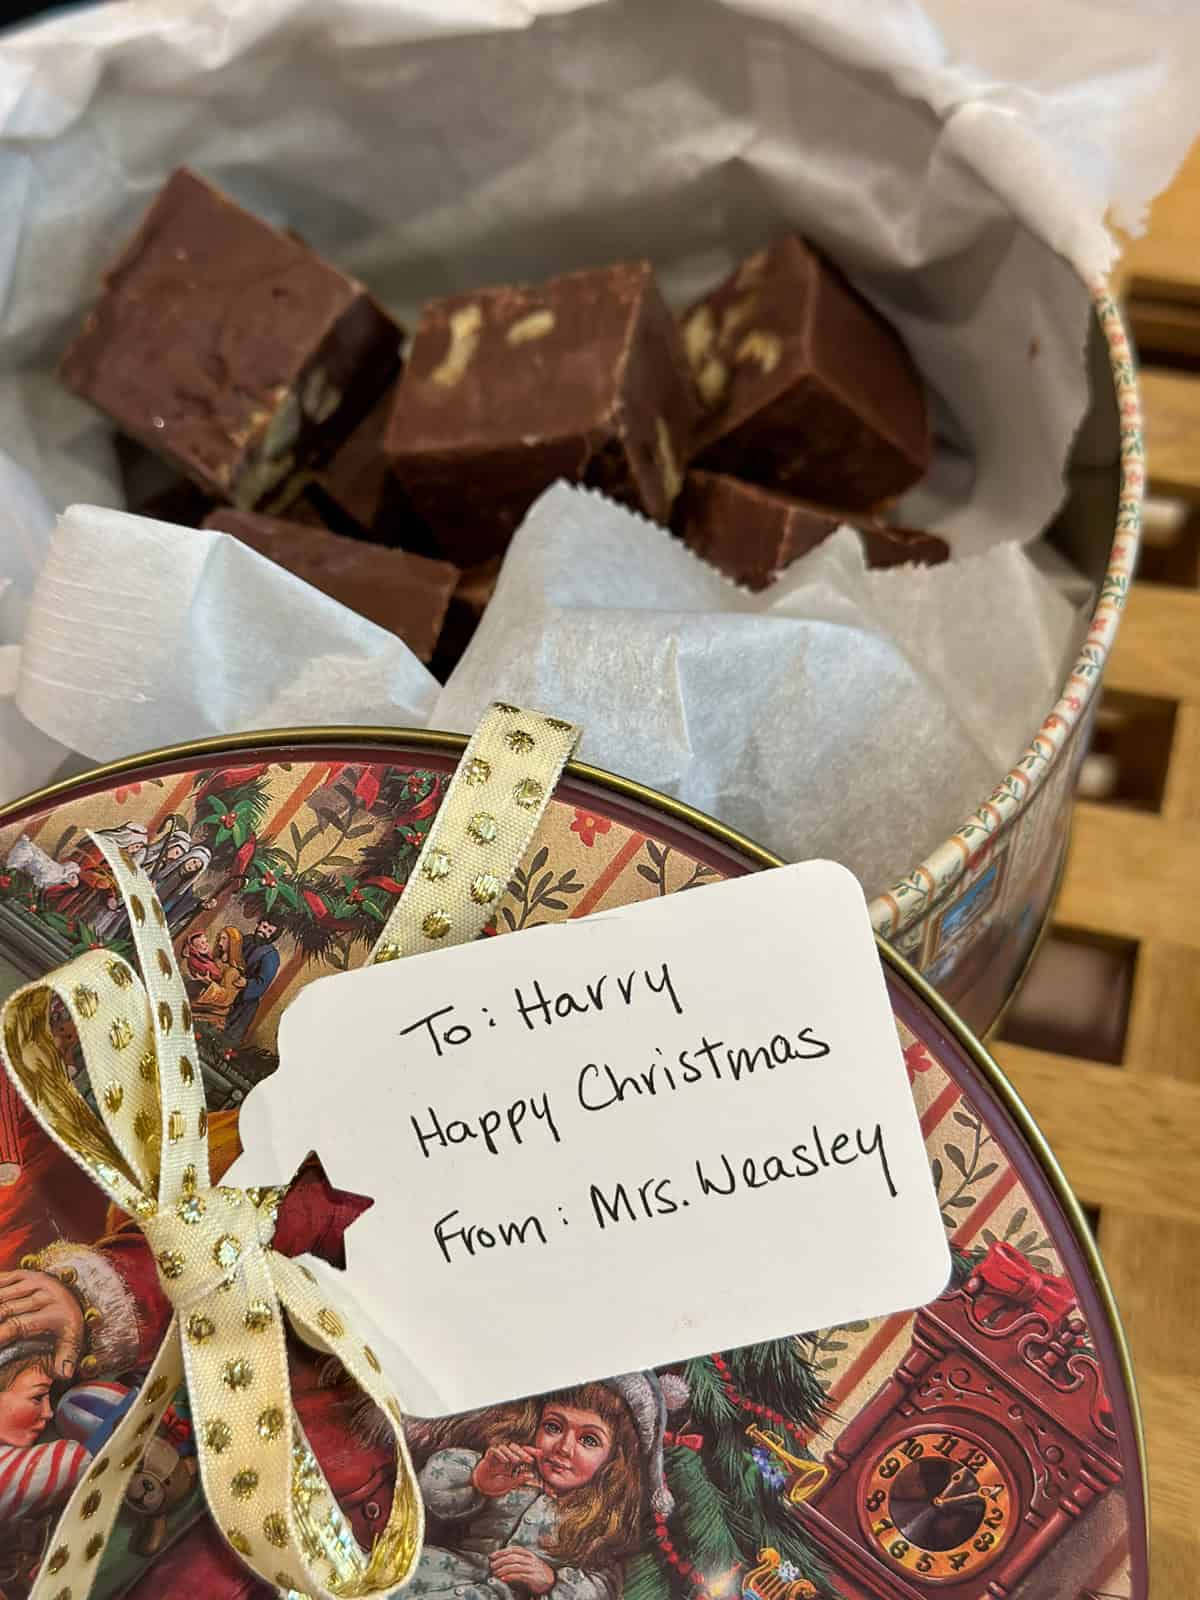
Such a sweet detail! A vintage tin filled with homemade chocolate fudge with a tag reading "To: Harry, Happy Christmas From: Mrs. Weasley." Recreating the Christmas gift Mrs. Weasley sent Harry in the first book, Harry Potter and the Sorcerer's Stone, was such a fun detail. Make this simple homemade fudge with just a few ingredients. Find our Mrs. Weasley's Chocolate Walnut Fudge Recipe here. And be sure to place it in a Christmas tin. We found ours at the thrift store, and created a gift tag to go with it, tied with some starry ribbon.
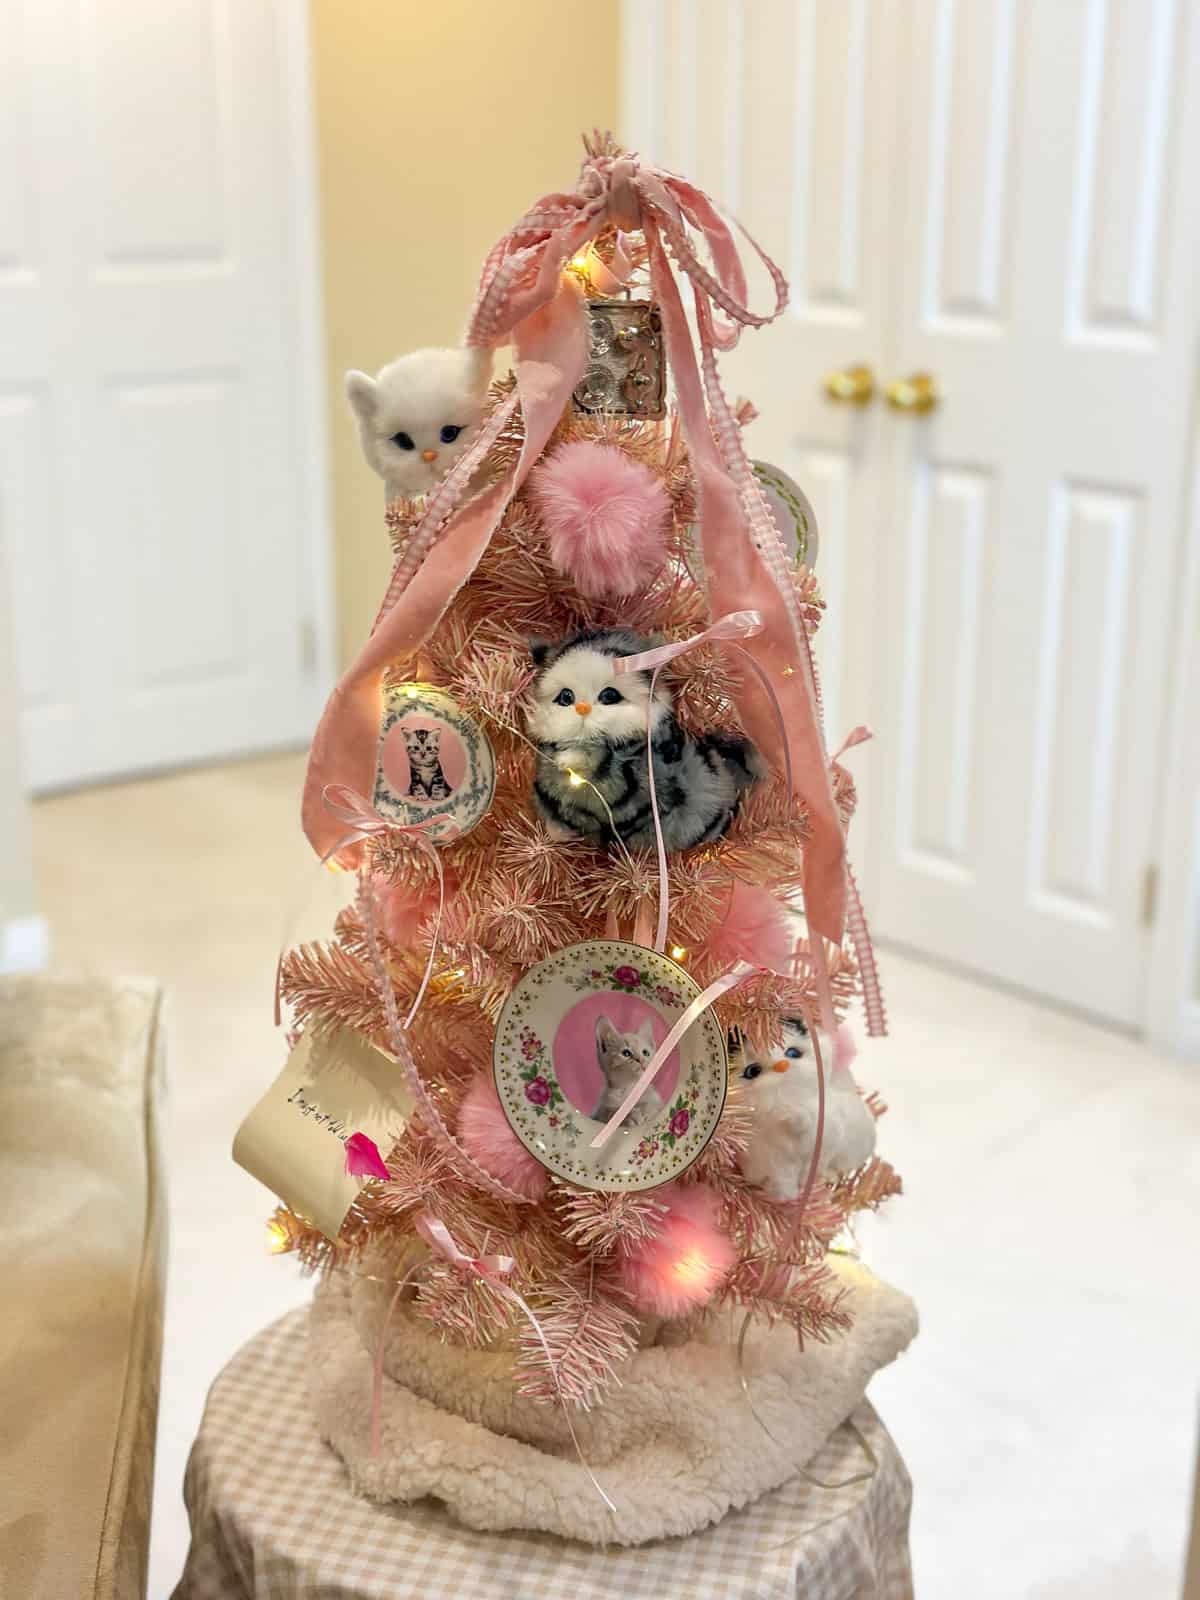
Dolores Umbridge Christmas Tree

We were inspired by our favorite villain, to make our very own Dolores Umbridge Christmas Tree, and it could not be cuter -in an evil kind of way. 😉 While Umbridge isn't anyone's favorite character, her distinctive pink and cat aesthetic is undeniably charming. This tabletop tree is all pink, fluffy, and covered in cats -exactly as Umbridge would want it.
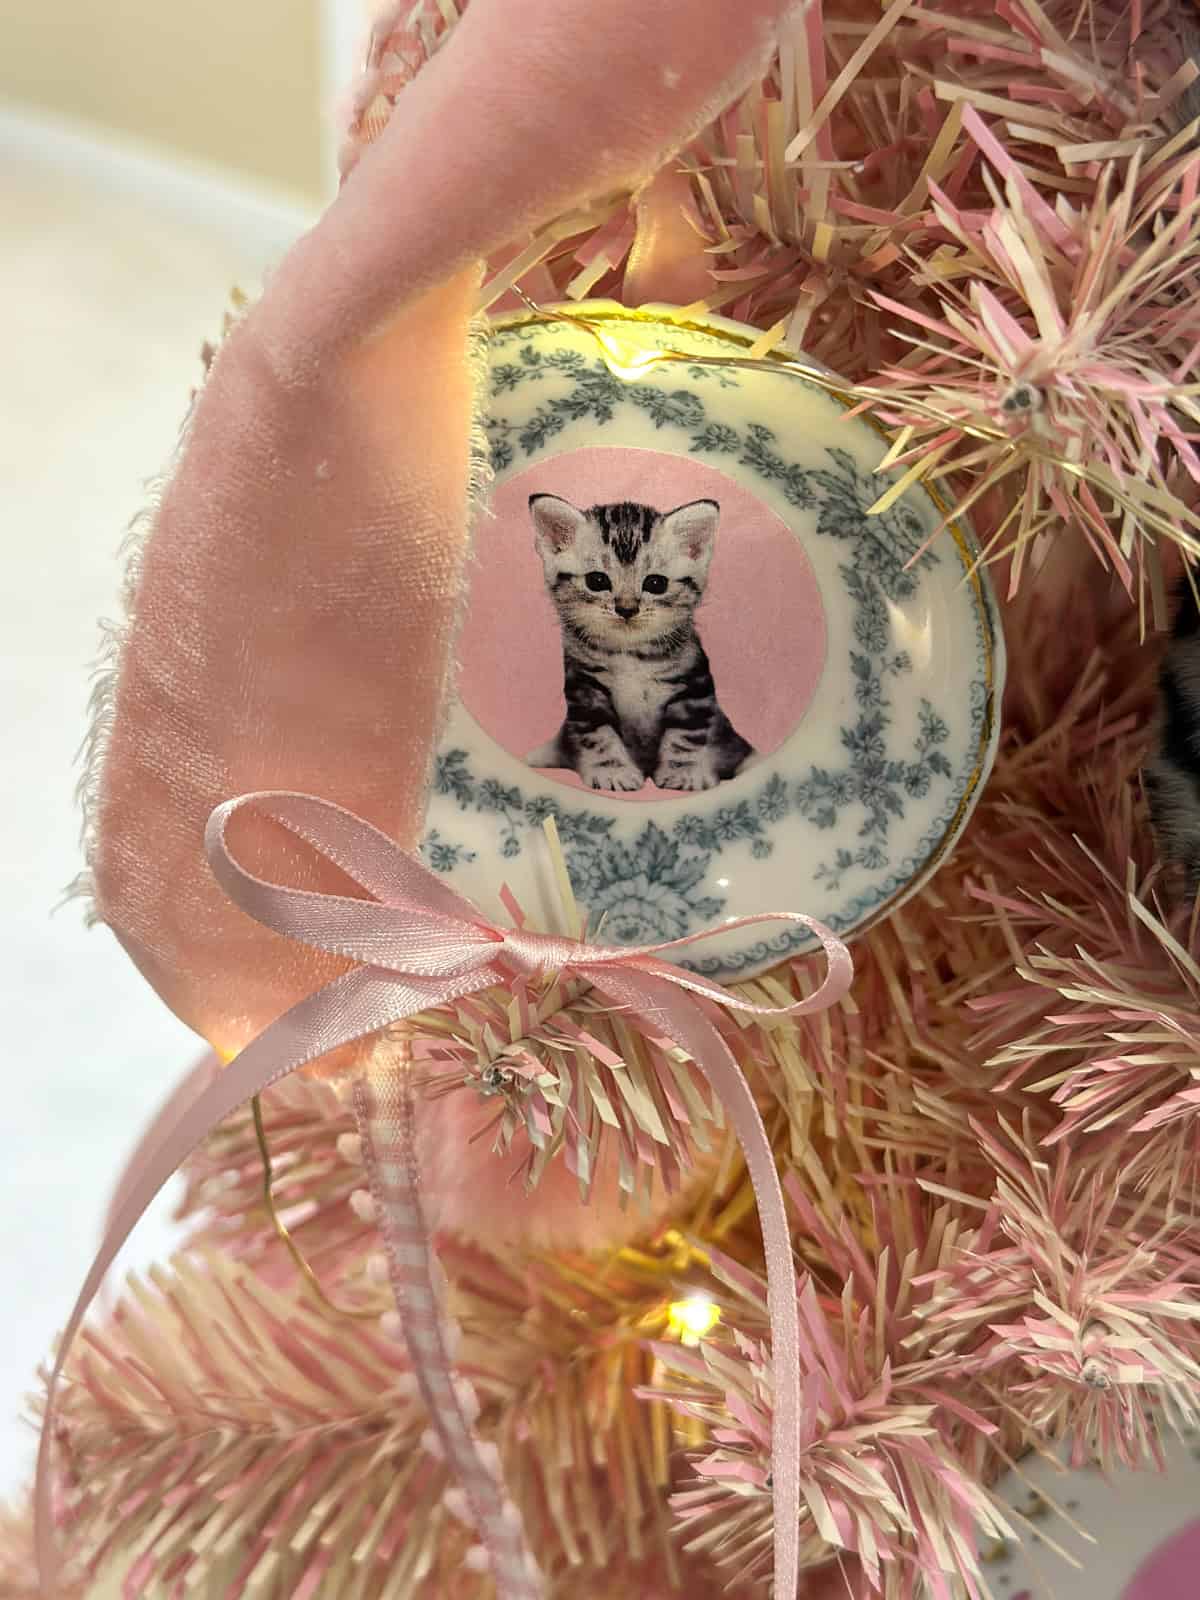
DIY Cat Plate Ornaments
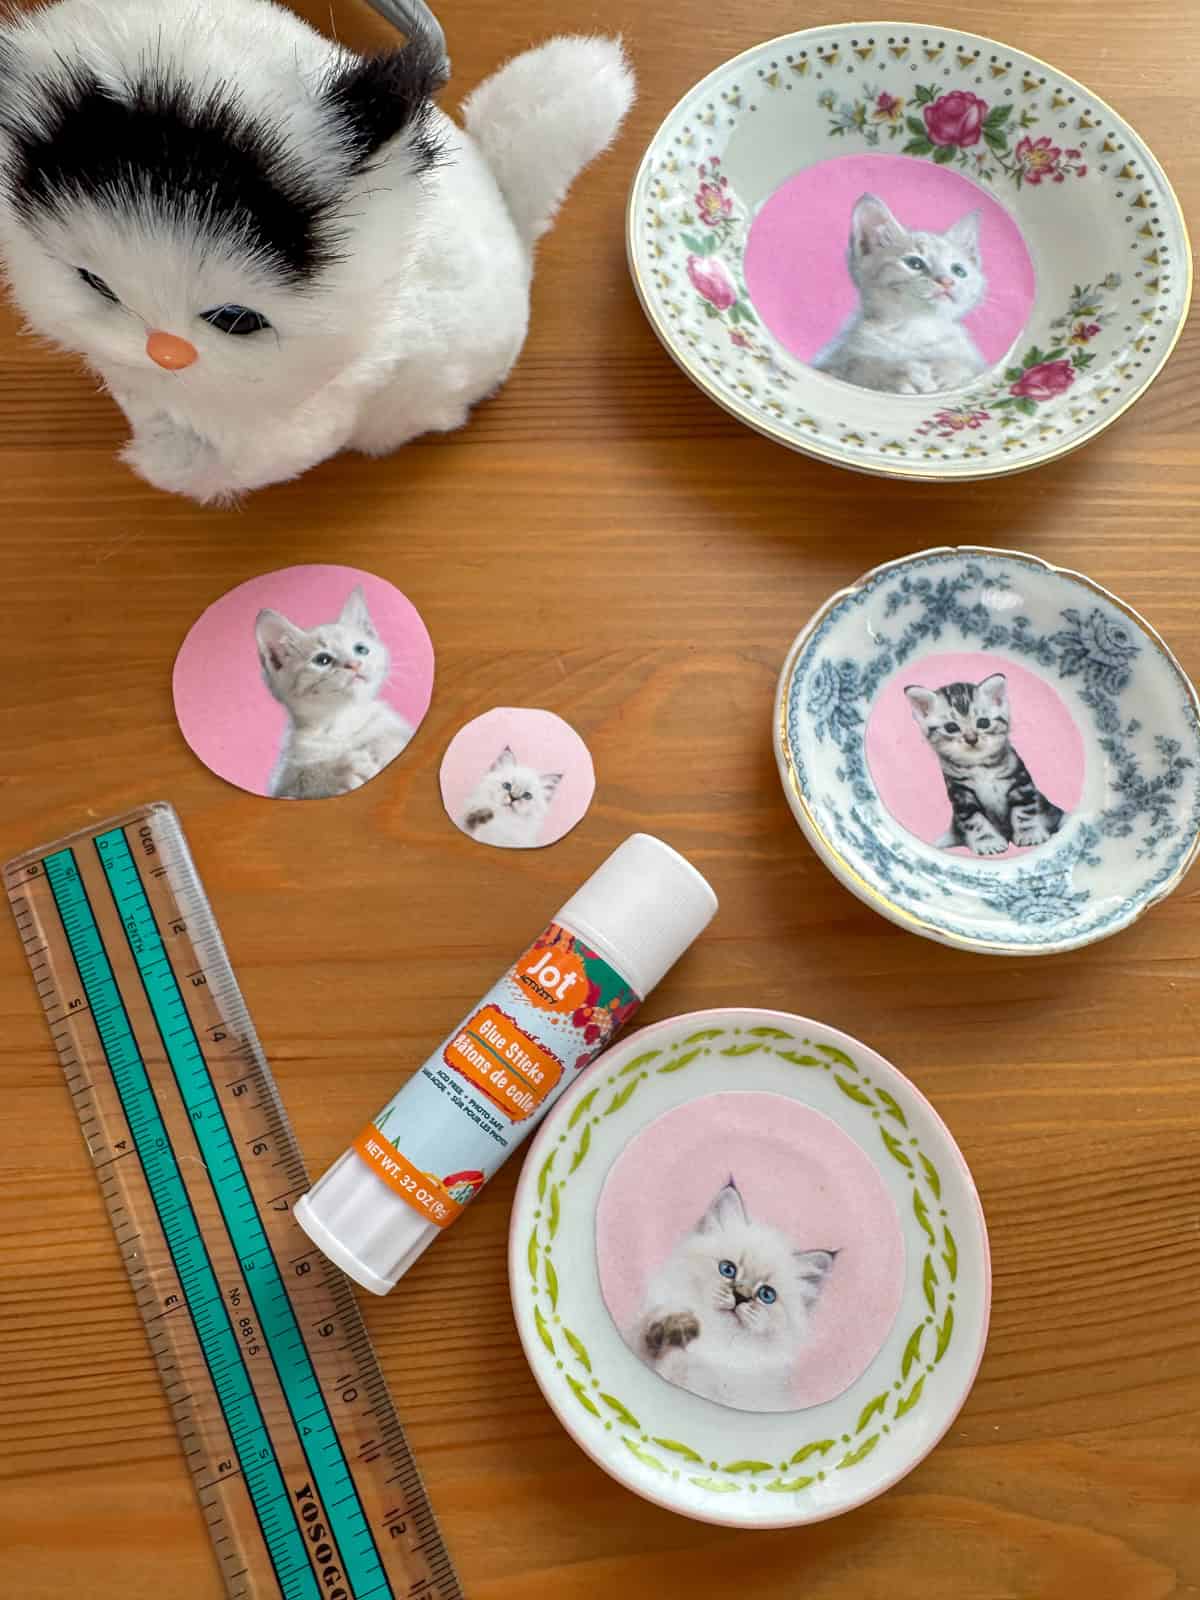
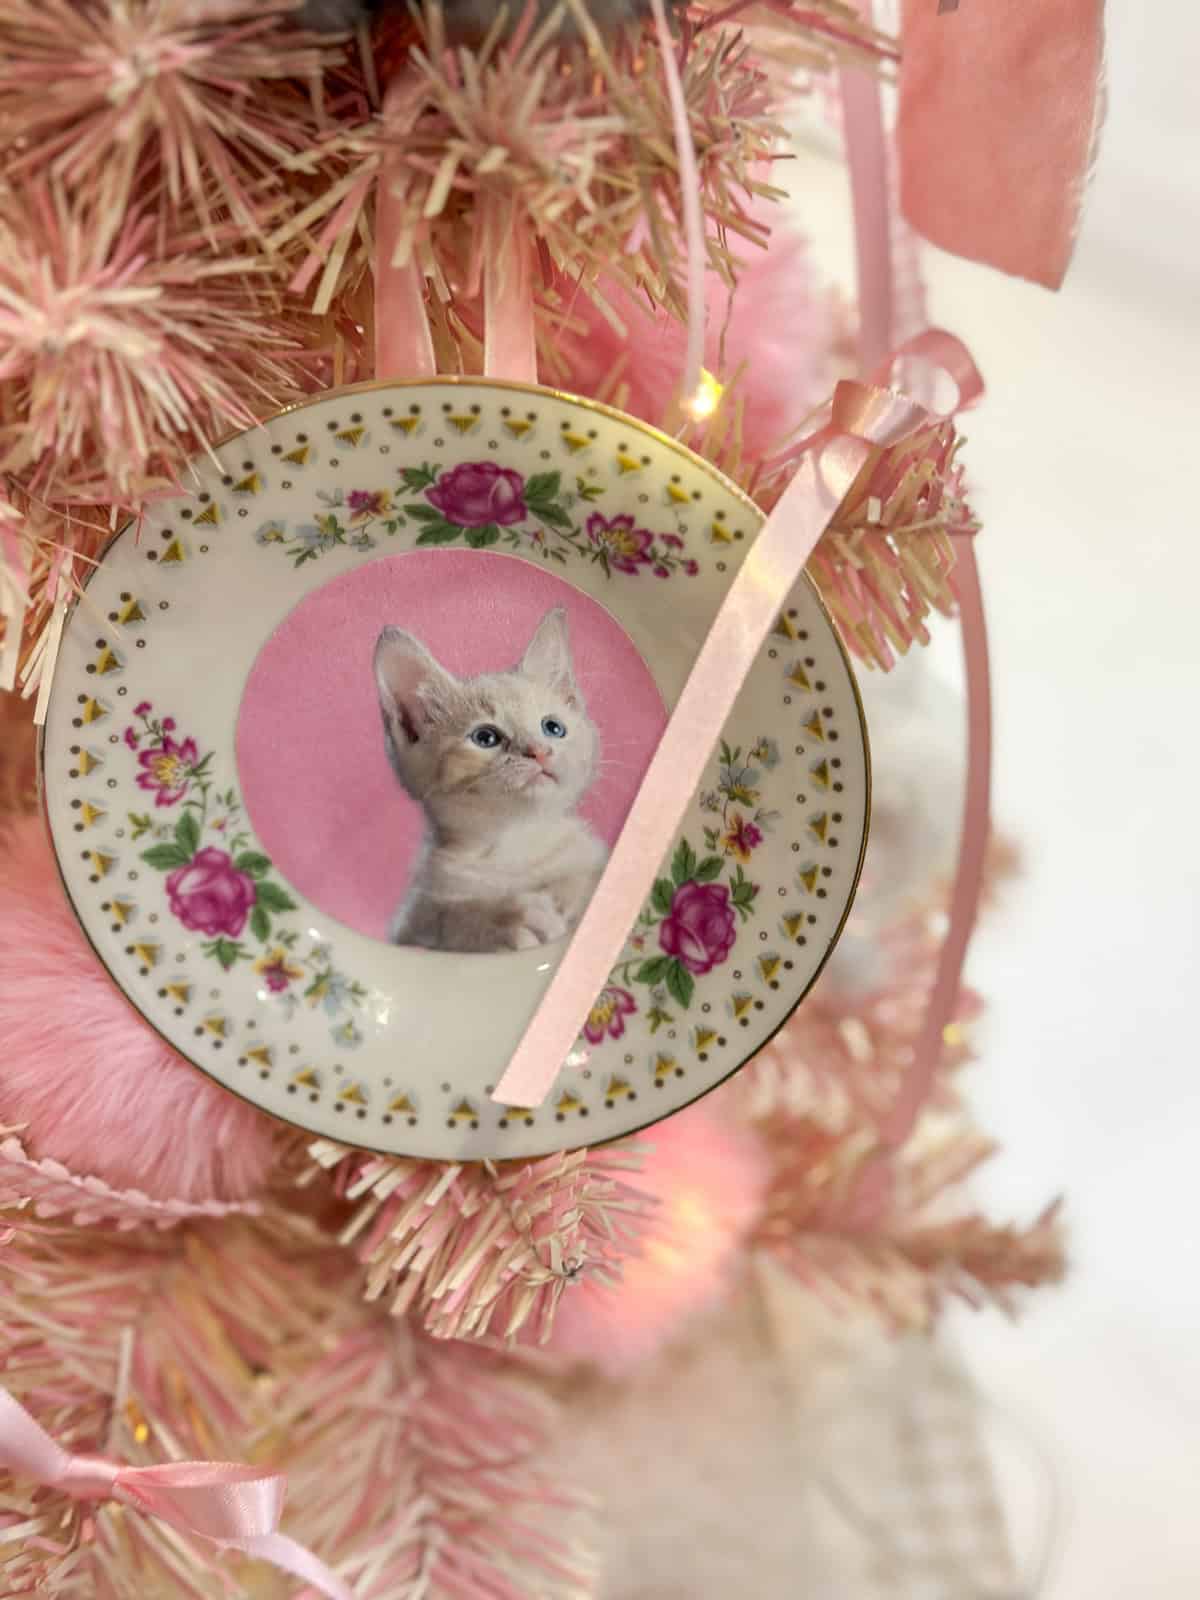
These cat plate ornaments are everyone's favorite! Made with real china mini plates and our free cat printables, they're surprisingly easy.
Gather mini plates. We used a vintage mini espresso saucer, a butter pat plate, and a small doll plate. Look for these at antique stores, thrift stores, checking the kitchen sections, doll accessories, and decorative plate areas. Download and print our free cat images on copy paper and cut out carefully. Adjust the size with your printer if necessary. Decide if you want removable (use glue stick) or permanent (use Mod Podge). Apply glue to the back of the image, center on the plate and press firmly. If using Mod Podge, apply topcoat over the image. Let dry. Hot glue pink velvet ribbon to the back, creating a loop for hanging.
Mix different plate sizes for interest. The more ornate and vintage the plates, the better!
- Materials: Mini plates (thrift stores, 2-4 inches diameter), our free cat printables, paper, scissors, glue stick OR Mod Podge, pink velvet ribbon, hot glue gun.
- Time: 5-10 minutes each
- Cost: $1-5 each
- Difficulty: Beginner
Other Umbridge Tree Ornaments
Miniature Silver Tea Set: Dolores has a silver tea set on her desk, and it inspired us to find a miniature tea set from the dollhouse furniture section. Look for one that comes with a tray, and then simply hot glue the pieces to the tray, and add a velvet ribbon for hanging as an ornament. Cost $5
"I Must Not Tell Lies" Ornament: Inspired by the horrible scene from the movie when Harry has to serve detention as punishment in Order of the Phoenix, when the magic quill carved the words Harry has to write into his hand. We made a free printable of the phrase, just print it onto some cream colored cardstock, and cut it into a scroll shape, curling the top and bottom slightly. To attach the feather quill, use a small piece of wire inserted into the bottom of the feather shaft, and then make a hole in the paper and insert the wire, bend it against the paper, and use some tape to hold it in place. Bonus points for using a pink feather to match the tree. 😉

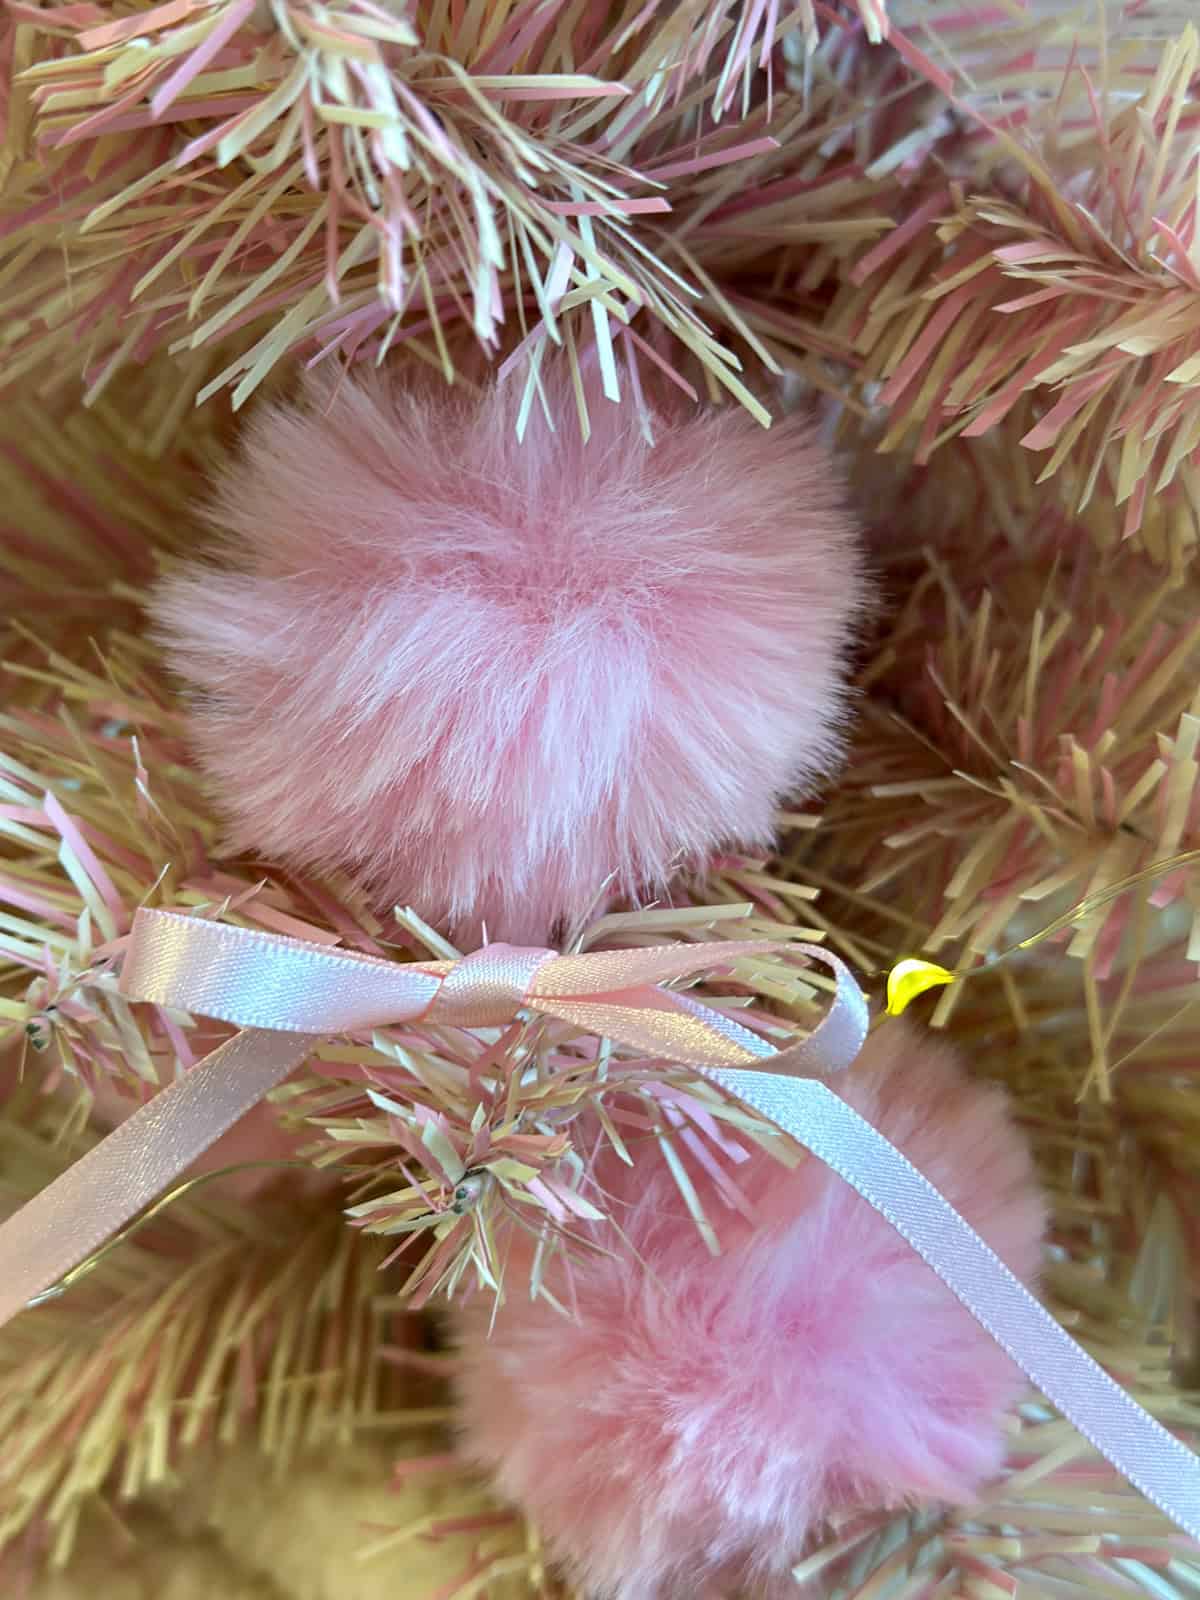
Pink Fur Balls: Fluffy faux fur pink pom-poms throughout, bringing all the fluffy kitten vibes. Cost $6 for 12
Kitten Figurines: We used small kitten decorations, made with faux fur, and about 4 inches tall and wide. You could also look for cat themed Christmas ornaments. Cost $6 each
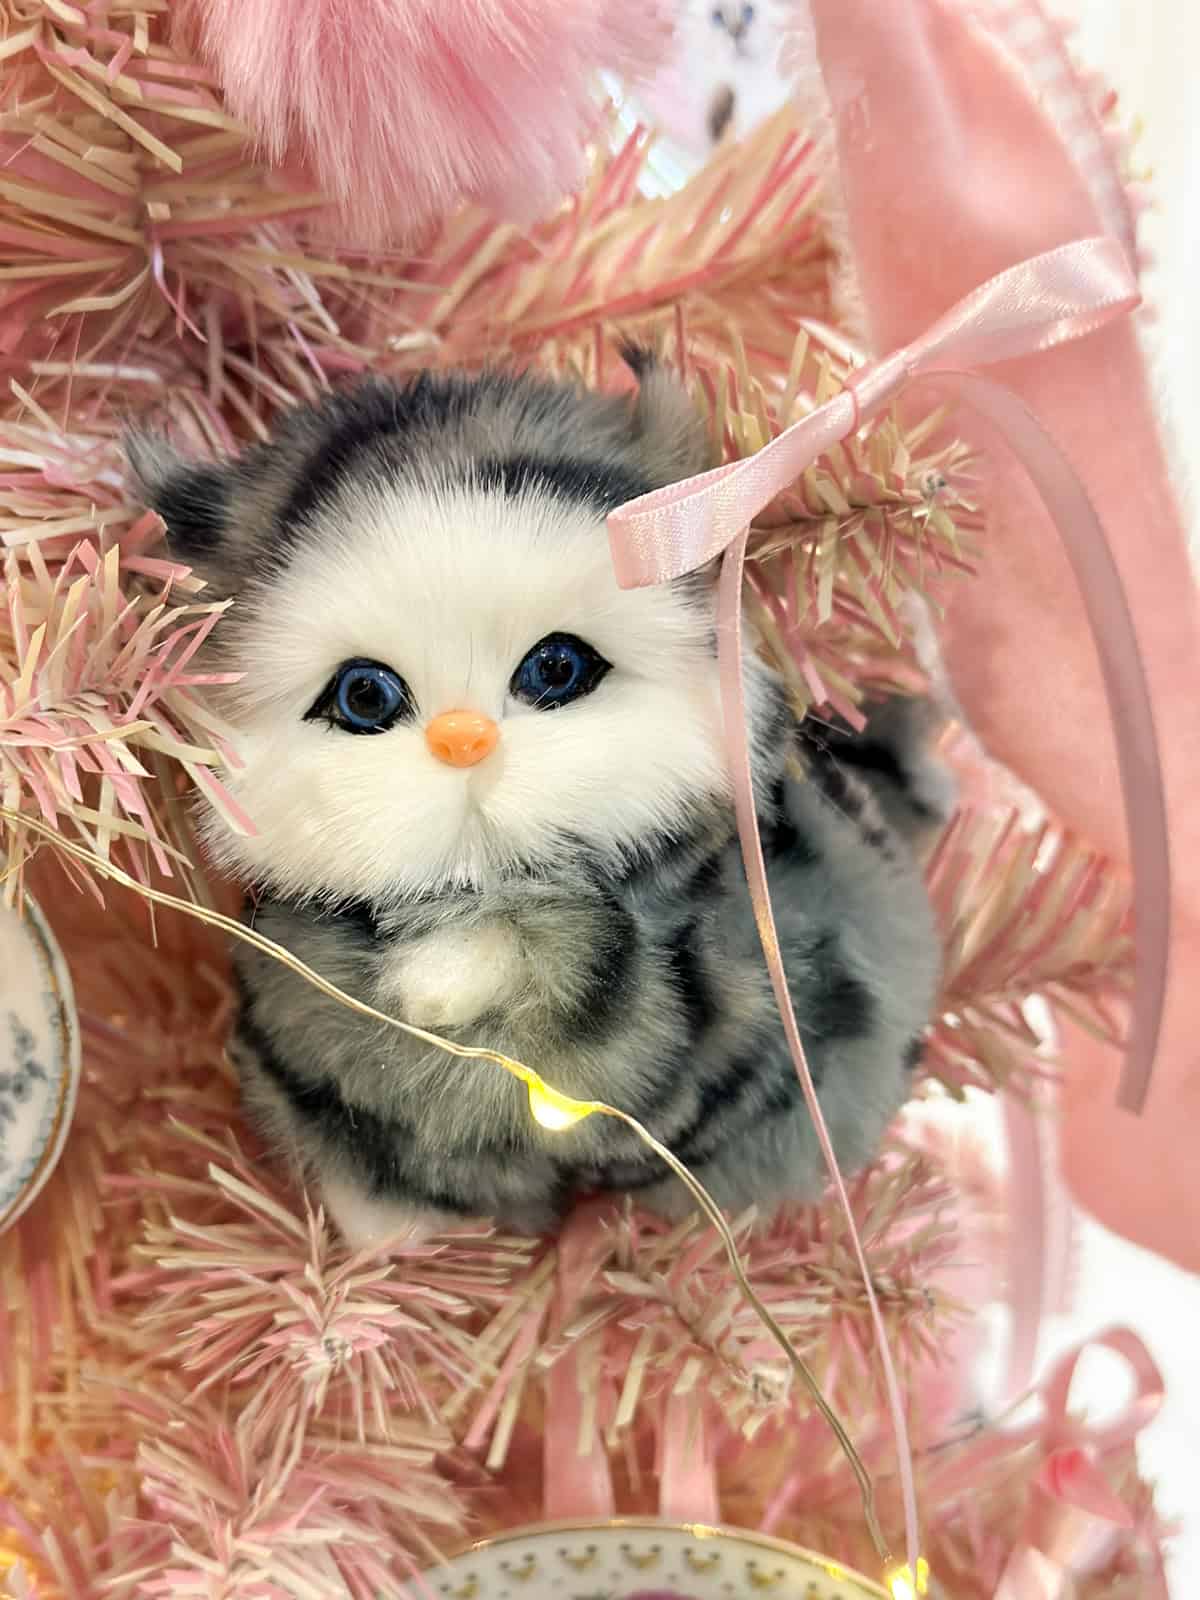
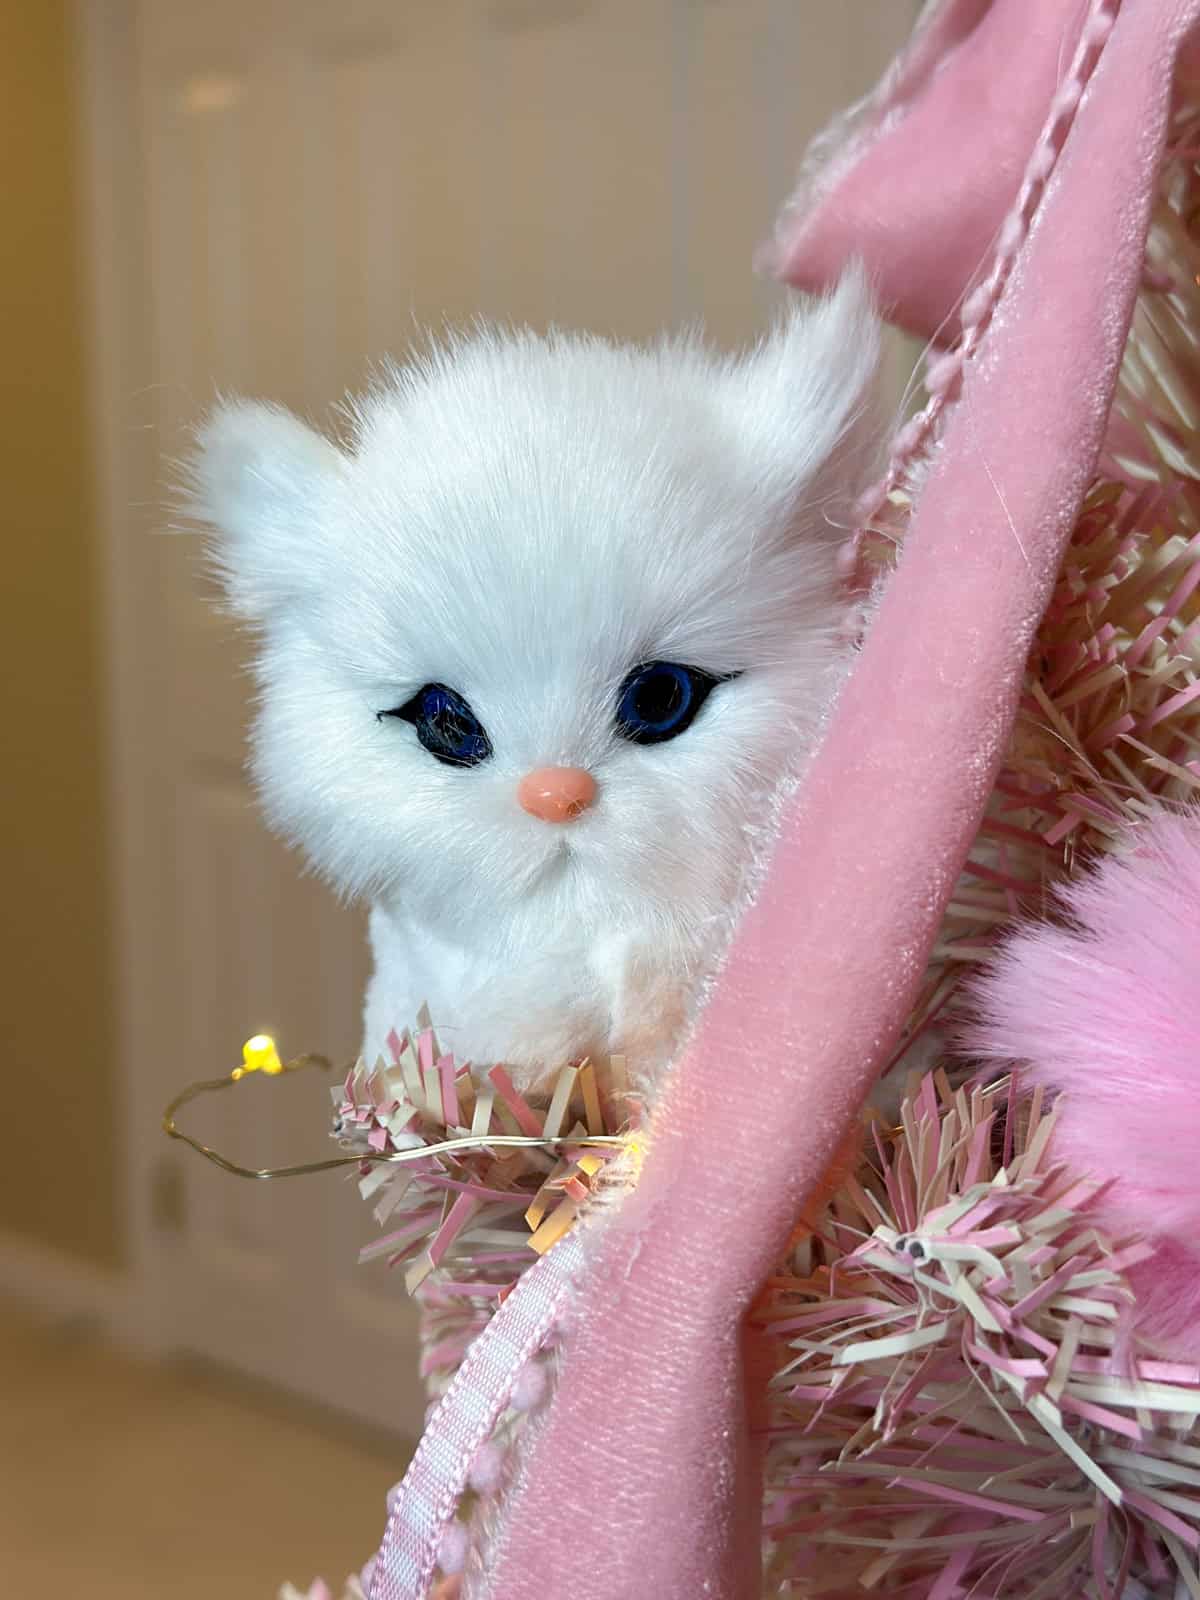
Pink Bows: LOTS of pink ribbon bows throughout, just tie into bows and rest on the tree branches. We also used a larger pink gingham and velvet ribbon bow for a simple tree topper.
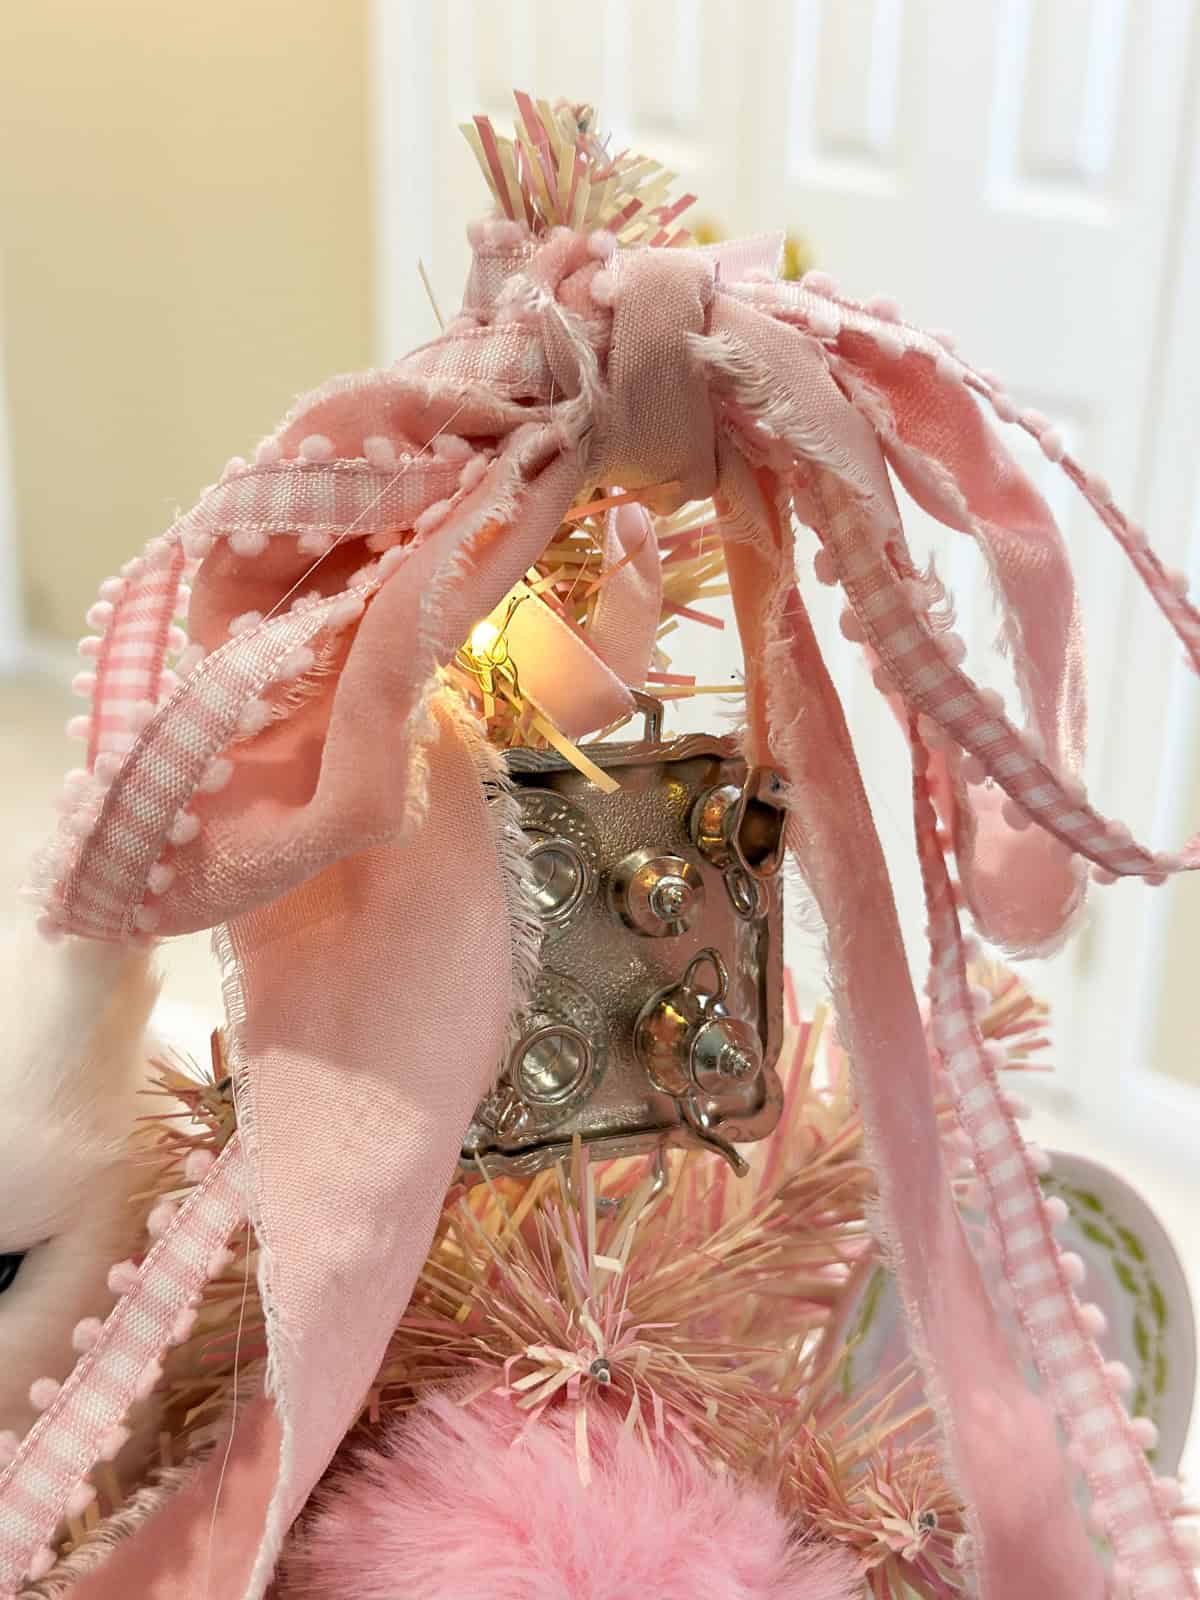
This 3-foot tabletop tree sits on a side table styled very full, very pink, very Umbridge. We used a piece of Sherpa fabric as a simple cozy tree skirt. The cat plates are the stars displayed prominently. Use warm white or soft pink lights.
Tip: Not up for a whole Umbridge tree? Add your favorite elements to your larger Harry Potter tree.
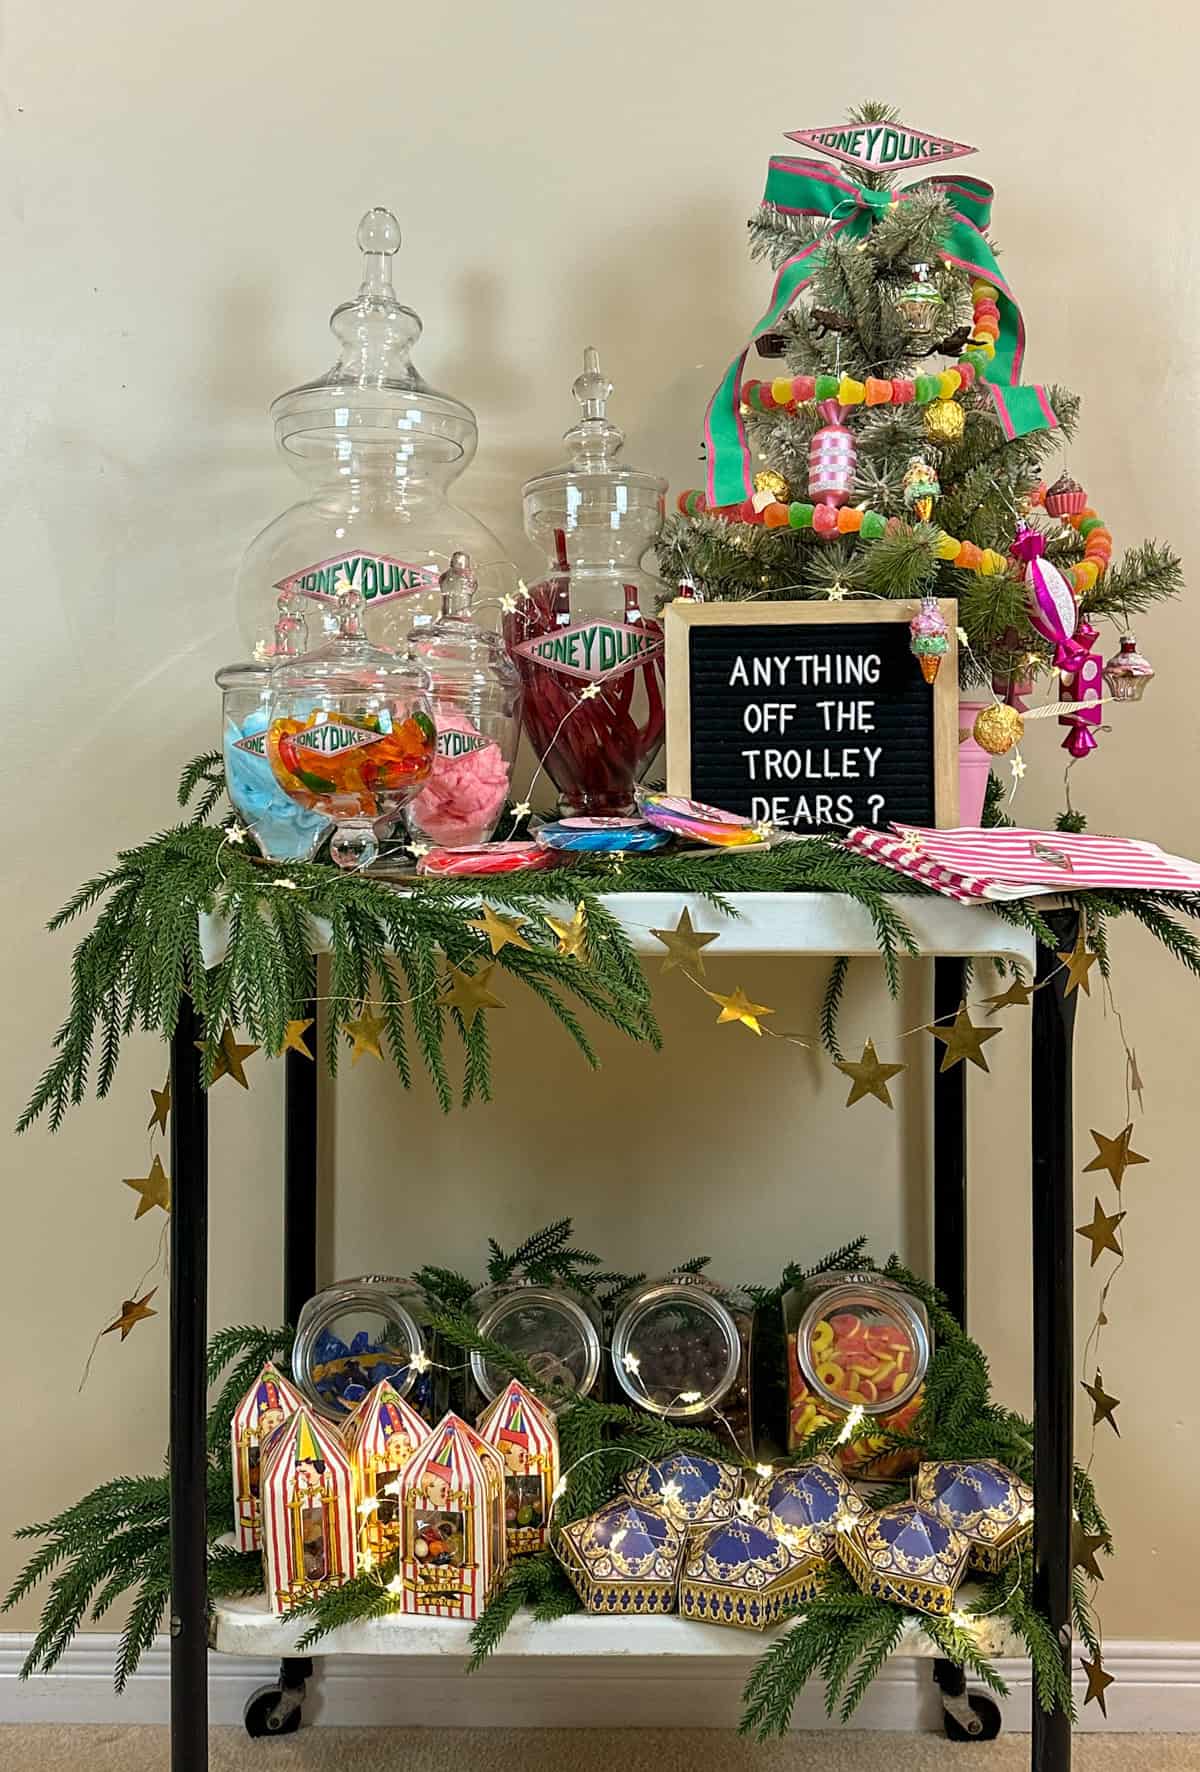
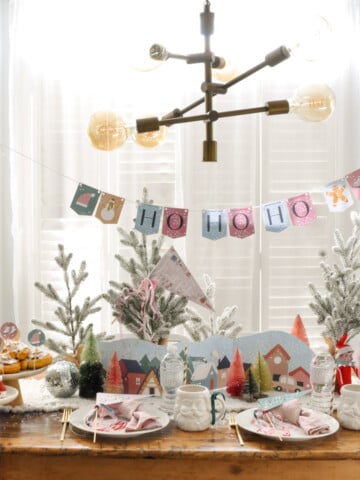
Honeydukes Candy Bar

The grand finale is a complete Honeydukes candy shop! A vintage bar cart stocked with candy jars, homemade chocolate frogs, coconut ice, and sweets from the books.
Homemade Chocolate Frogs
Making your own is way cheaper than buying pre-made candy, really delicious, and surprisingly simple and even kids can help! I used 3D frog chocolate moulds (Temu, $7) and melting chocolate from the bulk food store.
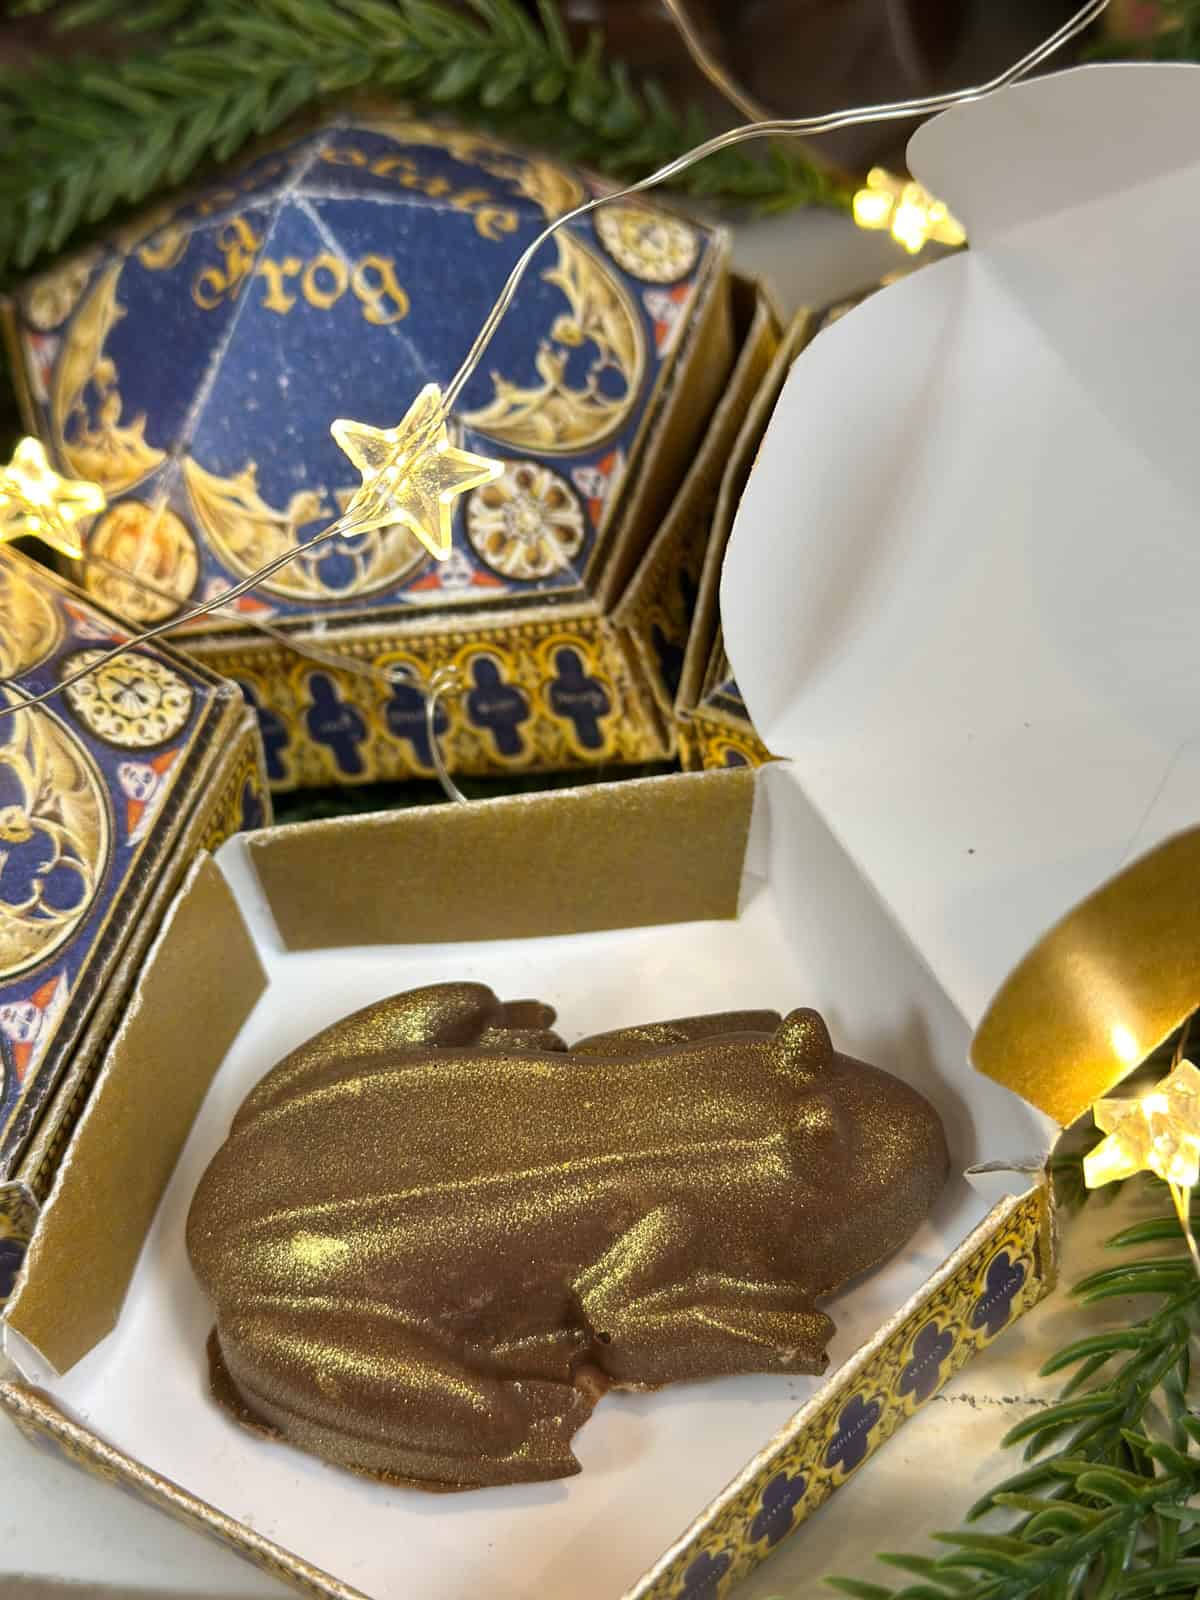
To make your chocolate frogs, melt chocolate, pour into moulds, add filling if desired or make them solid chocolate. Since we were making our own, we experimented with adding peanut butter, rice Krispies, and chopped almonds into different ones. Try mini marshmallows, dried fruit, popping candy, jelly beans, cookie pieces or nuts in your own. Top with more chocolate, and refrigerate 15-30 minutes until set, then pop them out. To make them even more magical, we used edible gold spray paint to make them shine.
The homemade versions taste so much better than anything you'd buy, kids absolutely love helping, and they're so much cheaper than the store bought version.
Watch the full tutorial in my Honeydukes video above, then package in custom boxes (below).
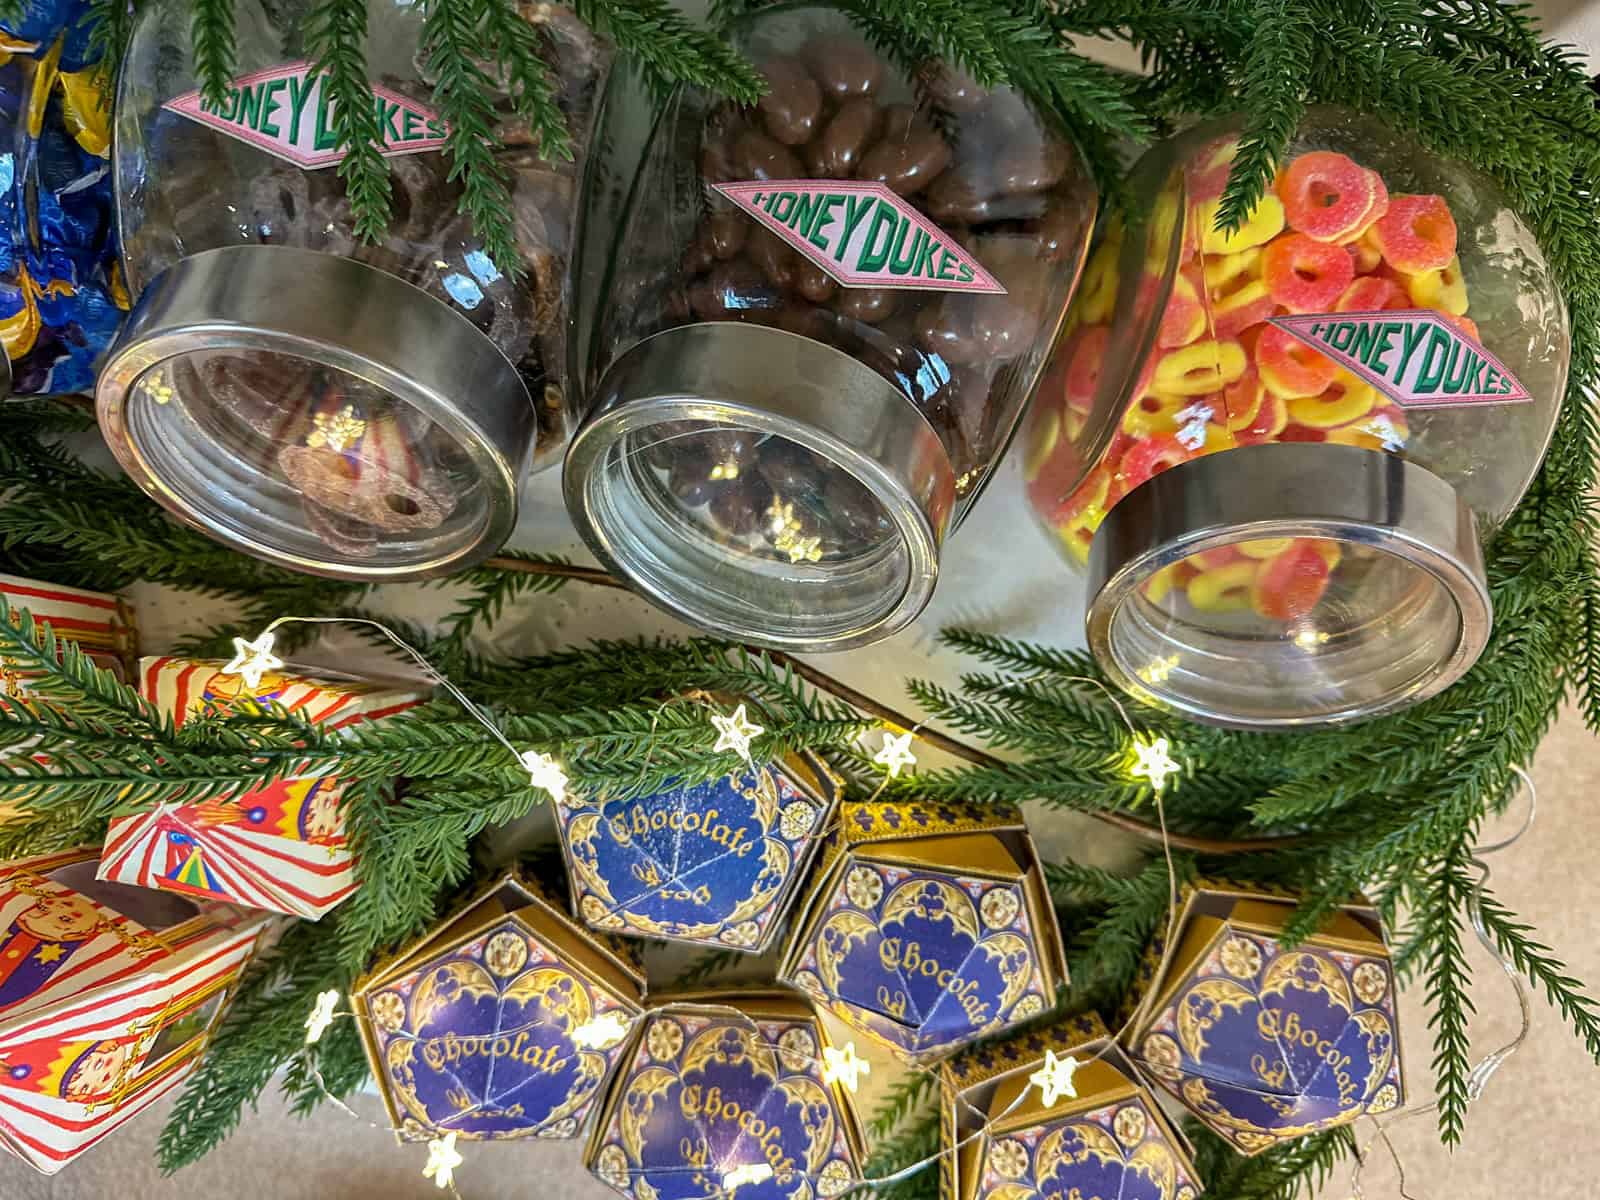
Chocolate Frog Boxes

Package your frogs using our free printable template! Subscribe below and download the free printable from our Free Resource Library, and print on cardstock. Cut out along solid lines and then begin to fold together. You also need to snip the edges of the box to form the sides. Use hot glue to hold the box together. Place the frog inside! You can secure the box top down with a small piece of clear tape. These also work great for gifting to guests.
Time: 5 minutes per box | Cost: Just ink and cardstock | Difficulty: Beginner
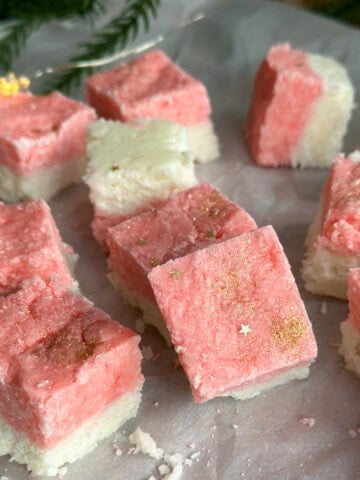
Homemade Coconut Ice
Another budget-friendly homemade candy! Traditional British coconut ice is surprisingly easy. It's a simple no-bake recipe kids can help with and it's really delicious. Find our Coconut Ice Recipe here.
Bertie Bott's Every Flavour Beans Boxes

Create custom boxes using our free printables! Subscribe below and find the boxes in our Free Resource Library. Print on cardstock, cut and fold together. Use a craft knife to cut out the windows in the sides of the box, and glue in cellophane to cover them. Fill with jelly beans. I used gourmet jelly beans in mine, but if you want a more authentic every flavor bean experience, purchase a few boxes of actual Bertie Bott's beans and mix them with the regular gourmet jelly beans -and let your guests take their chances. 😉 These make great party favors too!
- Time: 5 minutes per box
- Cost: Minimal
- Difficulty: Beginner
Honeydukes Candy Jar Setup

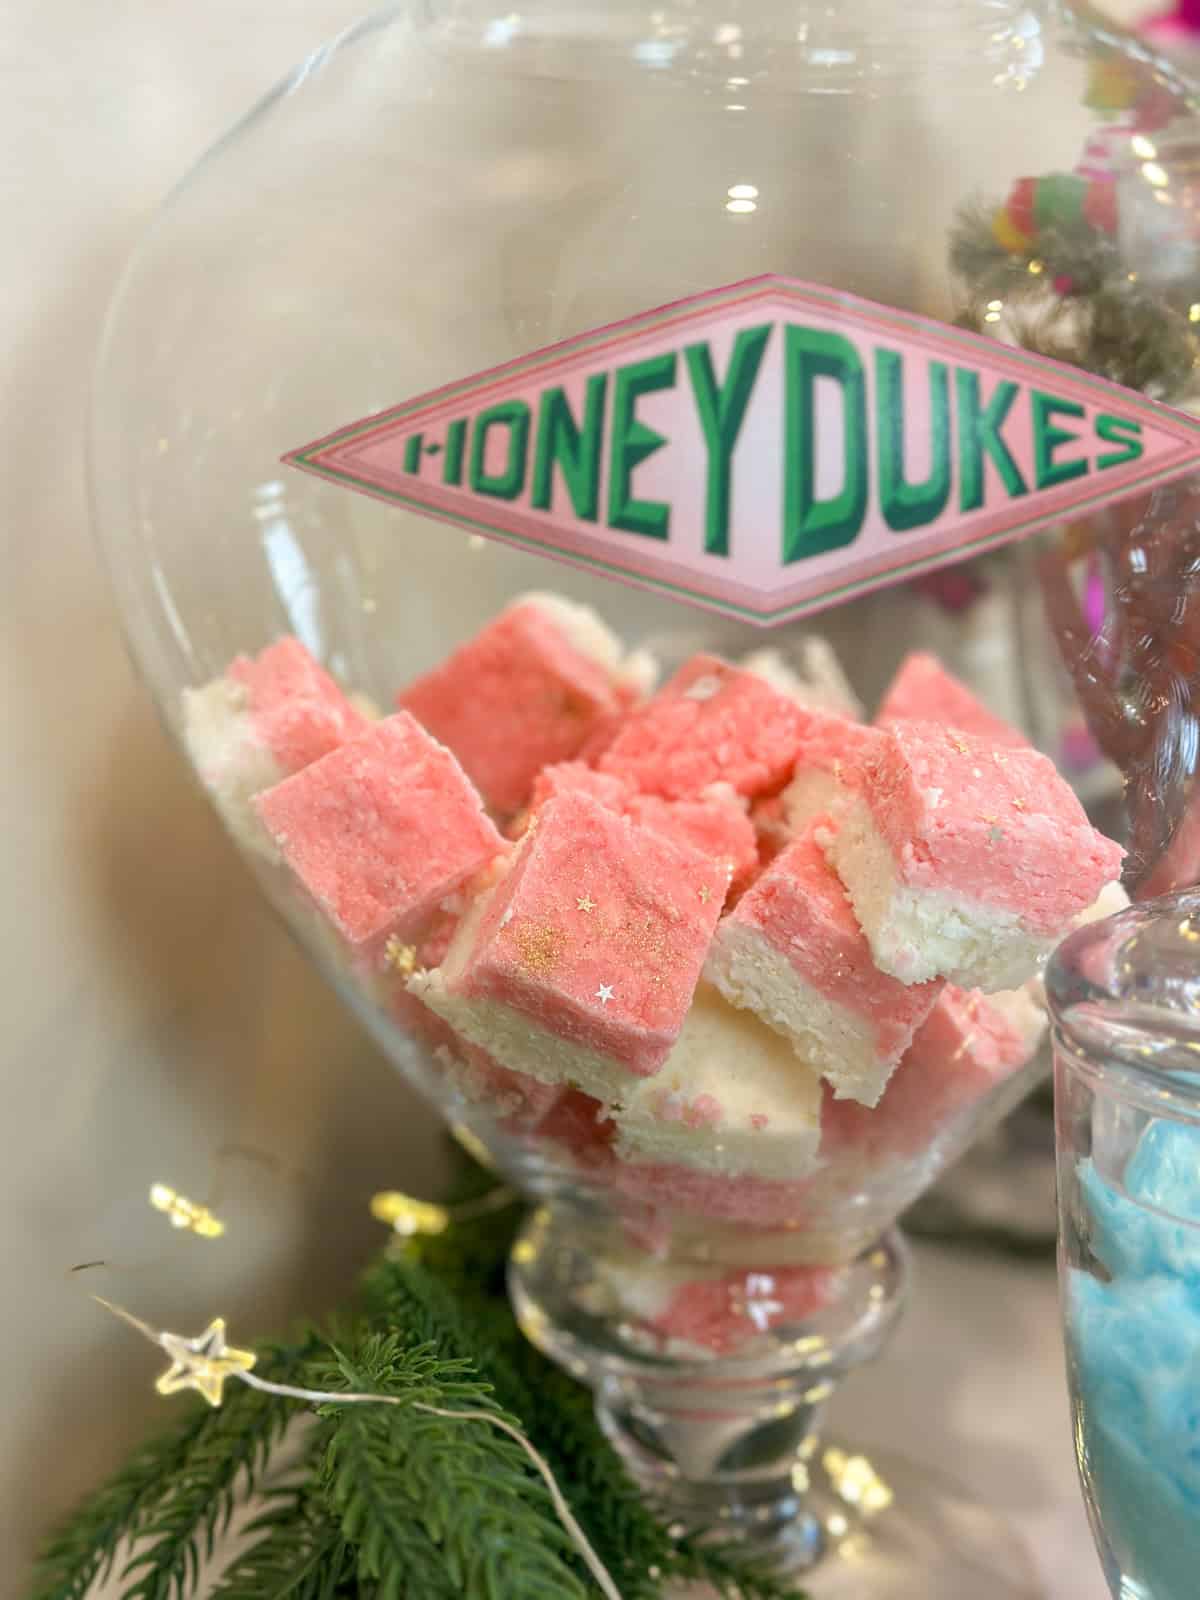
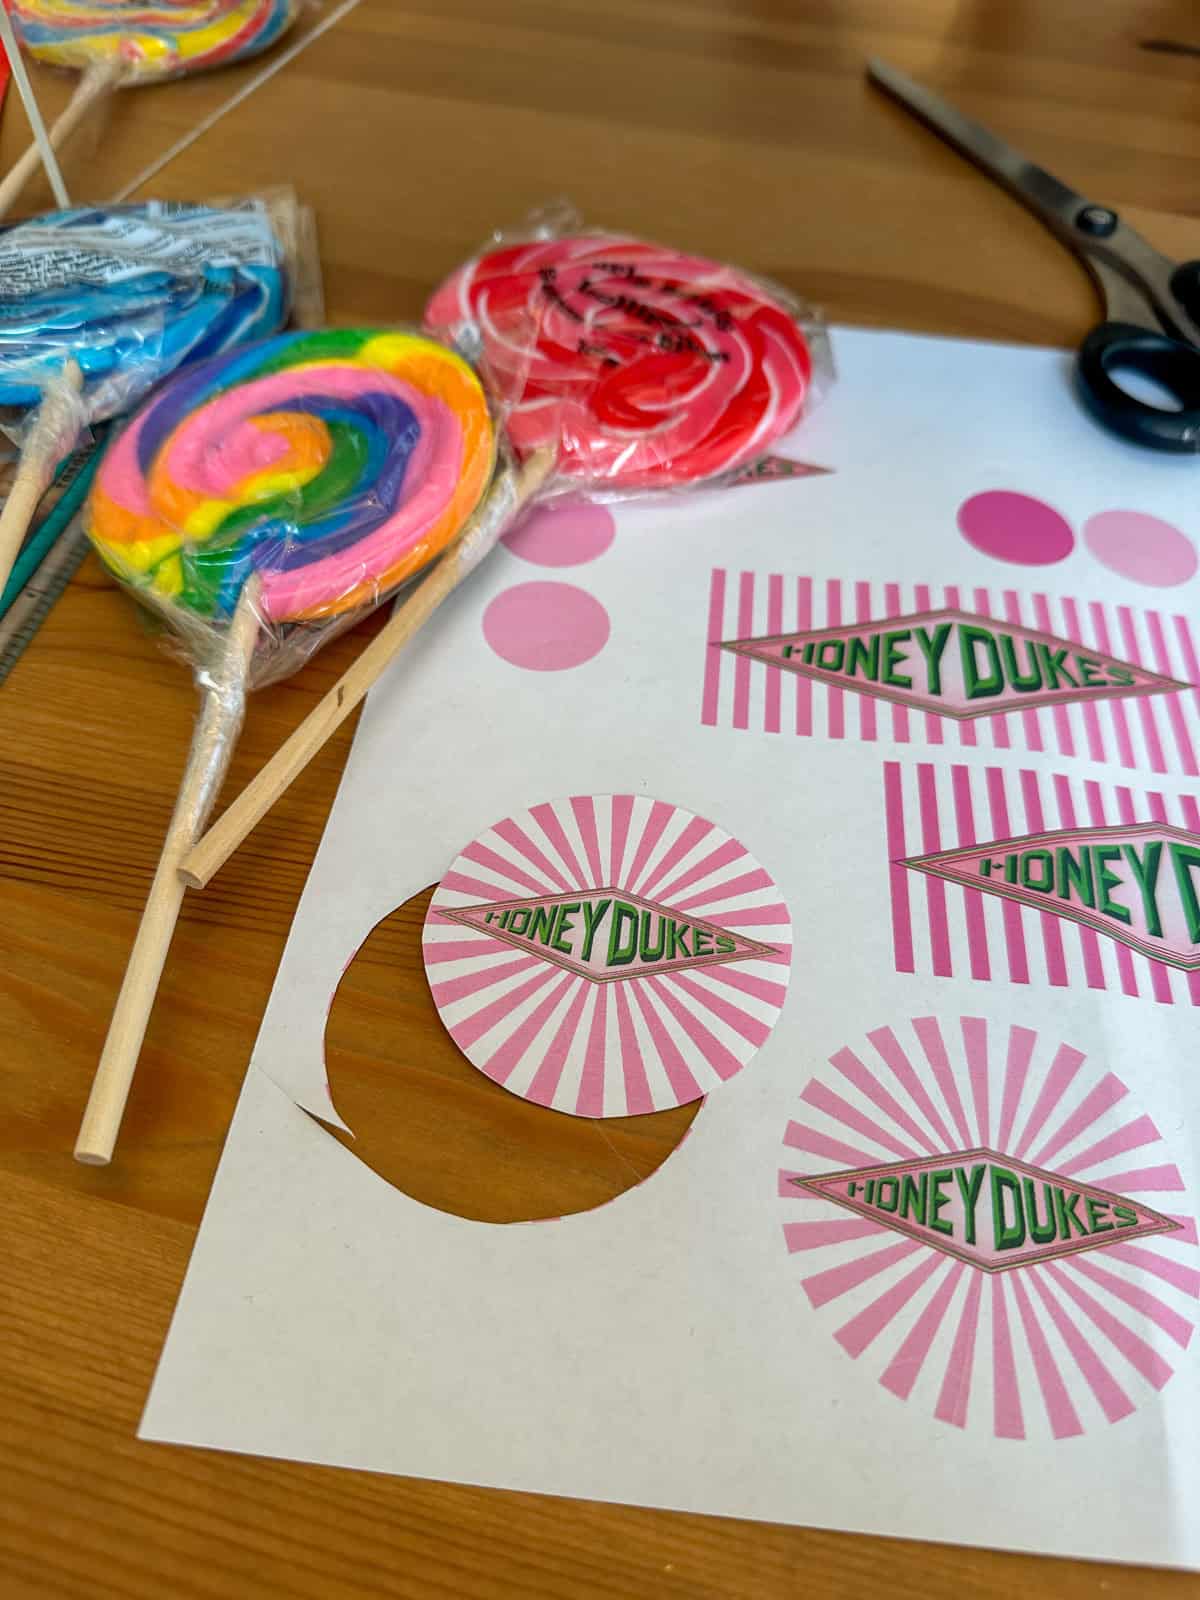
Collect glass jars in various sizes from thrift stores and clean thoroughly. Print our Honeydukes logos on regular paper or sticker paper, cut out and attach to jars as a sticker, or using a glue stick (I like this option because it's much easier to remove later.) Fill with candy!
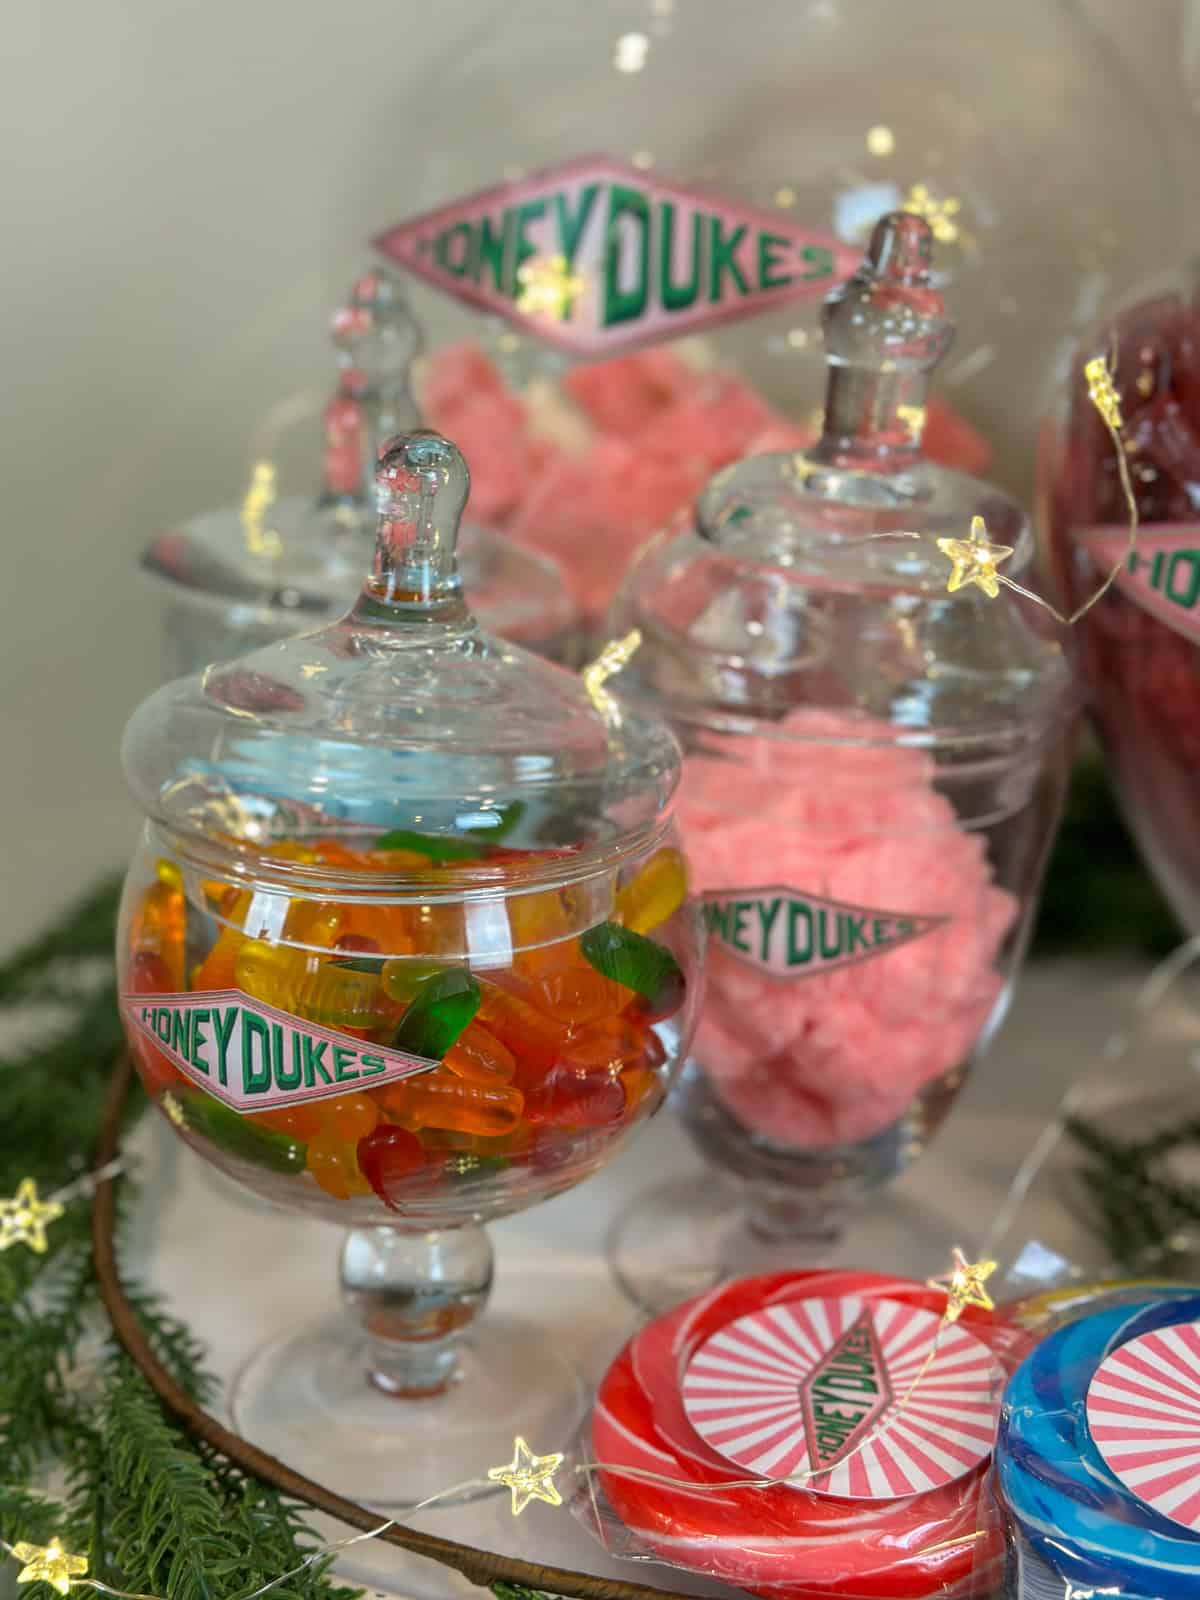
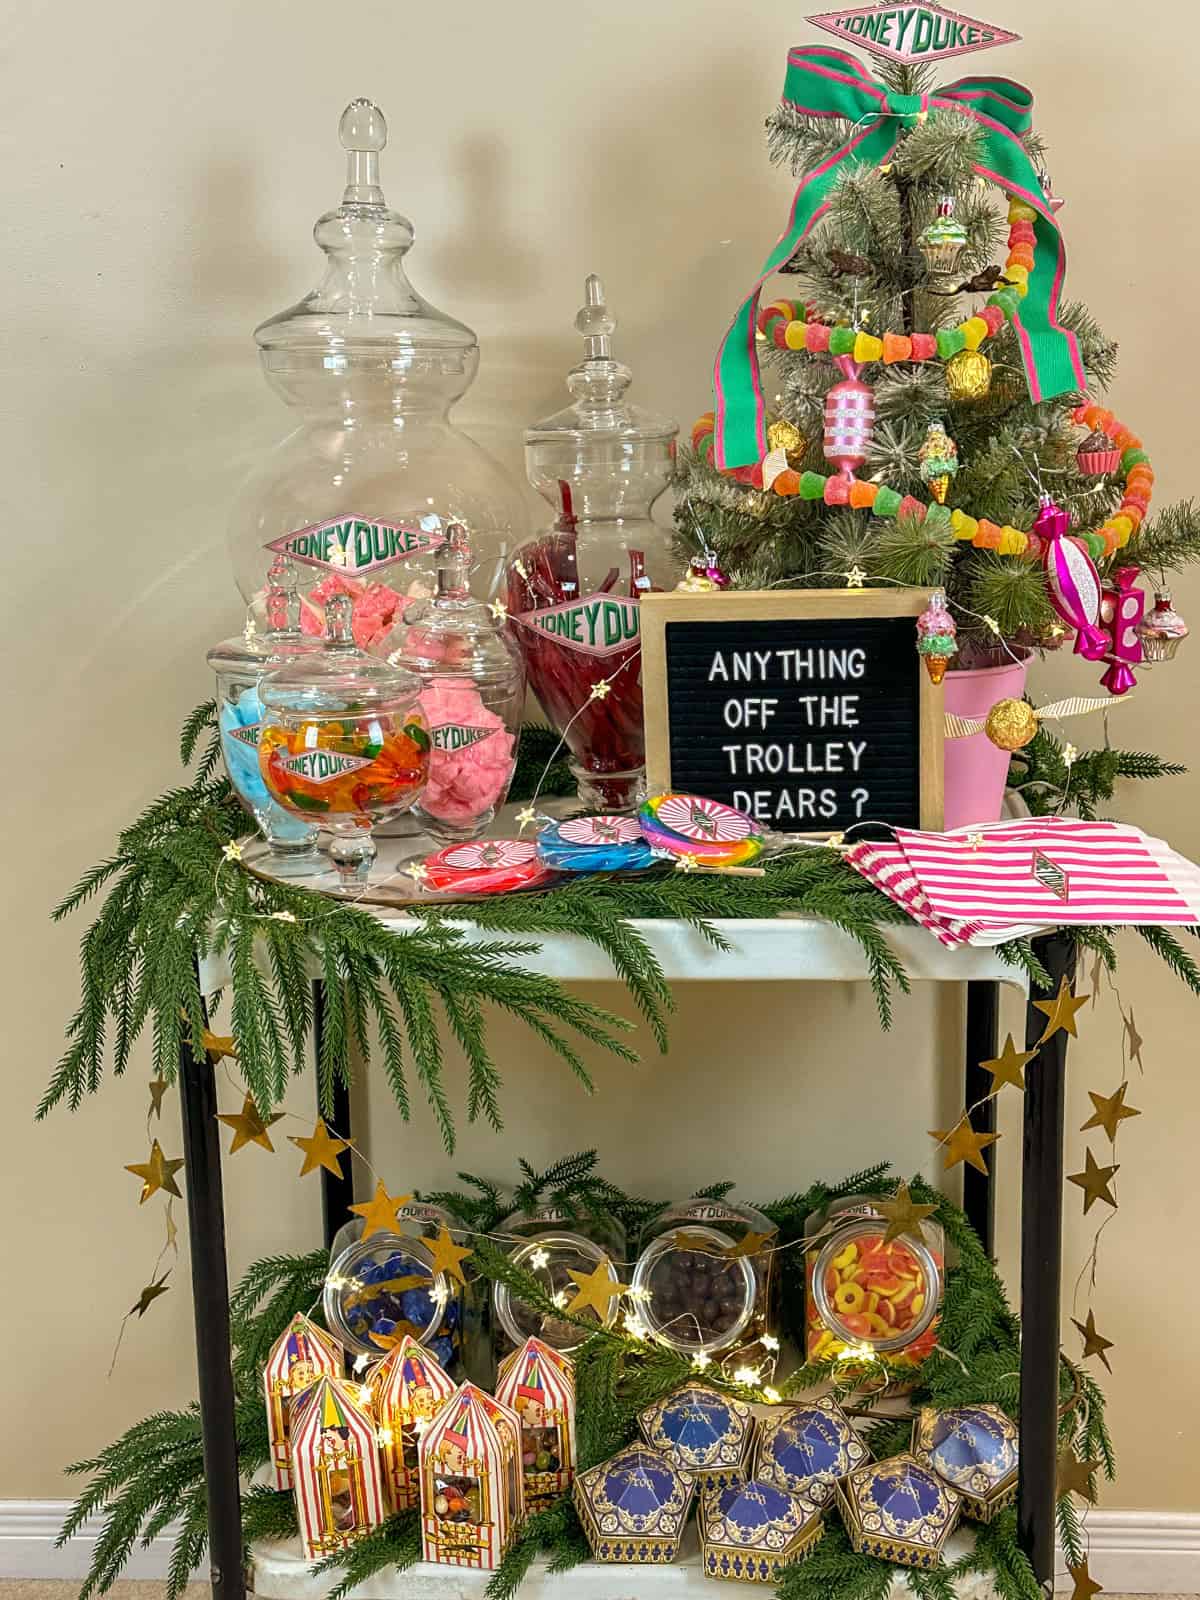
Authentic Honeydukes candy: Want to know all the actual candy mentioned in the books at Honeydukes? Check out this list if you're a stickler for details like this. ;). We used licorice wands (red licorice sticks), Peach Rings, Gummy Worms, Lollipops, Cotton Candy, and are favorite chocolates, since the book says "hundreds of different kinds of chocolate", plus our homemade coconut ice and chocolate frogs, and Bertie Bott's Every Flavor Beans.
We found our large lollipops at the dollar store in different colors. We added a round Honeydukes logo sticker to the front. Use our free printables and print onto sticker paper, or use regular paper and a glue stick to add them to the lollipop packaging.
Budget tip: Bulk candy stores let you buy exact amounts and choose colors that fit the aesthetic. Our cotton candy or candy floss wasn't strictly authentic, but it's inexpensive, takes up a lot of space, feels festive and special, and is a hit with kids.
Honeydukes Printables & Details
Using our free printables for: Jar logos, lollipop stickers, treat bag logo stickers and, Honeydukes tree topper.

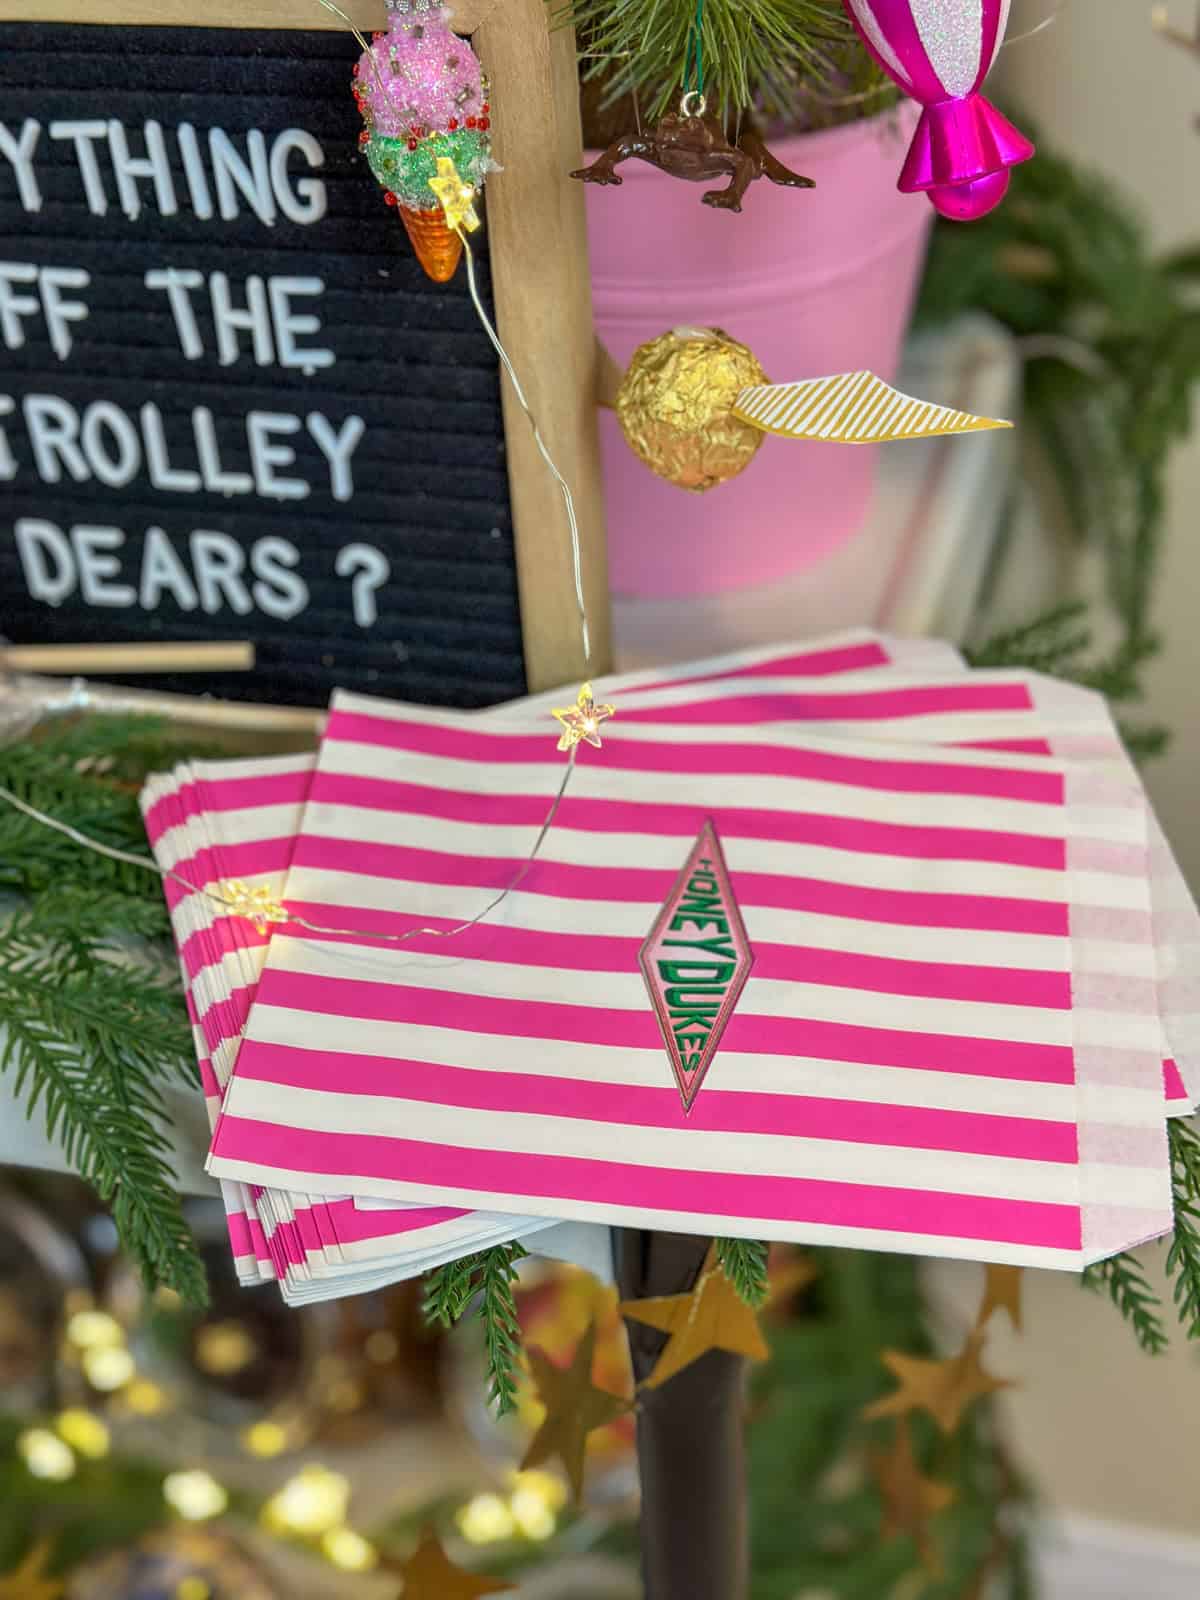
Treat Bags: We found pink and white striped paper treat bags online and added out Honeydukes logo stickers to the front. These are perfect for guests to help themselves nd take some treats home with them.
Scoops and Tongs: Don't forget to stock this area with small scoops and tongs so everyone can help themselves without putting their hands in the jars.
Mini Honeydukes Tree: Small 2-3 foot tabletop tree styled with mini lights, cupcake, ice cream, and candy ornaments, DIY chocolate frog ornaments, gumdrop garland, chocolate snitches -see how we made these above, and Honeydukes logo topper.
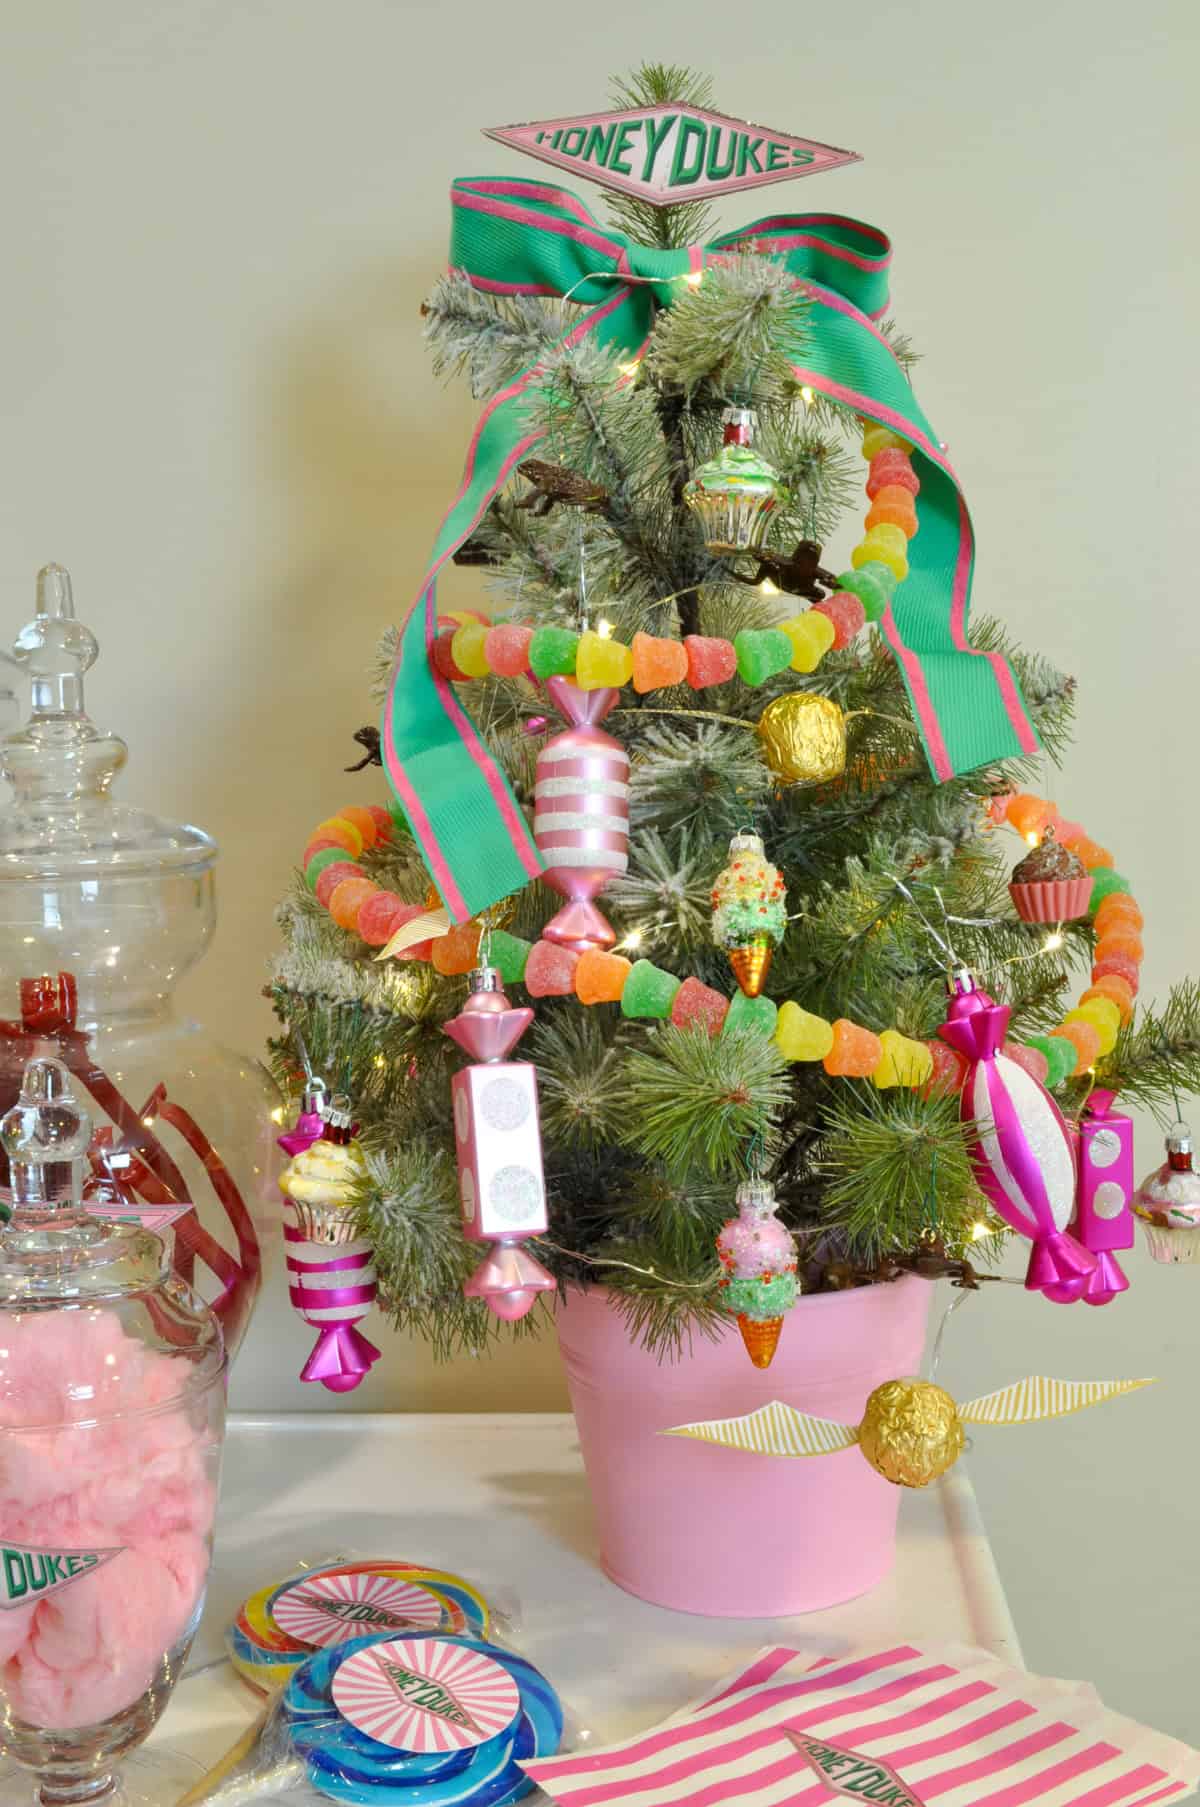
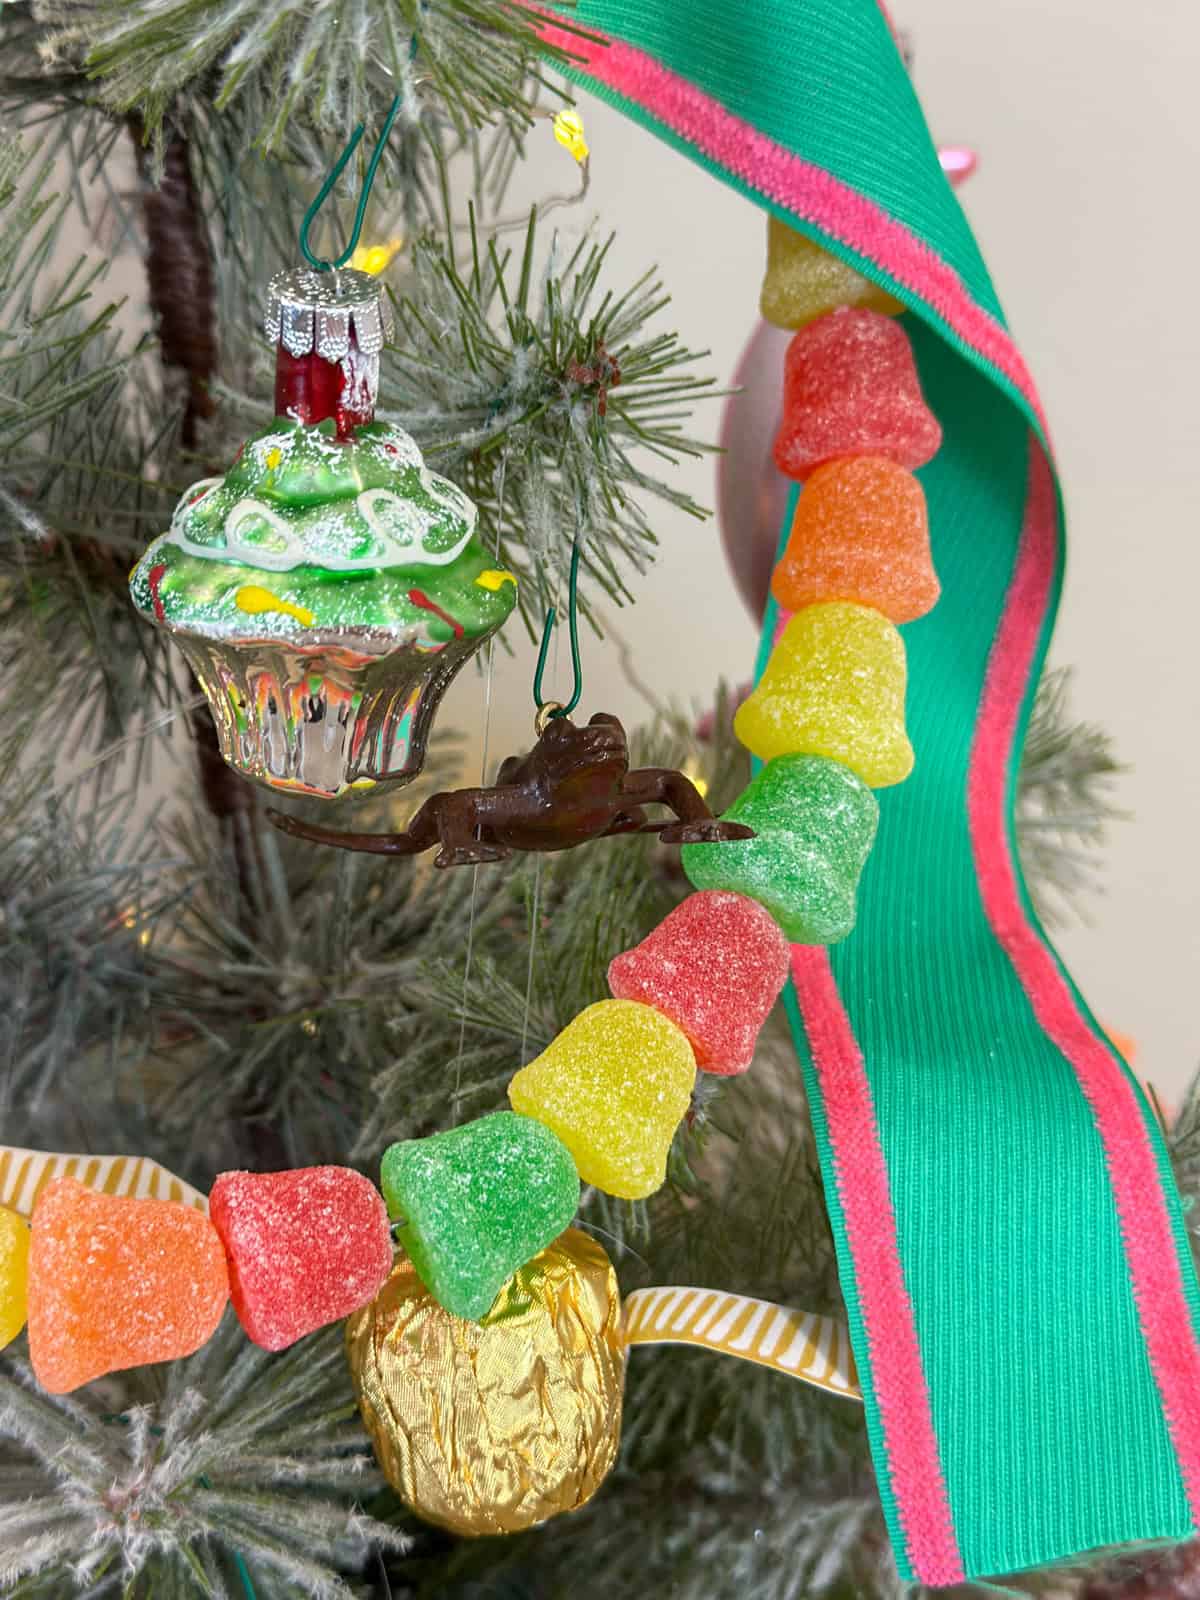
Gumdrop Garland: Use wire to string real gumdrops onto wire to form a garland. You can use a thread and a needle, but this job is very sticky, and the wire is easier to use. Wipe the wire off with a warm wet cloth as necessary.
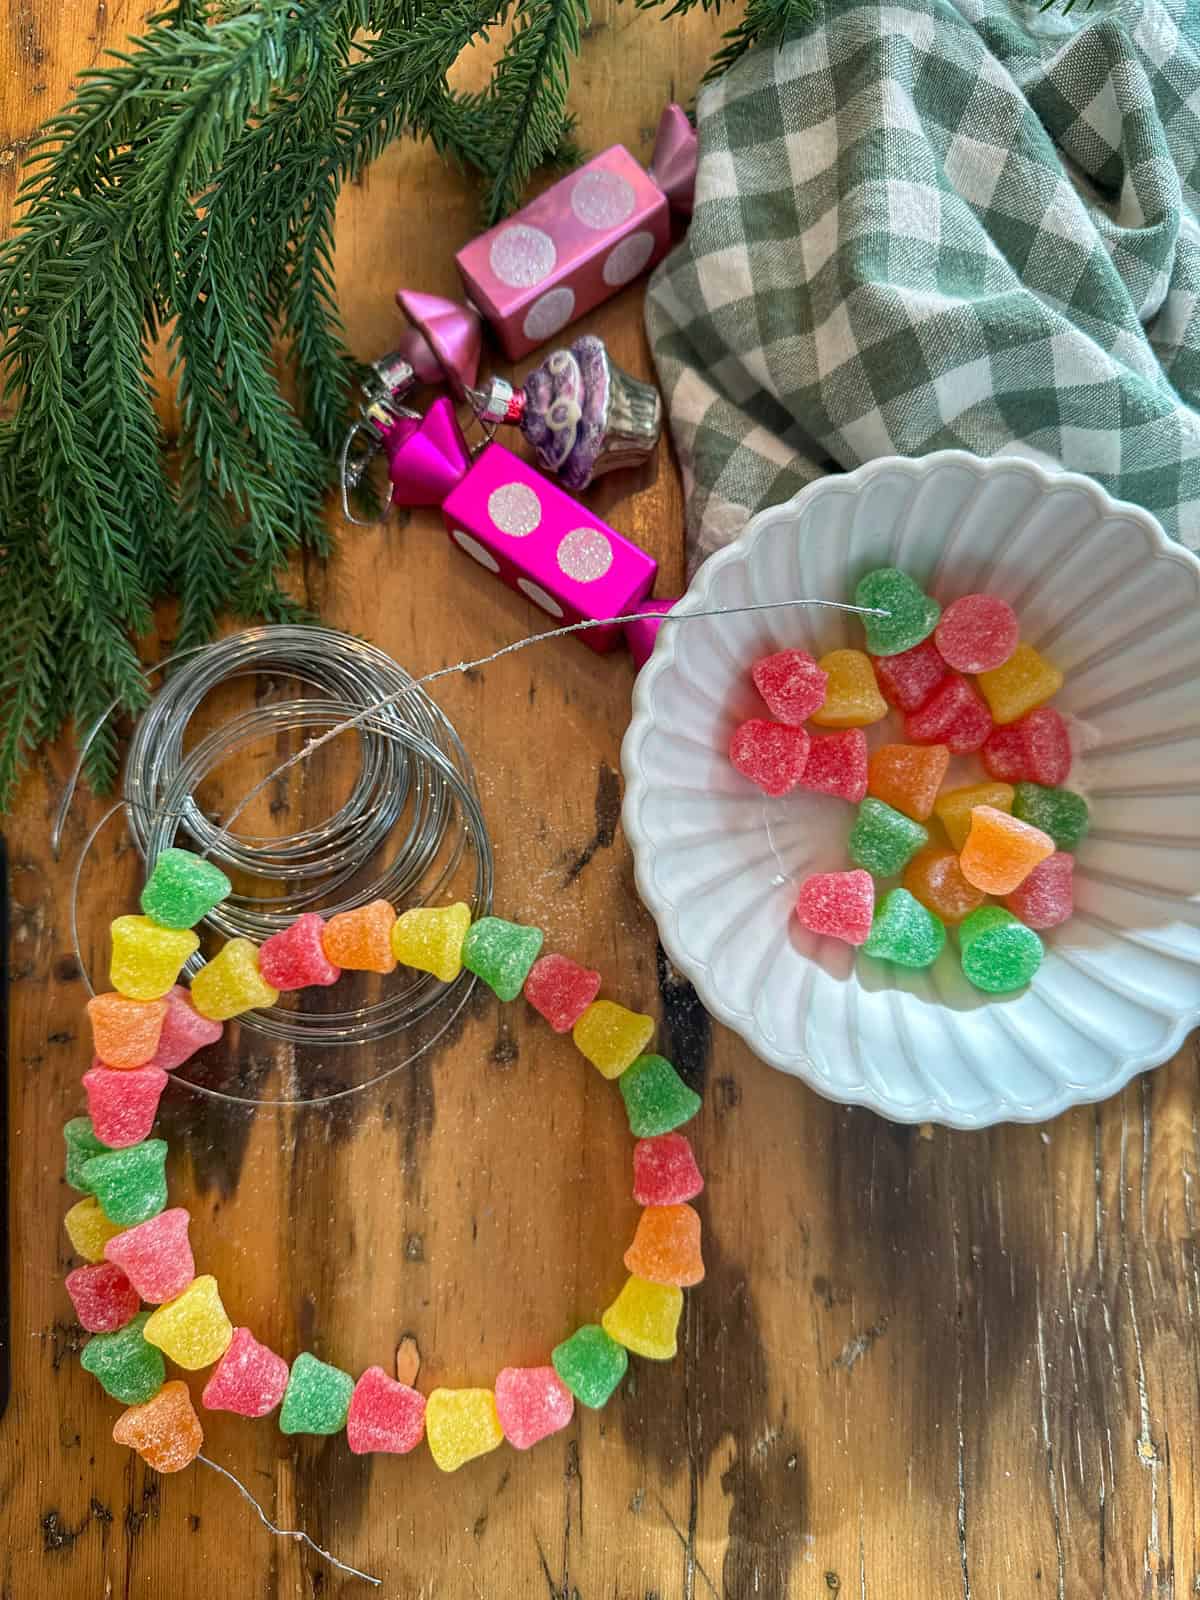
Chocolate Frog Ornaments: For our mini candy themed tree, we made small chocolate frogs. Using the same toy frogs we used for the larger chocolate frog ornaments, we painted them with several coats of brown acrylic craft paint, and then gave them a top coat of Mod Podge for the shine. To hang them, we added a small eyehook and a piece of fishing line.
"Anything Off The Trolley Dears?" Sign: Originally, I was thinking of the Honeydukes store, but since the trolley on the train is run by Honeydukes, and since we set up our candy on an actual trolley cart, it seemed perfect to add this quote with a simple letterboard. Get ready for your guests to say, "we'll take the lot!"

Free Harry Potter Christmas Printables
All printables are completely FREE to download and print at home! Subscribe below for instant access. Check your email for the password to the Free Resource Library. Not there? Check your spam/junk folder in case it went there by mistake. Find the printables in our printable library under "Harry Potter" marked Christmas Harry Potter Free Printables.
Frequently Asked Questions
I spent about $250 The candy was a big expense, costing about $80 Biggest savings came from thrifting. You could do a scaled-down version for $50-75, focusing on just the tree with DIY ornaments.
All the jewelry came from AliExpress. Search "Harry Potter Horcrux" or specific items. They're really inexpensive ($2-8 each) but take 2-3 weeks to ship - order early!
No! While helpful for some cutting, everything can be done with scissors, or a craft knife.
We used a battery powered motorized disco ball spinner. I ordered mine on Temu. We turned our spinner upside down and zip-tied it to the top of the tree. We attached our wire to a hole in the spinner, so look for one with a hole, and not the kind with a chain that hangs down. Cost $10-25
We love our DIY motorized Santa on a broomstick that flies around the tree top. We used a disco ball spinner to create the effect. Other great options are a large golden snitch, a sorting hat, or a large star to go with the celestial theme.
Budget Planning Tips
Where I saved money:
- Thrifted everything possible. Books ($1-2), sweaters for stockings ($3-5), candlesticks, birdcage.
- DIY instead of buying. We made so many decorations. Store bought licensed ornaments really add up quickly. Our advice -do a combination of DIY and store bought, and add a few special store bought ones to your collection each year. Making the chocolate frogs, Bertie Bott's Every Flavor Beans, fudge, and coconut ice was much cheaper than buying -and yummier! 😉
- Ordered from Temu/AliExpress. Horcrux set $20 (vs. $50-80), chocolate molds $8, disco ball spinner $10, small items 50-75% less. Just order early -shipping takes 2-3 weeks!
- Where I splurged: The biggest splurge was the candy! I usually buy candy for Christmas and stockings, so I viewed that as part of my regular Christmas spend. I also love to host around the holidays, and I hope my guests will enjoy the candy and take some home as party favors.
- My total: $200-250 for everything.
You could do a beautiful version for $50-75, focusing just on the tree with DIY ornaments and thrifted finds, or build your collection over multiple years! Start with 5-8 ornaments Year 1, add Horcruxes Year 2, add mantel decor in Year 3, add Honeydukes Year 4.
Conclusion: Creating Your Own Harry Potter Christmas Magic
What started as "I'll make a few Harry Potter ornaments" turned into this complete Wizarding World Christmas wonderland -and I don't regret a single minute.
The best part? It's not about having the perfect Pinterest-worthy Christmas. It's about creating spaces where the people you love want to gather. Where you can slow down, light some candles, turn on the tree, pour some hot chocolate, and watch Harry Potter movies together. That's the real magic.
You don't have to do everything I did. Maybe you'll just make the Weasley stockings this year. Maybe you'll create a few book page ornaments. Maybe you'll go all out. Whatever you choose, I hope this guide showed you that creating magical spaces is actually doable -it just takes time, creativity, and a willingness to thrift and DIY.
Start where you are. Use what you have. Thrift what you can. Make what speaks to you. Skip what doesn't. Build slowly if needed. Make it YOUR version of a Harry Potter Christmas.
Thank you for spending this time with me. I hope you found inspiration, practical tutorials, and the confidence to try something creative this Christmas season.
Now go make some magic! ✨🎄
More Harry Potter Inspiration


Share Your Harry Potter Christmas!
Did you create any of these projects? I'd LOVE to see!
📸 Tag @lifeisaparty on Instagram
💬 Leave a comment below
📌 Pin your favorites to Pinterest
Your creations inspire me and other readers - please share!

Leave a Reply
You must be logged in to post a comment.