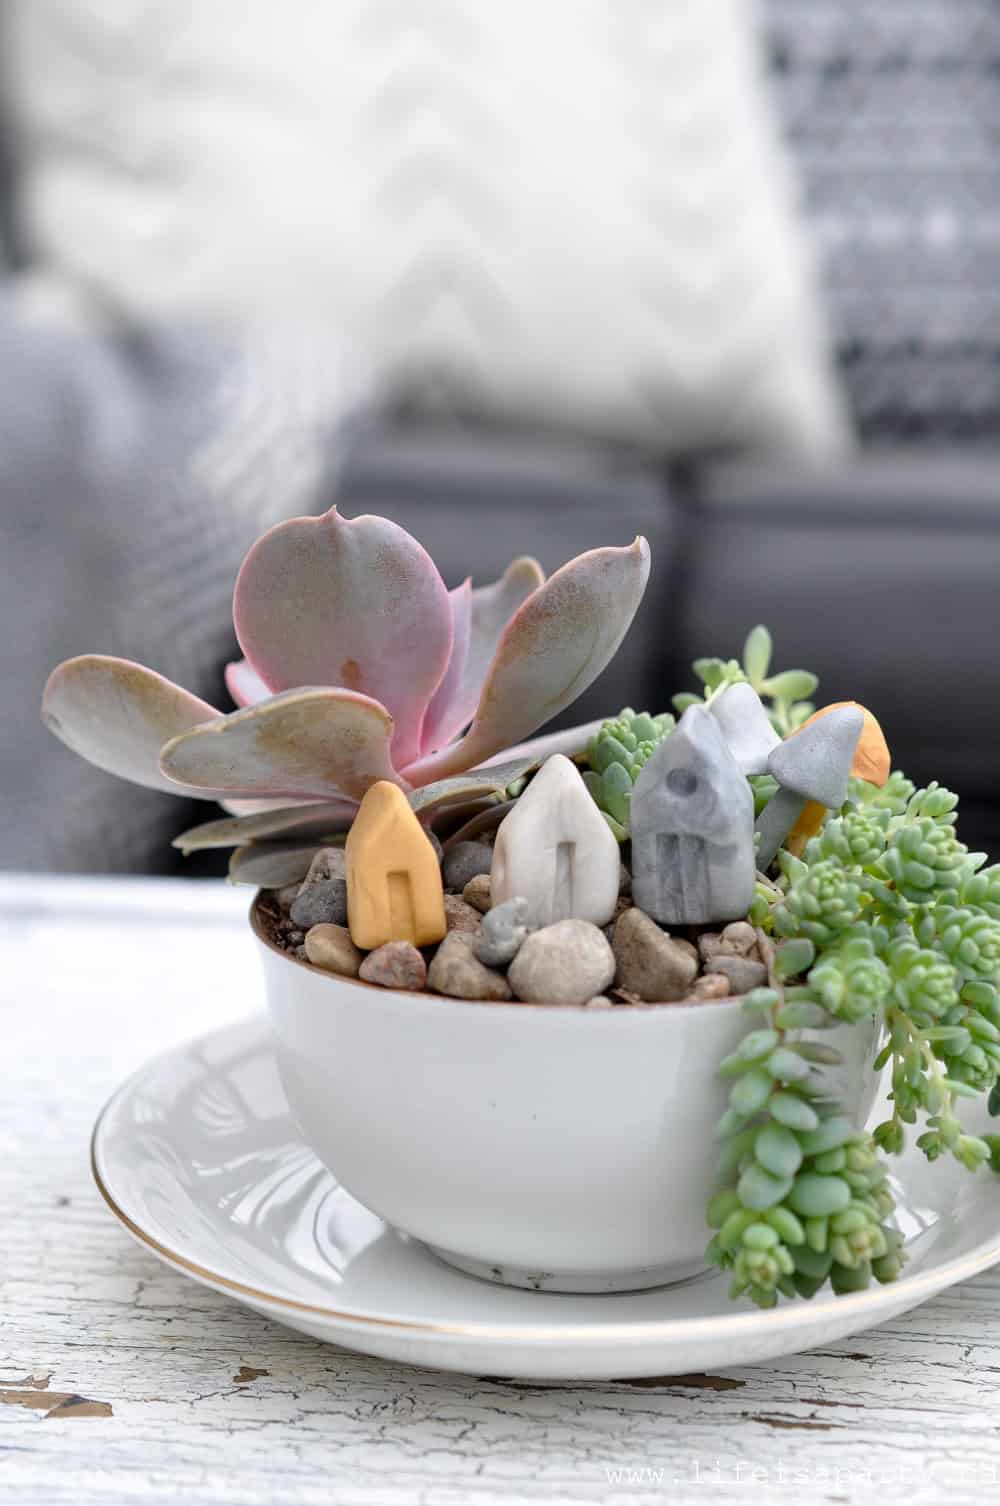
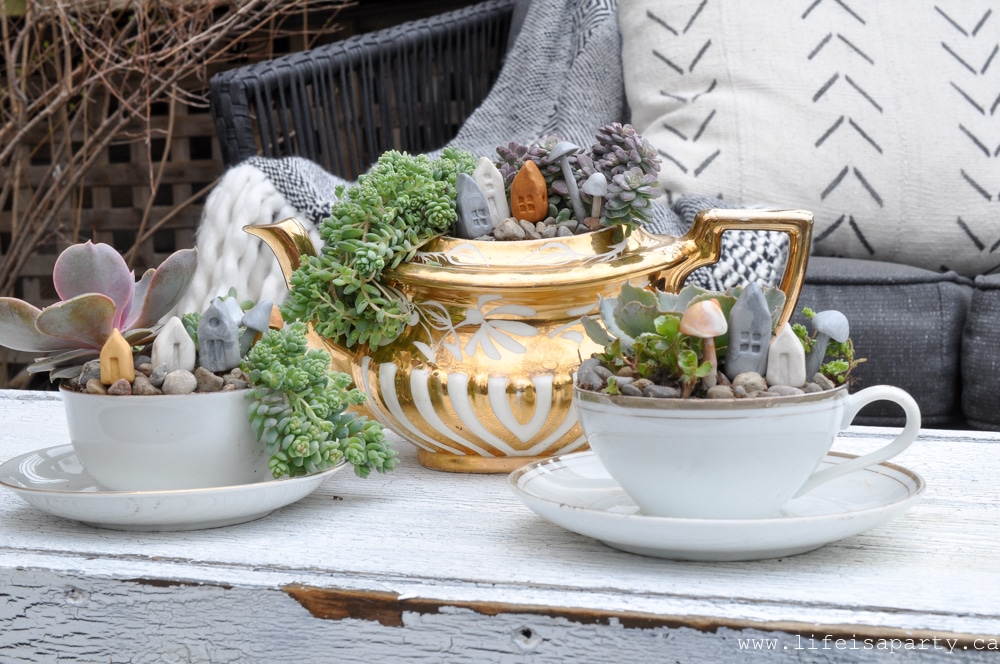
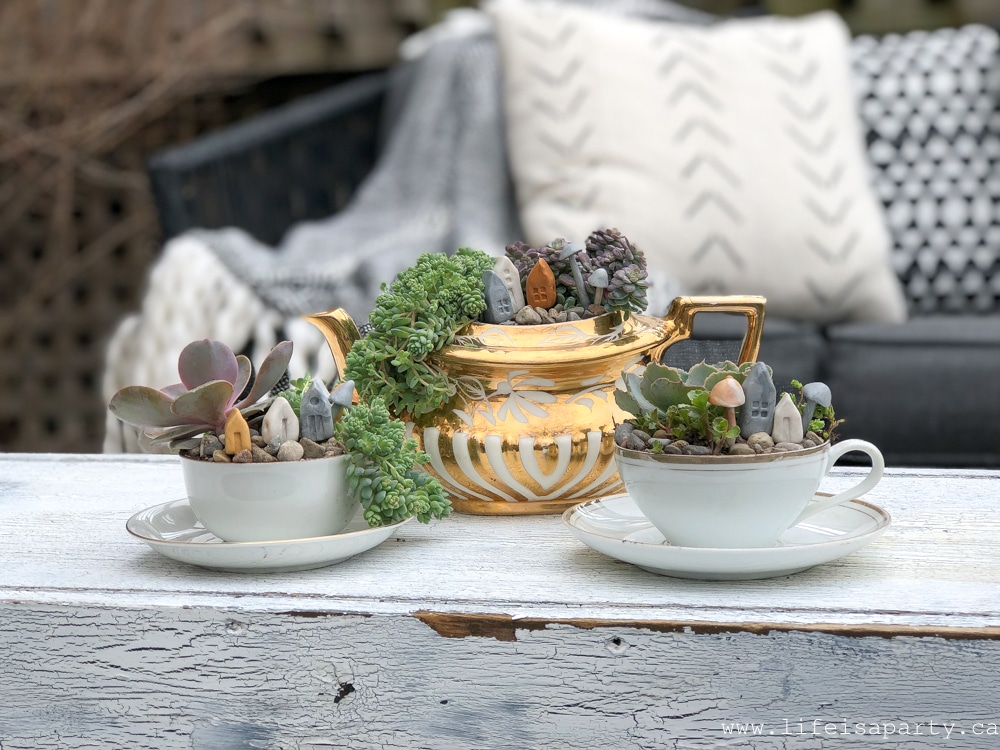
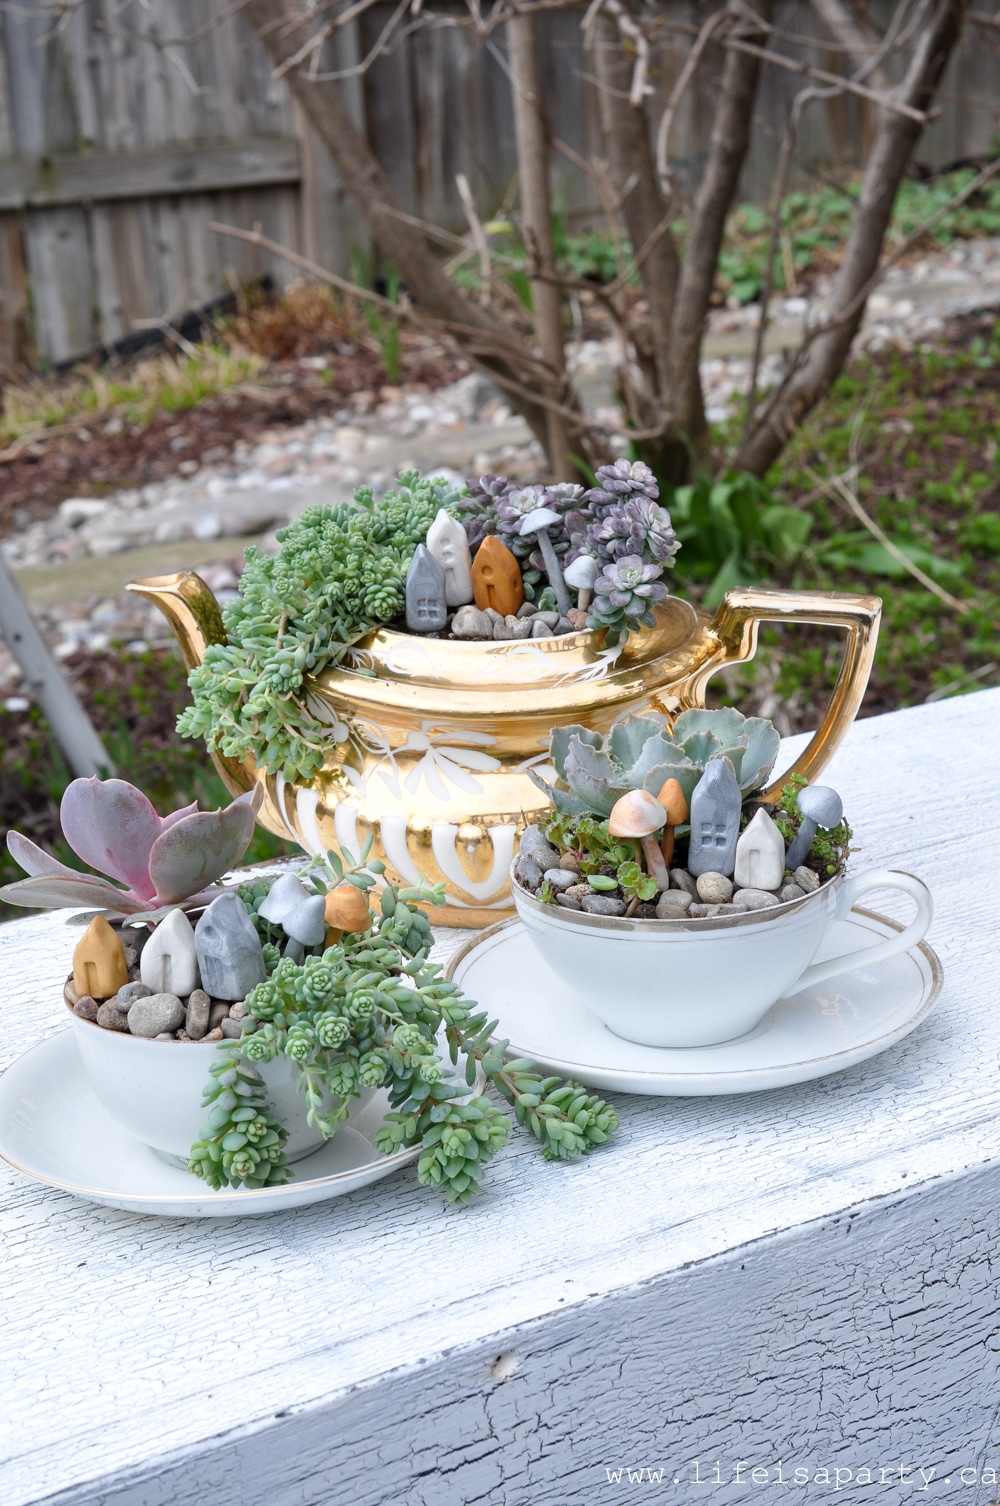
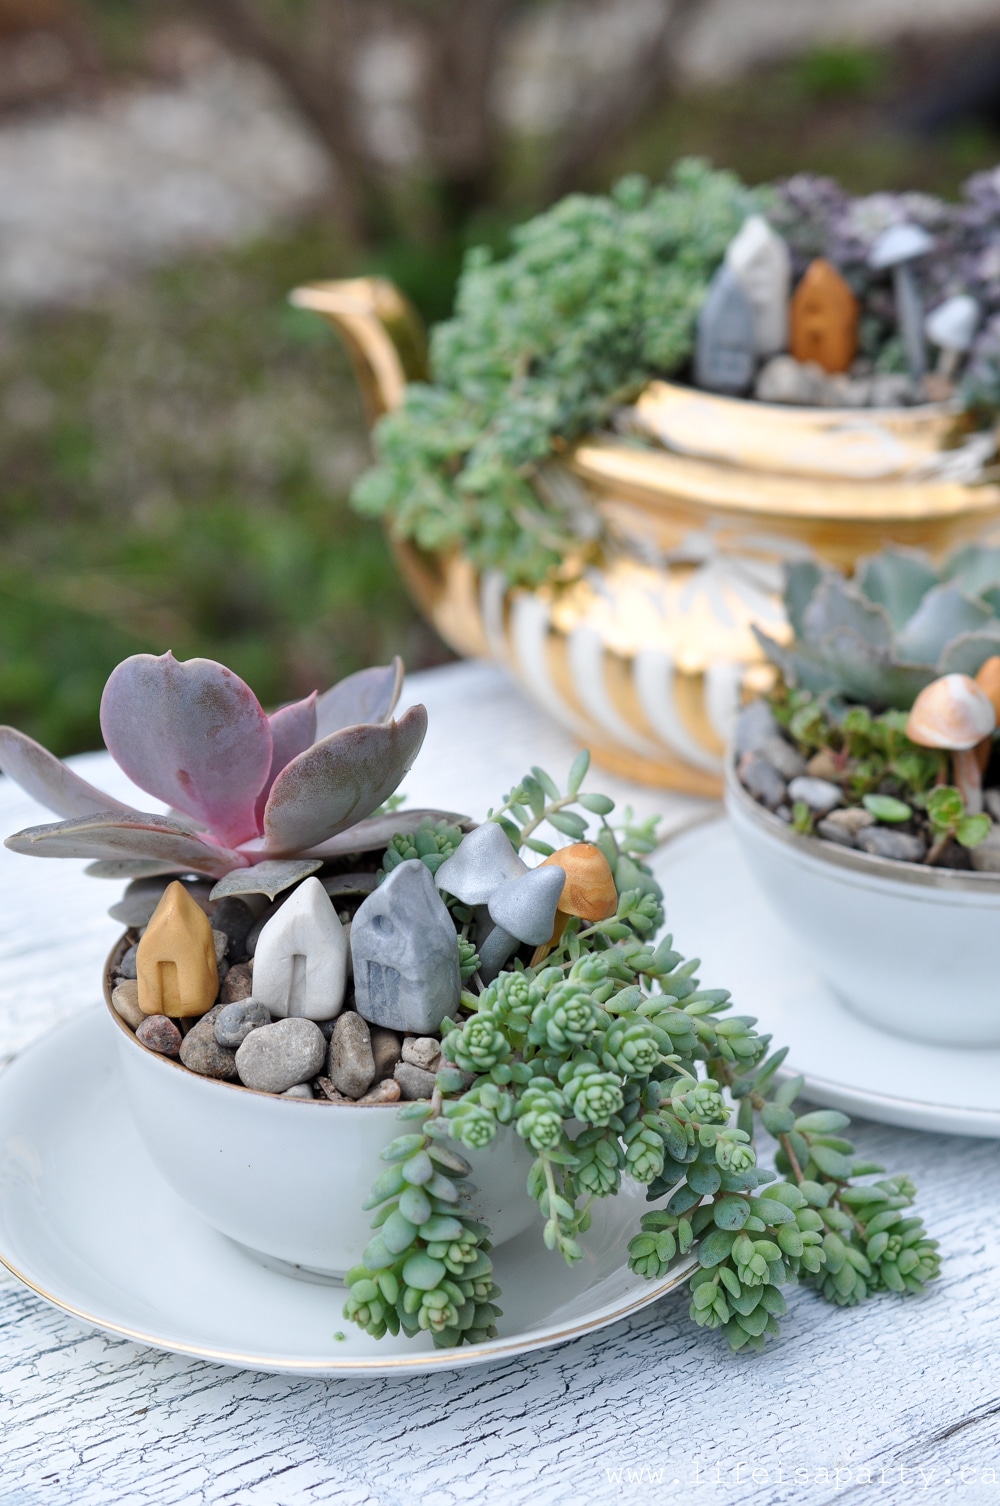
This Teacup Garden is planted in some thrifted teacups and teapots. We added a whimsical touch with our miniature polymer clay houses and mushrooms. It looks like the sweetest and tiniest fairy village and it's so adorable!

Jump to:
Why We Love This Project
- It's a great way to use old vintage teapots and teacups.
- We love succulents and this is such a cute way to grow them.
- Succlents like dry conditions so they can thrive in a teacup, where other plants would not.
- The clay houses and mushrooms add so much whimsy and charm to these teacup gardens.
- The houses are an easy DIY and you can make them in any color you like.
These Teacup Gardens couldn't be cuter. They're an update of the original Teacup Fairy Gardens I made a few years ago. They're very simple to make, and a really fun DIY. I love fairy gardens. Be sure to check out how to make a fairy garden, and how to make a fairy garden house also.
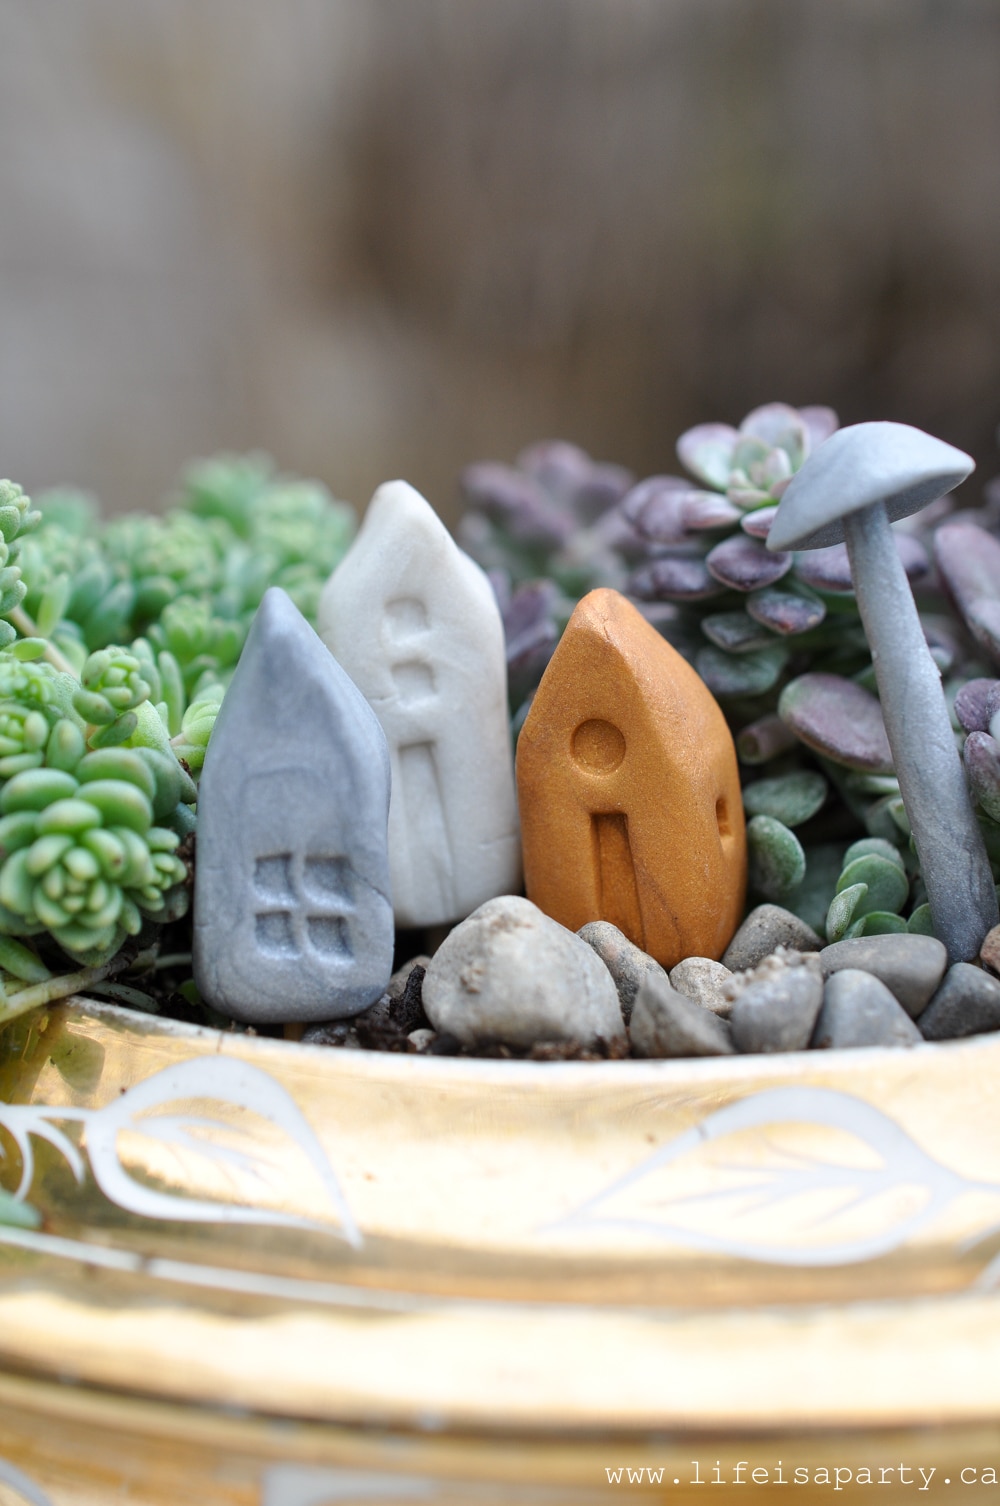
 I was inspired by some cute little pottery mini houses I saw, and decided to try and make my own version with oven bake clay. They worked out really great and they were quite easy to put together.
Also I know from past experience that polymer clay holds up really well outside in damp, wet conditons, or in full sun.
Materials:
See more details in the How-To card below.
- Oven Bake Polymer Clay -look for this at the craft store in any colors you like. Any brand is fine.
- Toothpicks or Wooden Skewers -these will help the tiny pieces stay in place, without them they would fall over really easily.
- Match Stick and Lollipop Stick -these are for making the doors and window indentations in the clay.
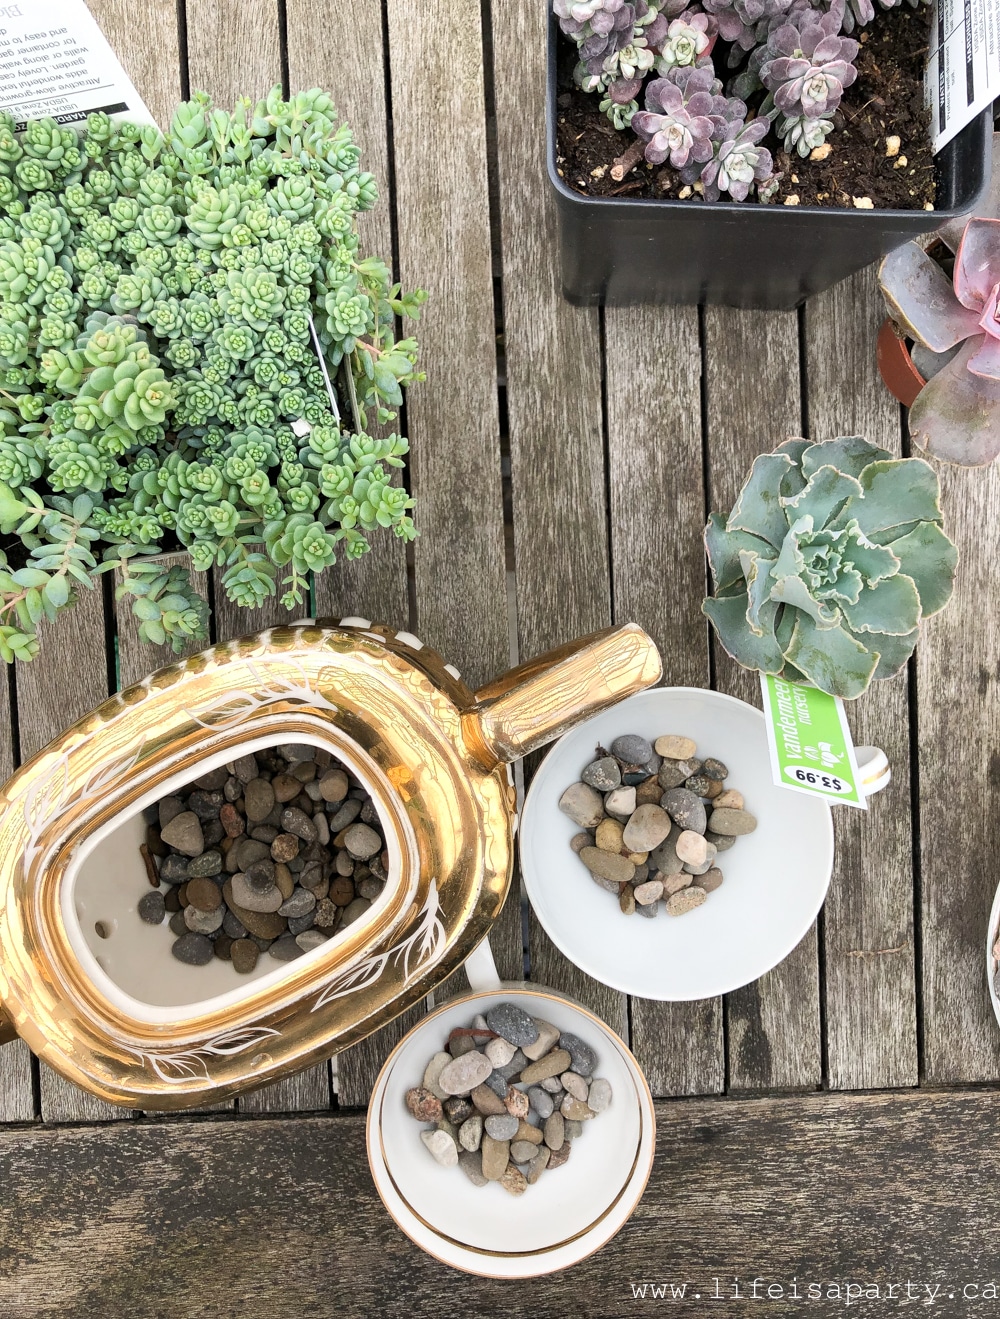
- Vintage Teapot and Teacups -look for these at the thrift store, antique stores, or garage sales. The teapot I found was missing it's lid, so this was the perfect upcycle.
- Potting Soil
- Small Succulent Plants -we love succulents because they can tolerate dry conditions and thrive in teacups.
- Small Rocks or Gravel -this is for the bottom of the teapot and teacups and also a top dressing. Succulents don't like to get their feet wet and with no drainage the rocks will help to lift the soil and roots of the plant up from the bottom of the container, where it might be wet after watering. Adding the rocks to the top of the soil looks great and helps the soil retain moisture.
Step 1: How To Make Miniature Fairy Houses
Use a small piece of oven bake clay and work it in your hands until it's soft. Working on a piece of parchment paper, shape the clay into a cube with your fingers, and using the flat surface of the table and your fingers, create the pointed roof on one end.
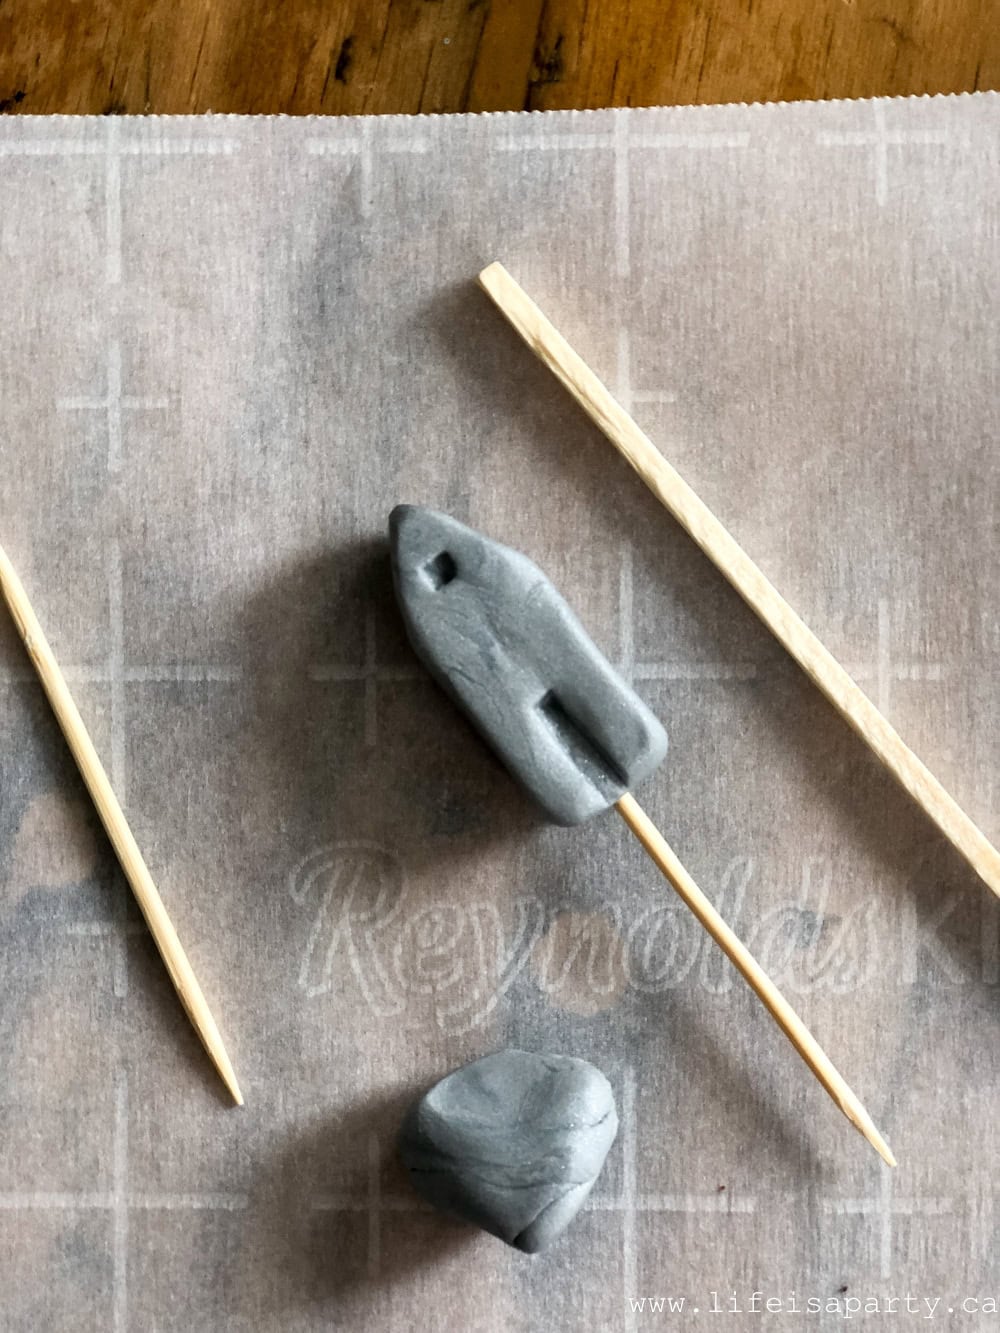
To create the windows and doors, use the end of a match stick to make small squares. Use the long side of the match stick to create long doors. And you can make circles using the end of a lollipop stick for round windows.
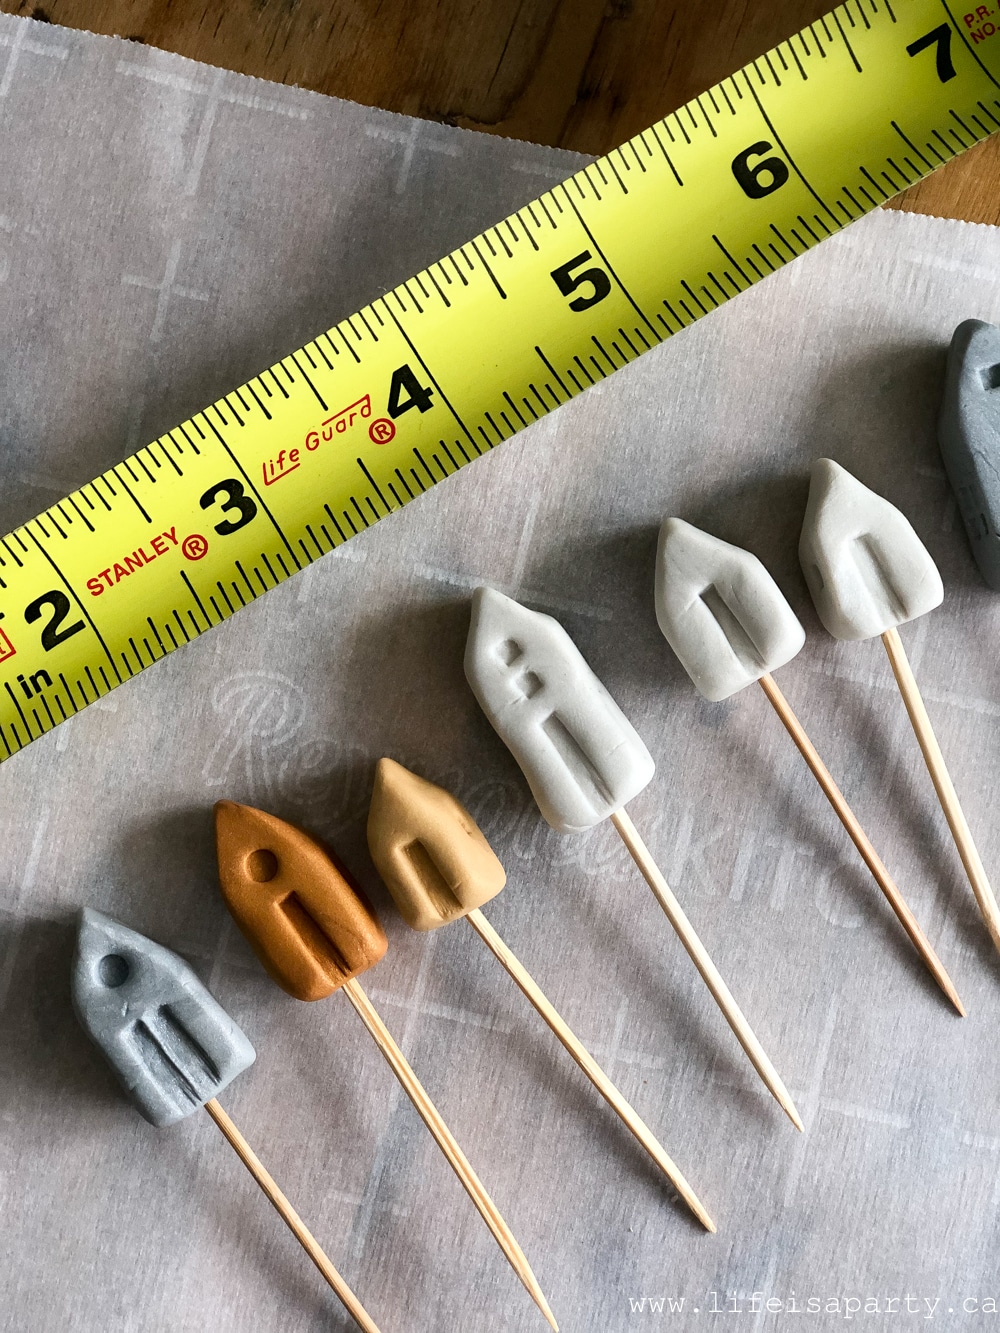
Insert a wooden toothpick into the house.
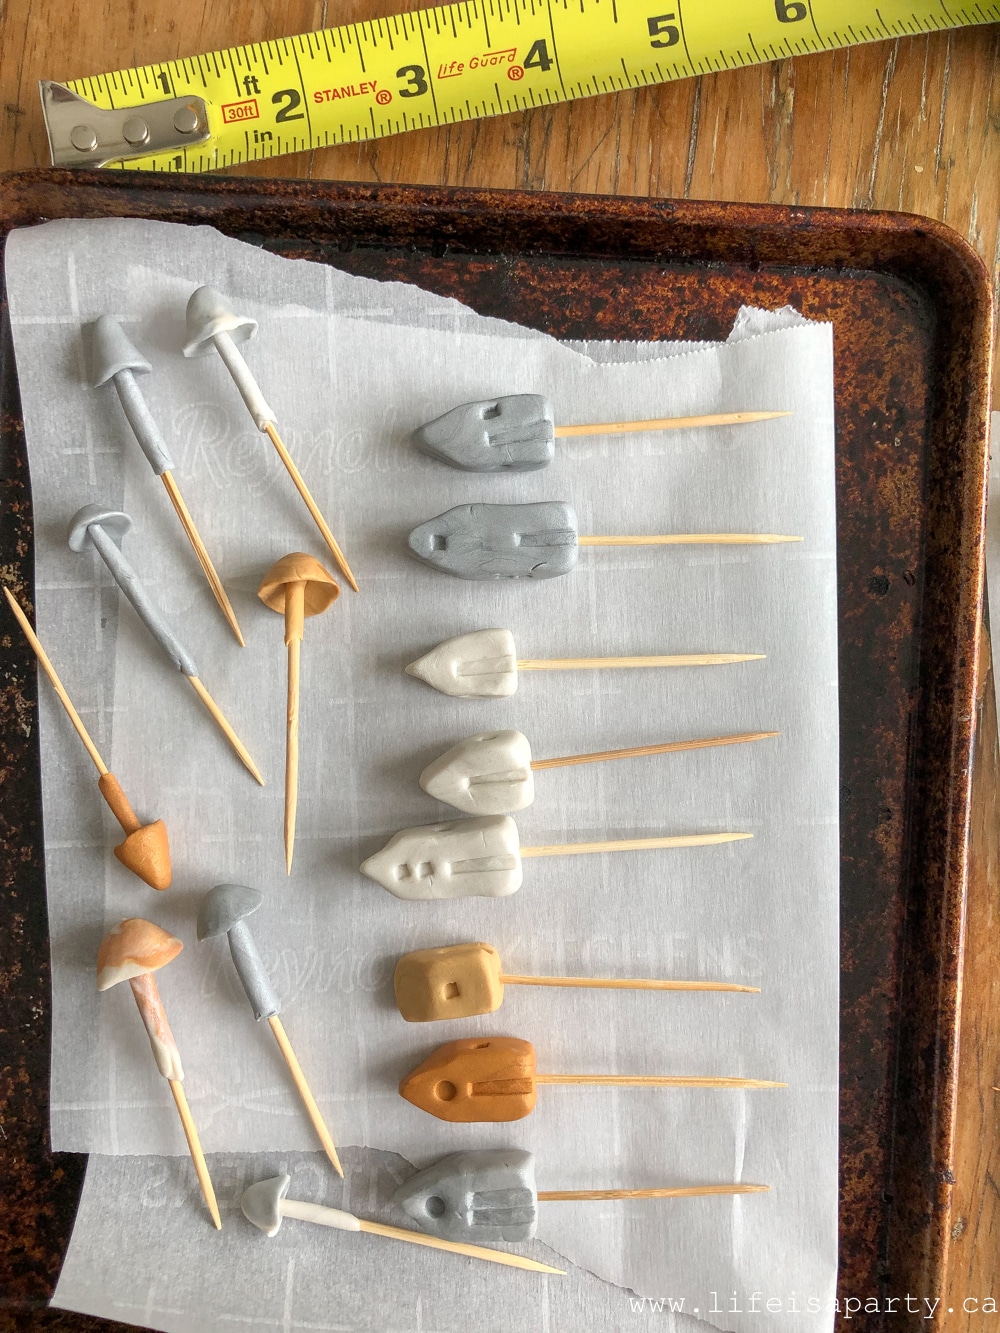
Bake according to package directions, taking care not to burn them.
When they're cool, they're ready to insert into plants.
Step 2: How To Make the Miniature Mushrooms:
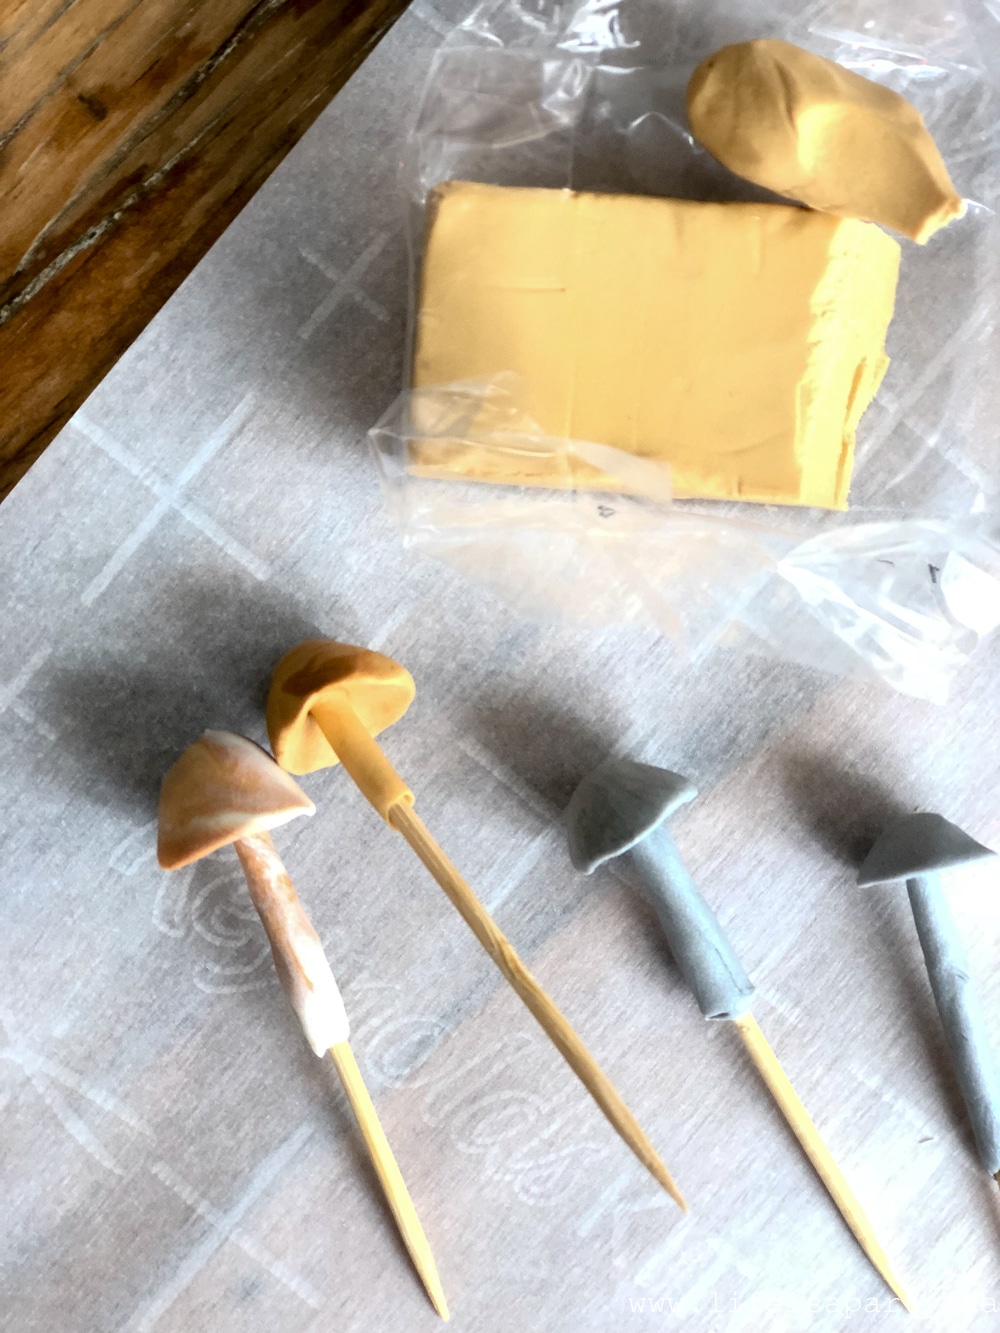
Roll a small amount of soft clay around the toothpick. Leave a gap at the pointed end to insert into the mushroom cap.
Create a mushroom cap using your fingers to mold it, and then insert the tip of the toothpick into it to attach it to its stem.
Back according to the package directions, again taking care not to burn them because they'll discolour.
When cooled, add them in your plant arrangements.
Step 3: Planting Your Teacup Garden
To make a teapot and teacup garden look for teacups at the thrift store where they are usually very inexpensive.
When you're making your fairy garden in a teacup or teapot it's a good idea to add some stones to the bottom of your container, since succulents don't like to be too wet, and they have no drainage holes.
Next add in your succulent plants. I found some of my plants from the nursery were too big for my small containers, so I just divided them.
To divide them look for natural separations and just pull them apart. Leave as much soil around the roots as you can.
This part can be a little nerve wracking, but just carefully go for it. I did mine a few weeks ago and they look amazing, so I know it didn't damage them at all to divide them up.
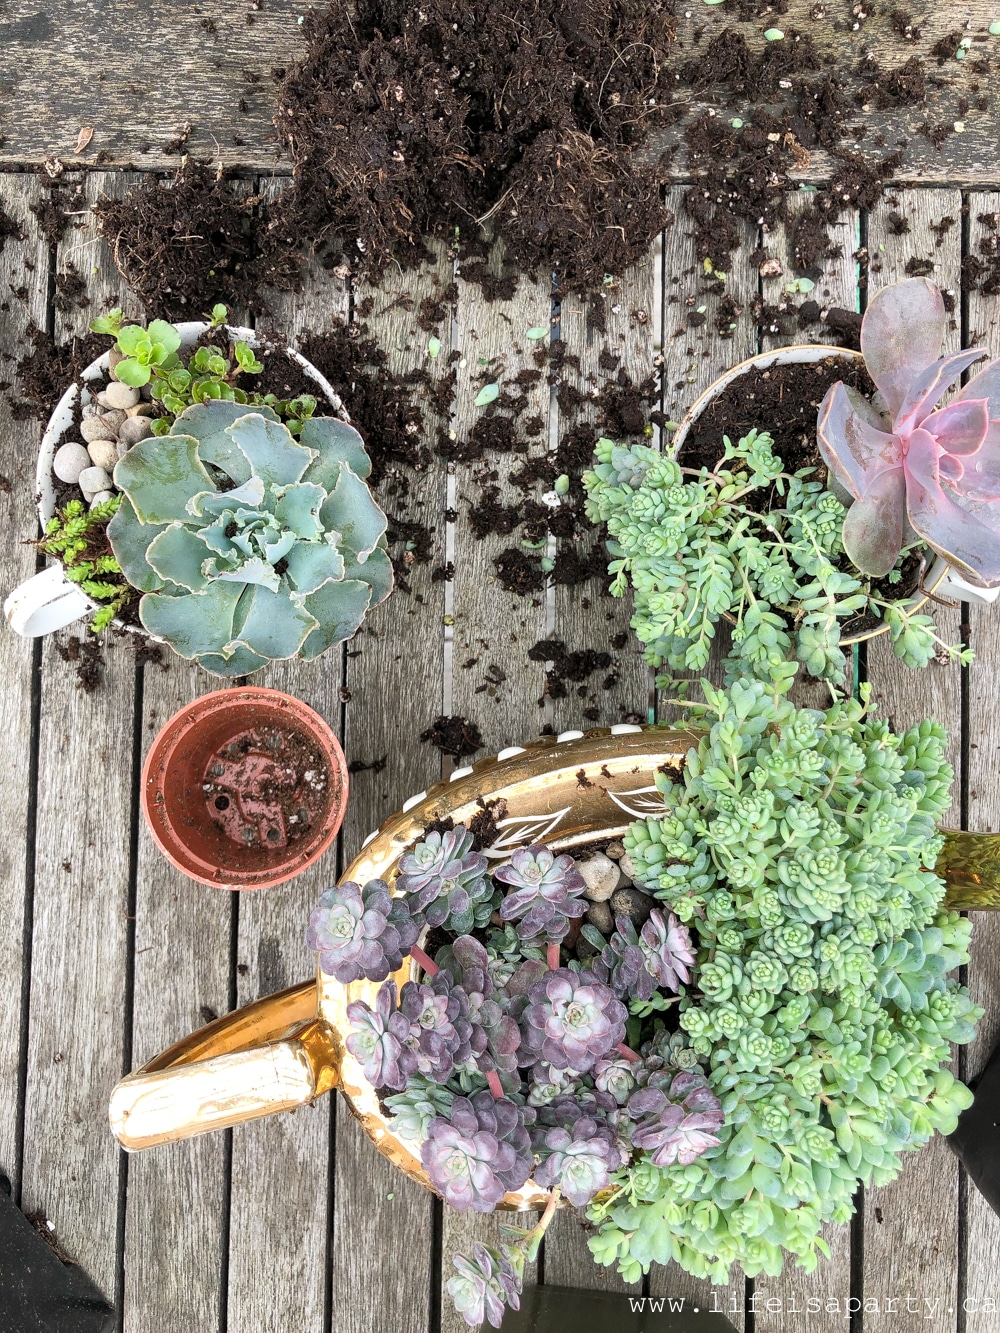
When you're placing your plants, be sure to leave a small place for your village. Start by adding some fine pea gravel to the exposed soil. This looks great, but will also help keep the plant moist.
Then, I added two or three houses to each one, and two or three of the mushrooms.

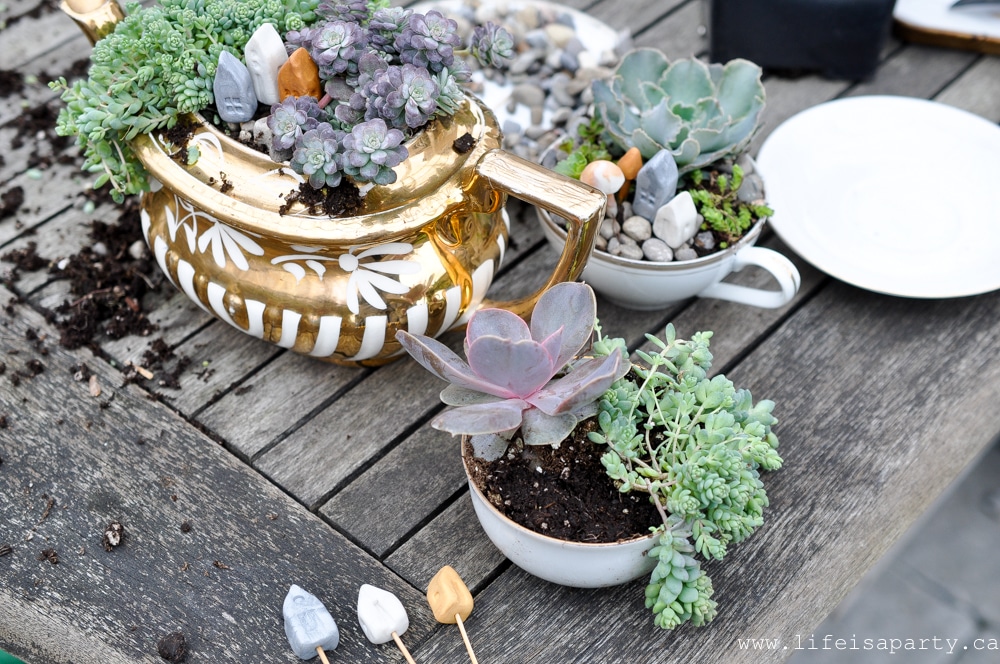
I love how whimsical and fun they are.
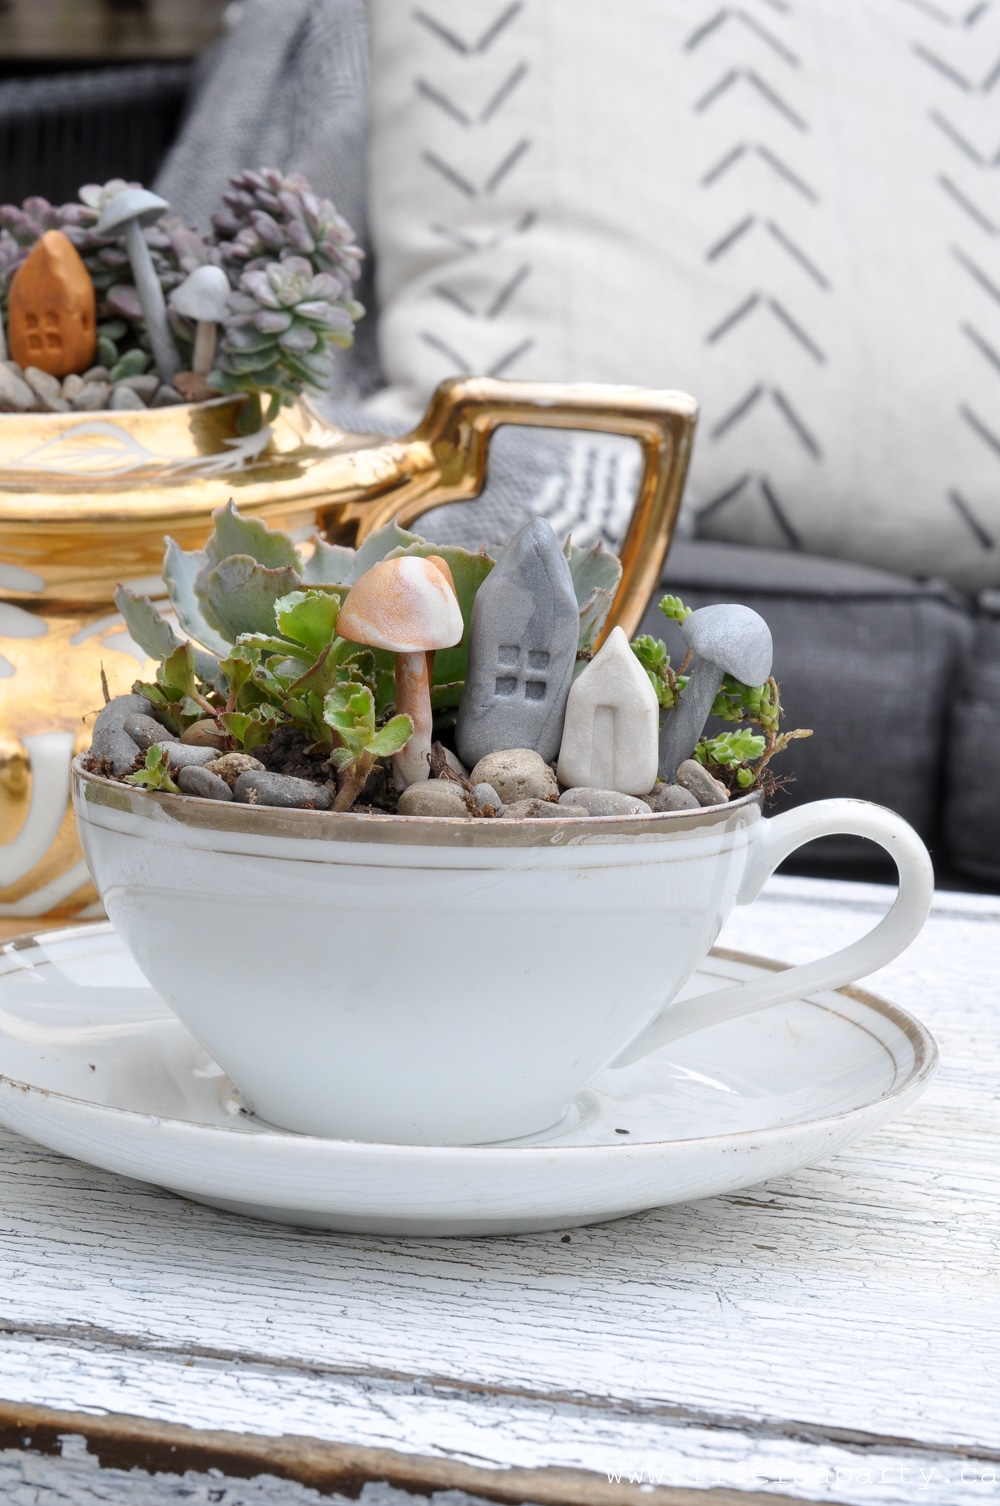
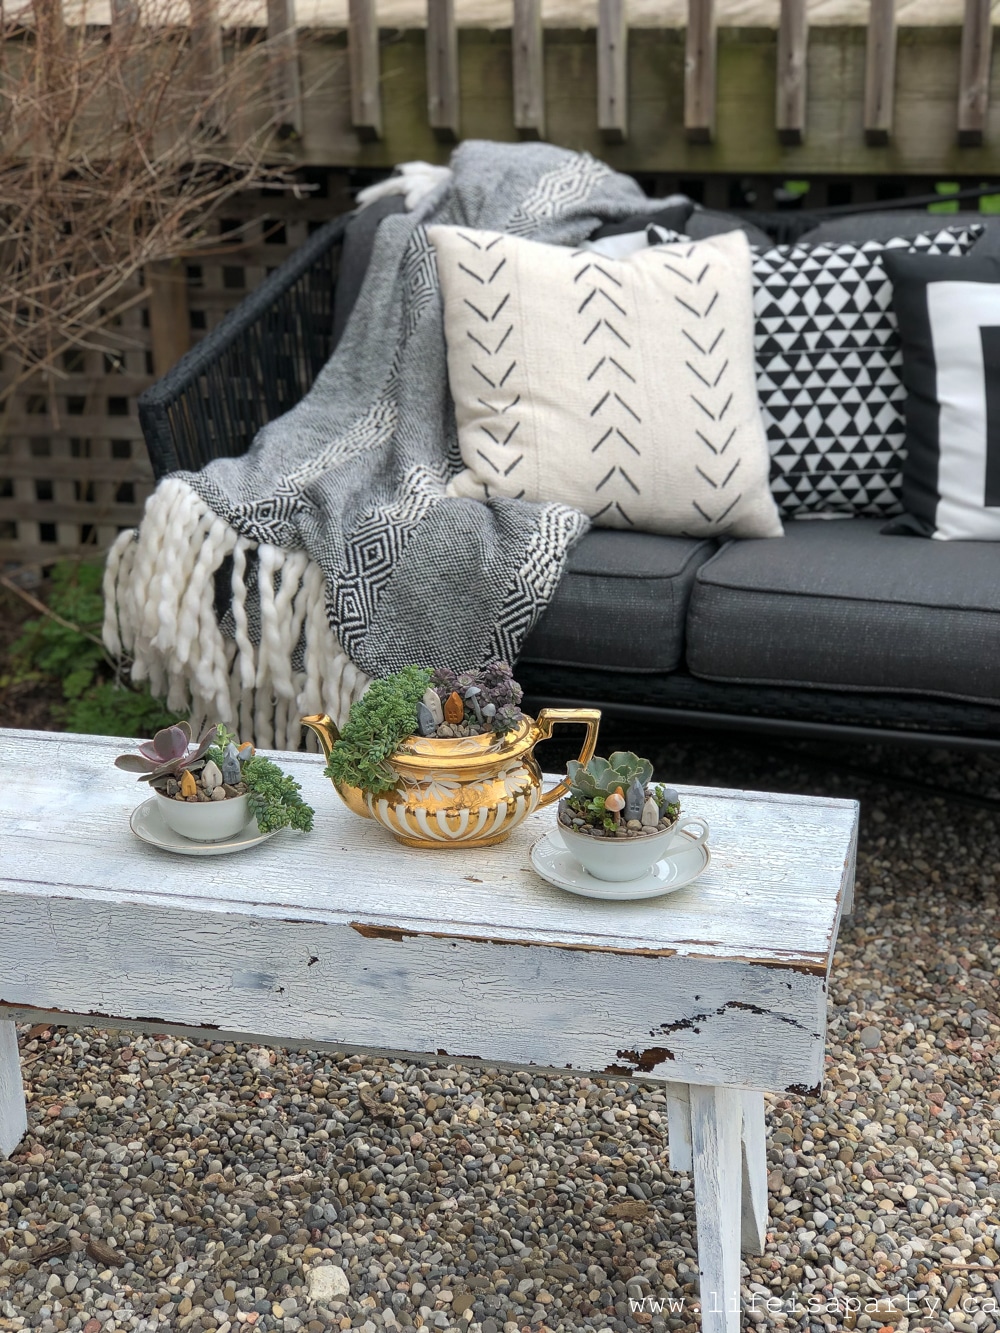
I also really like how you don't necessarily notice the houses and mushrooms at first in the little teacup gardens, until you take a closer look. They're a little hidden away, just how I imagine the fairies like it. 😉
Plant Care
Once these are done, enjoy them indoors or outdoors. Watering them regularly when ever they are dry, but take care not to overwater.
With these Teacup Gardens, life really is a party!
Frequently Asked Questions
If you plant your teacup with succulents it should last for years. Just be sure to water it when it's dry and not overwater it.
Look for inexpensive vintage teacups at thrift stores, antique stores, garage sales, or on-line at places like Facebook marketplace or other re-sale sites.
If the garden is outside it may need water more frequently. Water your teacup garden when it's dry, but take care not to overwater since there's no drainage and succulents don't like to be too wet. Indoors water about once a week.
More Fairy Garden Inspiration


If you try making one of these Teacup Gardens or any other idea on my blog please leave a star rating and let me know how it went in the comments below. Thanks for visiting today!
Equipment
- oven or toaster oven
- garden trowel
Materials
- Oven Bake Polymer Clay any colors
- Toothpicks or Wooden Skewers
- Match Stick and Lollipop Stick
- Parchment Paper
- Vintage Teapot and or Teacups
- Potting Soil
- Assorted Small Succulent Plants
- Small Stones or Gravel
Instructions
How To Make Miniature Clay Fairy Houses
- Use a small piece of oven bake clay and work it in your hands until it's soft. Working on a piece of parchment paper, shape the clay into a cube with your fingers, and using the flat surface of the table and your fingers, create the pointed roof on one end.
- To create the windows and doors, use the end of a match stick to make small squares. Use the long side of the match stick to create long doors. And you can make circles using the end of a lollipop stick for round windows.
- Insert a wooden toothpick into the house.
- Bake according to package directions, taking care not to burn them. When they're cool, they're ready to insert into plants.
How To Make the Miniature Mushrooms
- Roll a small amount of soft clay around the toothpick. Leave a gap at the pointed end to insert into the mushroom cap.
- Create a mushroom cap using your fingers to mold it, and then insert the tip of the toothpick into it to attach it to its stem.
- Back according to the package directions, again taking care not to burn them because they'll discolour. When cooled, add them in your plant arrangements.
Planting Your Teacup Garden
- When you're making your fairy garden in a teacup or teapot garden, start by adding some stones to the bottom of your container, since succulents don't like to be too wet, and they have no drainage holes.
- Next add in your succulent plants. If your are too big for your small containers, divide the plants.To divide them look for natural separations and just pull them apart. Leave as much soil around the roots as you can.
- When you're placing your plants, be sure to leave a small place for your village. Start by adding some fine pea gravel to the exposed soil. This looks great, but will also help keep the plant moist. Then, I added two or three houses to each one, and two or three of the mushrooms


dnr says
Thanks Marguerite, sorry I didn't see a mark on the bottom. Isn't it pretty? I found it at the thrift store with no lid, so it was perfect for this little project.
Dannyelle
Janine says
Oh my goodness, I love this so much! Your clay structures are so whimsical and adorable! And oh my, I love your gold teapot too! What a wonderful project!
Ashley says
This is seriously the cutest thing I have ever seen! What a fun project. I am going to make one of these for my mom - she would love it! xoxo
dnr says
Jo-Anna, thanks so much. I do love a fairy garden, so fun. 😉
Dannyelle
Jo-Anna says
Cutest idea Dannyelle! I've always wanted to make a fairy garden and just never do...they're SO cute so I think this is the year!
Marguerite says
These are gorgeous! i realize its an antique from a shop, but am in love with that teapot. What a great use for a teapot! Is th3ere a mark on the bottom what china co. made it back in the day? thanks so much.
Marguerite