How To Make A Fairy Garden with ideas for small plants to use, and how to make your own DIY fairy houses out of bird houses. Plus a DIY fairy arbour, mailbox and fairy garden accessories.
Jump to:
- Why We Love Fairy Gardens
- DIY Fairy Garden Houses
- Pinecone Roof Fairy House
- Fairy Garden Containers
- Fairy Garden Plants
- DIY Fairy Garden Decor
- Stepping Stones and Pathways
- DIY Fairy Garden Arbour
- Tea Party for the Fairies
- DIY Fairy Garden Mailbox
- Fairy Garden House Number
- Frequently Asked Questions
- More Fairy Garden Inspiration
Why We Love Fairy Gardens
- They're so cute and adorable.
- They attract fairies to come live in your garden.
- They're like a hidden treasure among the plants.
- These are really fun to make with kids and for them to play with.
- For adults they awaken your inner child.
- There's lots of easy DIY things you can make for your fairy garden if you're crafty.
It's that time of the year again, where my mind starts thinking about fairies and building little fairy miniature gardens. It's becoming a bit of a tradition for my girls and I to make them each spring -see this fall fairy garden, teacup garden, fairy garden camp ground, and our teacup fairy garden here.

DIY Fairy Garden Houses
I usually start out making a fairy house with little dollar store or craft store bird houses, and make a few minor adjustments to make them into the perfect little fairy homes.
Start by using a little saw to cut off the bird perch. Then use your saw to cut off the end of a regular old paint stick to make little fairy doors for your houses.

Attach the doors to the tiny houses with a little finishing nail. When you hammer the door onto the house, leave the nail sticking out a little for the perfect tiny door knob. You could also use a bit of wood glue as well.

Then we usually paint the houses in pretty colours of acrylic paints and add a little glitter here and there for a the perfect fairy touch. You can use ordinary acrylic paint for an indoor fairy garden.
To make the houses work in your outdoor space, you can seal the houses with some spray on sealer.
It's also a great idea to get kids involved in in the painting. I often let my kids each make their own, with their own colors and their own fairy garden design.
This is a great way to let kids add a little imagination and create a really magical garden. You might even choose different themes for your fairy houses, and make an entire village.
Pinecone Roof Fairy House
This year I wanted to change it up a little and I've added a few more fun details to the house construction. I may or may not have watched a few too many Tinker Bell movies over the last few years since they're a favourite with my little girls.
I found myself thinking "what would the fairies use"?
They seem to use anything they can find -at least in the movies, so I incorporated a few things these magical creatures might have on hand too.

The first house I made this year has a shingle roof made with pine cones. I just bent little pieces of pine cone off with my fingers, and hot glued them in an overlapping shingle style to create the roof. Afterward I gave it a coat of glitter paint for a little fairy sparkle in our whimsical fairy garden.
The finishing touch was a front door made of twigs with a tiny little rock handle glued on. It is so much fun letting your imagination run wild with these cute fairy garden houses.


Birch Bark Fairy House
For the second DIY fairy house, I made some sweet little shingles out of some birch bark, trying to alternate colours and textures for a little variation.
The birch was just. a few pieces that were coming off of some birch trees in the woods that I found on a walk.
The door of this one is another piece of birch bark.
Birch bark is really easy to work with, and cuts really easily with regular scissors. All the birch bark is attached with hot glue, and finished with some glitter paint.
I found the hot glue held up well for the whole growing season. If you were worried though you could use a stronger glue like E6000 or Gorilla Glue.
This was such a fun project. It's a great idea to go for a little walk in the woods and find natural materials like this, and let them inspire you for your own fairy garden craft.

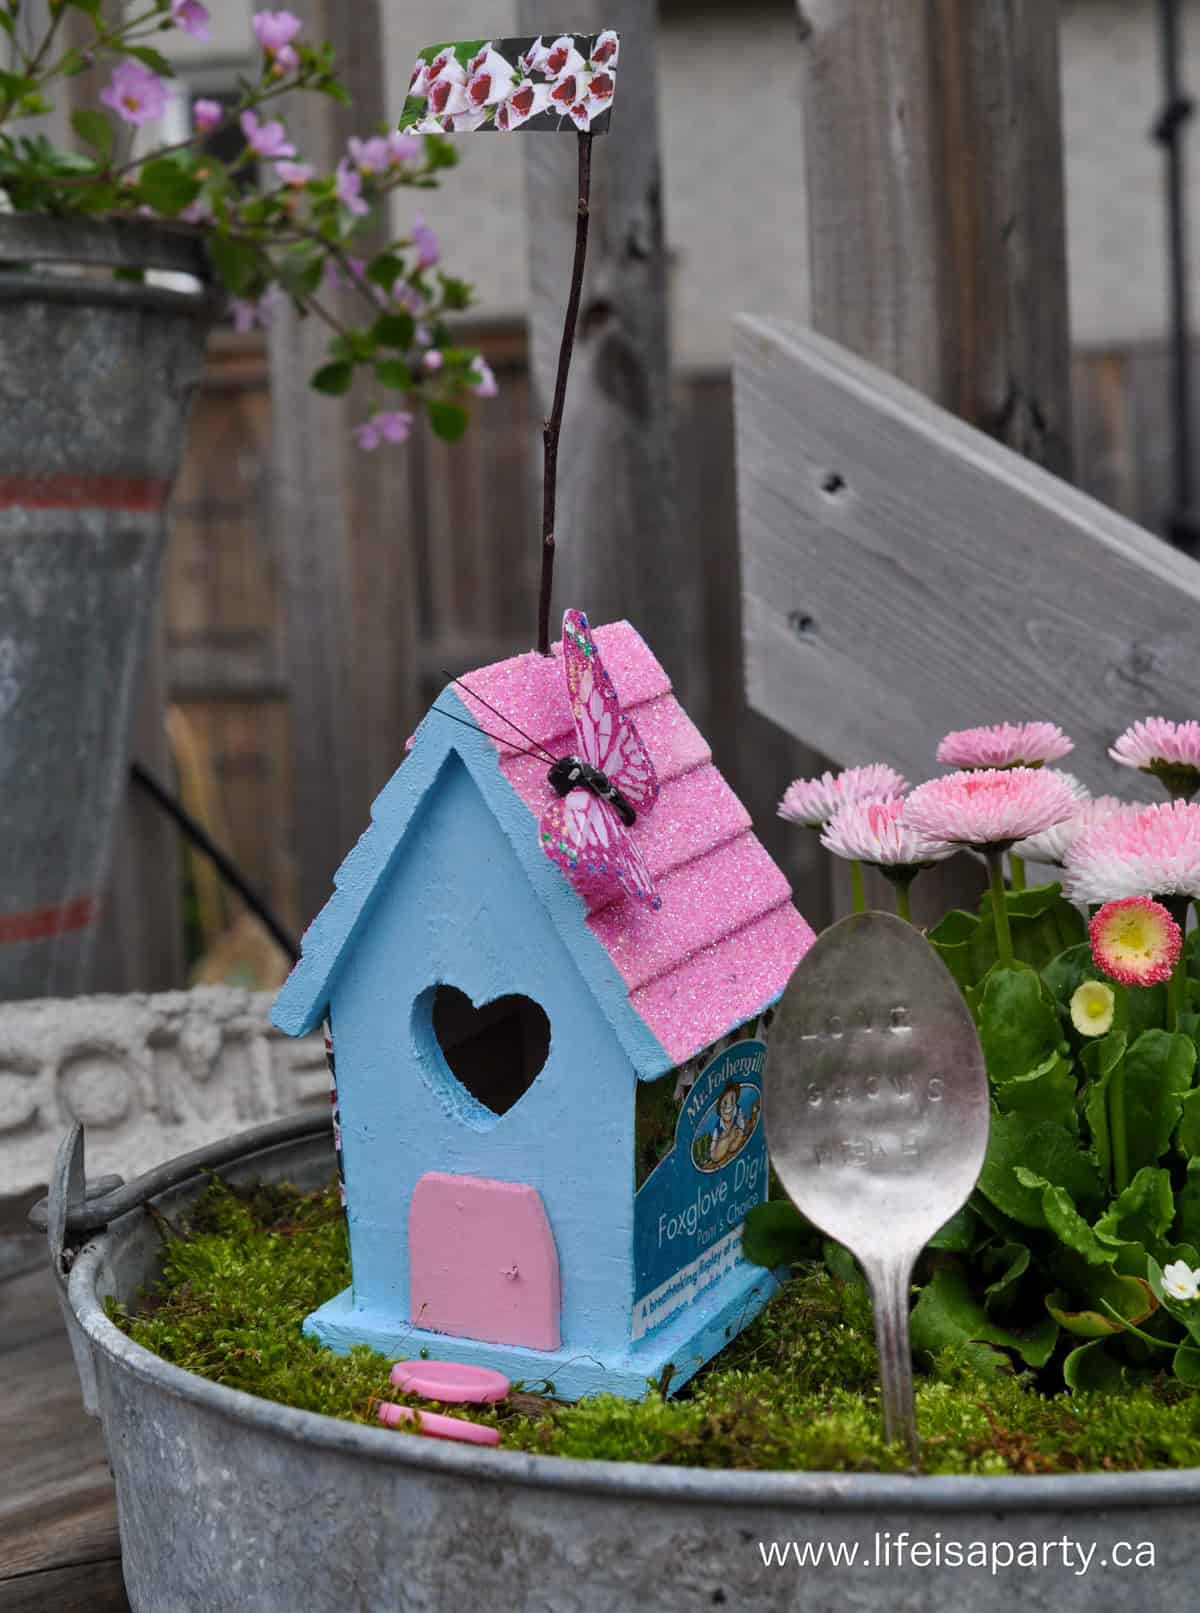
Seed Package Fairy House
The third DIY fairy house might be my very favourite, with three sides of it covered in seed packages. I saved my empty seed packages this year after planting some seeds in my garden. They were just too pretty to throw away. I thought they'd be really sweet on some fairy houses. See more on how to make a fairy garden house with seed packages here.
I just trimmed the empty seed packages to size and mod-podged them onto the tiny fairy houses.
This one has a full glitter roof too.
Seed packages are so beautiful, and this is the perfect way to upcycle them. If you don't have any, look for free printable versions on line that you can print on your home color printer and use.


Fairy Garden Containers
After the houses were made it was time to place them into the container fairy garden. I like using old galvanized steel, and enamelware containers like a galvanized tub. I've picked them up mostly at antique shows. They make a great flower pot. Just make sure to add some drainage holes with a nail and hammer or a drill before planting in them.
Clay pots or terra cotta pots are a great option too.
You can also make your fairy gardens in your flower beds if you prefer.
I love using containers for my fairy gardens, because you can really get up close and see all the fairy garden details. Other great container ideas are to use an old wheelbarrow, or an old hollowed out tree stump.
I usually add one house to each pot and group them together like a little fairy neighbourhood. They make a great focal point on your deck or patio. This is a perfect location for plants that love sun.
I like them arranged on the stairs, so that you can really appreciate each one. Together they make entire villages of fairy homes.
Making your fairy gardens in pots means they're perfect even for a small space. You can even add fairy lights, and enjoy your fairy gardens at night.
Fairy Garden Plants
I've used some small annals in my gardens this year.
Try and pick flowers with smallish blooms, and remember they'll grow, so give them some room, and be sure to leave space for the houses and accessories too.
Small plants work best so look for miniature plants of your favourite varieties. We used some English daisies, miniature rose bushes and lots of filler container plants like bacopas, sweet alyssums, and lobelia.
You can also include tiny trees or bonsai trees like we did for our camping themed fairy garden here. Look for these at your local garden store.
Another option is to make a succulent garden. Succulent gardens are also a great choice for fairy gardens. Succulents are small and slow growing, so they work well in a fairy landscape. See how we used them for our teacup fairy garden here.
After the plants are in, I like to add moss to mine to make the fairies yard. I just dug up some from a shady spot in our side yard where it was growing.
Another great option if you want create a green fairy lawn is to plant something like creeping thyme. It looks great and stays nice and low and green. Irish moss or Scotch moss are also great options. Look for them at the garden center.

DIY Fairy Garden Decor
Next, it's time to add your houses, and pathways, and fun little fairy garden accessories. I used some that I already had from other years -you can save them and use them year after year. We also added a few new ones too. It's a good idea to invest in or make a few new tiny accessories each year and add to your collection.
Stepping Stones and Pathways
It's fun to add some stepping stones and pathways to your small garden. We've used different items in different gardens here. One path is made out of buttons. Another path is made of smooth stones. Glass gems work well too. Another path is small wood slices from the fairy accessory section of the store, but you can also of course use real wood rounds too. Tiny pea gravel is a good option too, or aquarium gravel if you want bright colors. Try to think outside of the box when it come to decorating your cute garden. Old toys can make great additions to your DIY fairy garden too.

Where To Find Fairy Garden Accessories
When I first started making fairy gardens it was quite difficult to find cute accessories. The best place to look was a speciality doll house miniature store, or in the doll house miniature section of the craft store. It's much easiy to find them now. Look in craft stores, plant nurseries, and dollar stores. And if you can't find what you want in the store be sure to look on-line for even more options.

DIY Fairy Garden Accessories
It's always fun to make a few of your own DIY fairy garden accessories too, and get a bit creative with things you might have around the hosue.
Every busy fairy household needs a clothesline for the washing.
We made this one for our fairy friends with some string and miniature clothespins, it's a great place for fairies to hang out their fresh laundry.

DIY Fairy Garden Arbour
I made this sweet little arbour by hot gluing a few twigs together, I think it makes a sweet garden entrance. And it was really simple to make. Find out how to make your own arbour or DIY fairy garden pergola here.

Tea Party for the Fairies
The arbour made the perfect entrance to a little fairy tea party in the garden.

I made the fairy cupcakes last year out of some polymer clay -see a tutorial on how to make miniature polymer clay cupcakes here. The polymer clay really held up great...makes me think about what else I could make using polymer clay for my DIY fairy garden next year.
The china tea set is from a miniature dollhouse store, I've had it outside in a fairy garden during the summers for three years now and it still looks great.
The table is a new addition from a local nursery selling some fairy furniture this year, and what better seats than a couple of thimbles, which I just picked up in the sewing section of a big box store.

DIY Fairy Garden Mailbox
The shell mailbox is new too. I used a seashell, and added the flag with a little piece of birch bark, coloured red with a sharpie and hammered in place with a little finishing nail. If the flags up -you've got mail!
Little ideas like this really make this into a magical fairy garden.

Fairy Garden House Number
And, every house needs a little house number so your friends can find you when they drop by. We just used a small wood round and a sharpie to make this and it's so cute.

I love making these little gardens and using them in pots along with some other flowers on my deck.


You might have noticed the black cords too, it's an irrigation system -read how we installed it here, that is on a timer, and will hopefully mean that it's impossible for me to forget to water these fairy gardens.
I hope these easy fairy garden ideas inspire you. Traditional fairy gardens like these are so much fun to make. Kids of all ages will love doing fairy garden crafts like these with you and creating their own beautiful fairy garden, and then waiting for the little fairies to move in.


With DIY fairy garden ideas like these, life really is a party!
Frequently Asked Questions
Make sure to include a beautiful house, you might even want to add a vacant or for rent sign so they know it's available. Fairies love seeing wonderful up-cycles so be sure to include some household items worked in like buttons and thimbles for example. They are also know to have a sweet tooth. 😉
If you make your fairy garden on a sunny deck or patio in a container like we did you will have to remember to water it everyday so that it doesn't dry out.
You will need a container with soil and plants. You can use small filler container plants, which are not expensive. Fairy garden houses and accessories can be expensive. Save money and get creative by making your own.
More Fairy Garden Inspiration


If you try making a Fairy Garden or any other idea on my blog please leave a star rating and let me know how it went in the comments below. Thanks for visiting today!


ladybug54 says
Love your wonderful, imaginative fairy gardens. I hope to make one before the summer is over.
dnr says
Hi Sherri,
Yes I made holes in the galvanized containers for drainage with a nail and hammer. You can see how here https://www.lifeisaparty.ca/2013/fairy-gardens-2013/ Hope this helps,
Dannyelle
sherri says
I love each an d every one of them...and love the fact that you made most of the Fairy Garden embellishments yourself! One question; did you somehow drill oles in the galvanized containers?
Mama Rosemary says
This is just an incredibly fun idea. I love it! All the attention to detail, the way you have created a little village... just perfect!
Kathy says
very cute collection of fairy gardens. I like how you arranged them on your steps.
Dani @ lifeovereasy says
Goodness those are adorable! Why didn't I know about fairy gardens when my girls were young?
Tia says
Cute craft!
Andrea@personallyandrea says
Oh. My. Gosh. That is the cutest thing I've ever seen! I must make one now!
Christina @The DIY Mommy says
Oh, these are sooooo cute. Thanks for sharing! I bet my little girls would love these.
The Happy Creations says
Hi, visiting from the makers party,
They are adorable,so cute,looks like you have great connection with your inner child:)
Love it:)
Kelly says
I saw this on the Re-Treat link up and had to come see what you've done! I'm so eager to buy a house this year just so I have a space to do things like this! Your attention to detail is absolutely amazing! Pinned!
Time With Thea (@TimeWithThea) says
This fairy garden is so adorable. I totally enjoyed all of the photographs! I am inspired to make my own one day! Pinning!
Sue {munchkin munchies} says
Eeeeeek!!! Oh my GOODNESS, I am dying of the utter cuteness! I adore these! Thanks so much for the inspiration and how-to's! Time to pin! 🙂