This dirt pudding without cream cheese is one of those recipes that looks seriously impressive but only has three real ingredients. No Cool Whip, no cream cheese, no powdered sugar. Just chocolate pudding, Oreos, and milk.

Quick Look
- 📋 Recipe: Easy Dirt Pudding Without Cream Cheese
- ⏲️ Ready In: 10 minutes (plus optional chill time)
- 👪 Servings: 4 individual cups
- 🔪 Difficulty: Easy
- 💭 Top Tip: Leave some larger Oreo chunks when you crush them. Bigger pieces create that satisfying texture contrast that makes this dessert so good.
Why You'll Love This Recipe
- Only 3 real ingredients and no baking required.
- No cream cheese, no Cool Whip, and no powdered sugar needed.
- Ready in 10 minutes and easily made ahead.
- Served in individual cups so there is no cutting or serving mess at parties.
- The plant pot styling is completely unique and makes these look so special.
Jump to:
We love a dessert that works double duty. These little dirt cups are easy enough for a Tuesday afternoon but look beautiful enough to set out at a garden party or spring celebration. We originally made them for our Earth Day party and they were such a hit.
What makes this version different from most dirt pudding recipes out there is how simple it really is. A lot of recipes swap out the cream cheese for Cool Whip, powdered sugar, or butter. This one uses none of those. Chocolate pudding mixed with half a bag of Oreos, topped with the remaining crumbs, and dressed up with chocolate rocks and a sprig of fresh mint. That is genuinely it.
The individual cup format is also our favorite way to serve this. You can see all the layers through a clear glass, everyone gets their own portion, and there is no slicing or scooping required at the table. But if you want to make this in one large container, you can do that too.
If you love easy no-bake chocolate desserts, you might also enjoy our individual brownie chocolate trifle cups, which use a similar layered format and are just as quick to pull together.
Ingredients

See the recipe below for exact measurements.
- Instant Chocolate Pudding Mix: Instant pudding is the base here. It sets quickly and gives you that rich chocolate color that looks exactly like real dirt. Make sure you pick up the instant variety and not the cook-and-serve type. If you are really pressed for time, you can use prepared pudding cups and skip the milk entirely.
- Oreo Cookies: We used a 225-gram bag of mini Oreos for this recipe. We crush the whole cookies, filling and all, because the frosting helps bind the crumbs together and adds a little sweetness. Use a rolling pin and a zip-close bag for the easiest cleanup. If you use a food processor, pulse carefully so you do not turn everything into a fine powder. You want some texture.
- Milk: Cold milk is all you need to mix the instant pudding. Use whatever you have on hand.
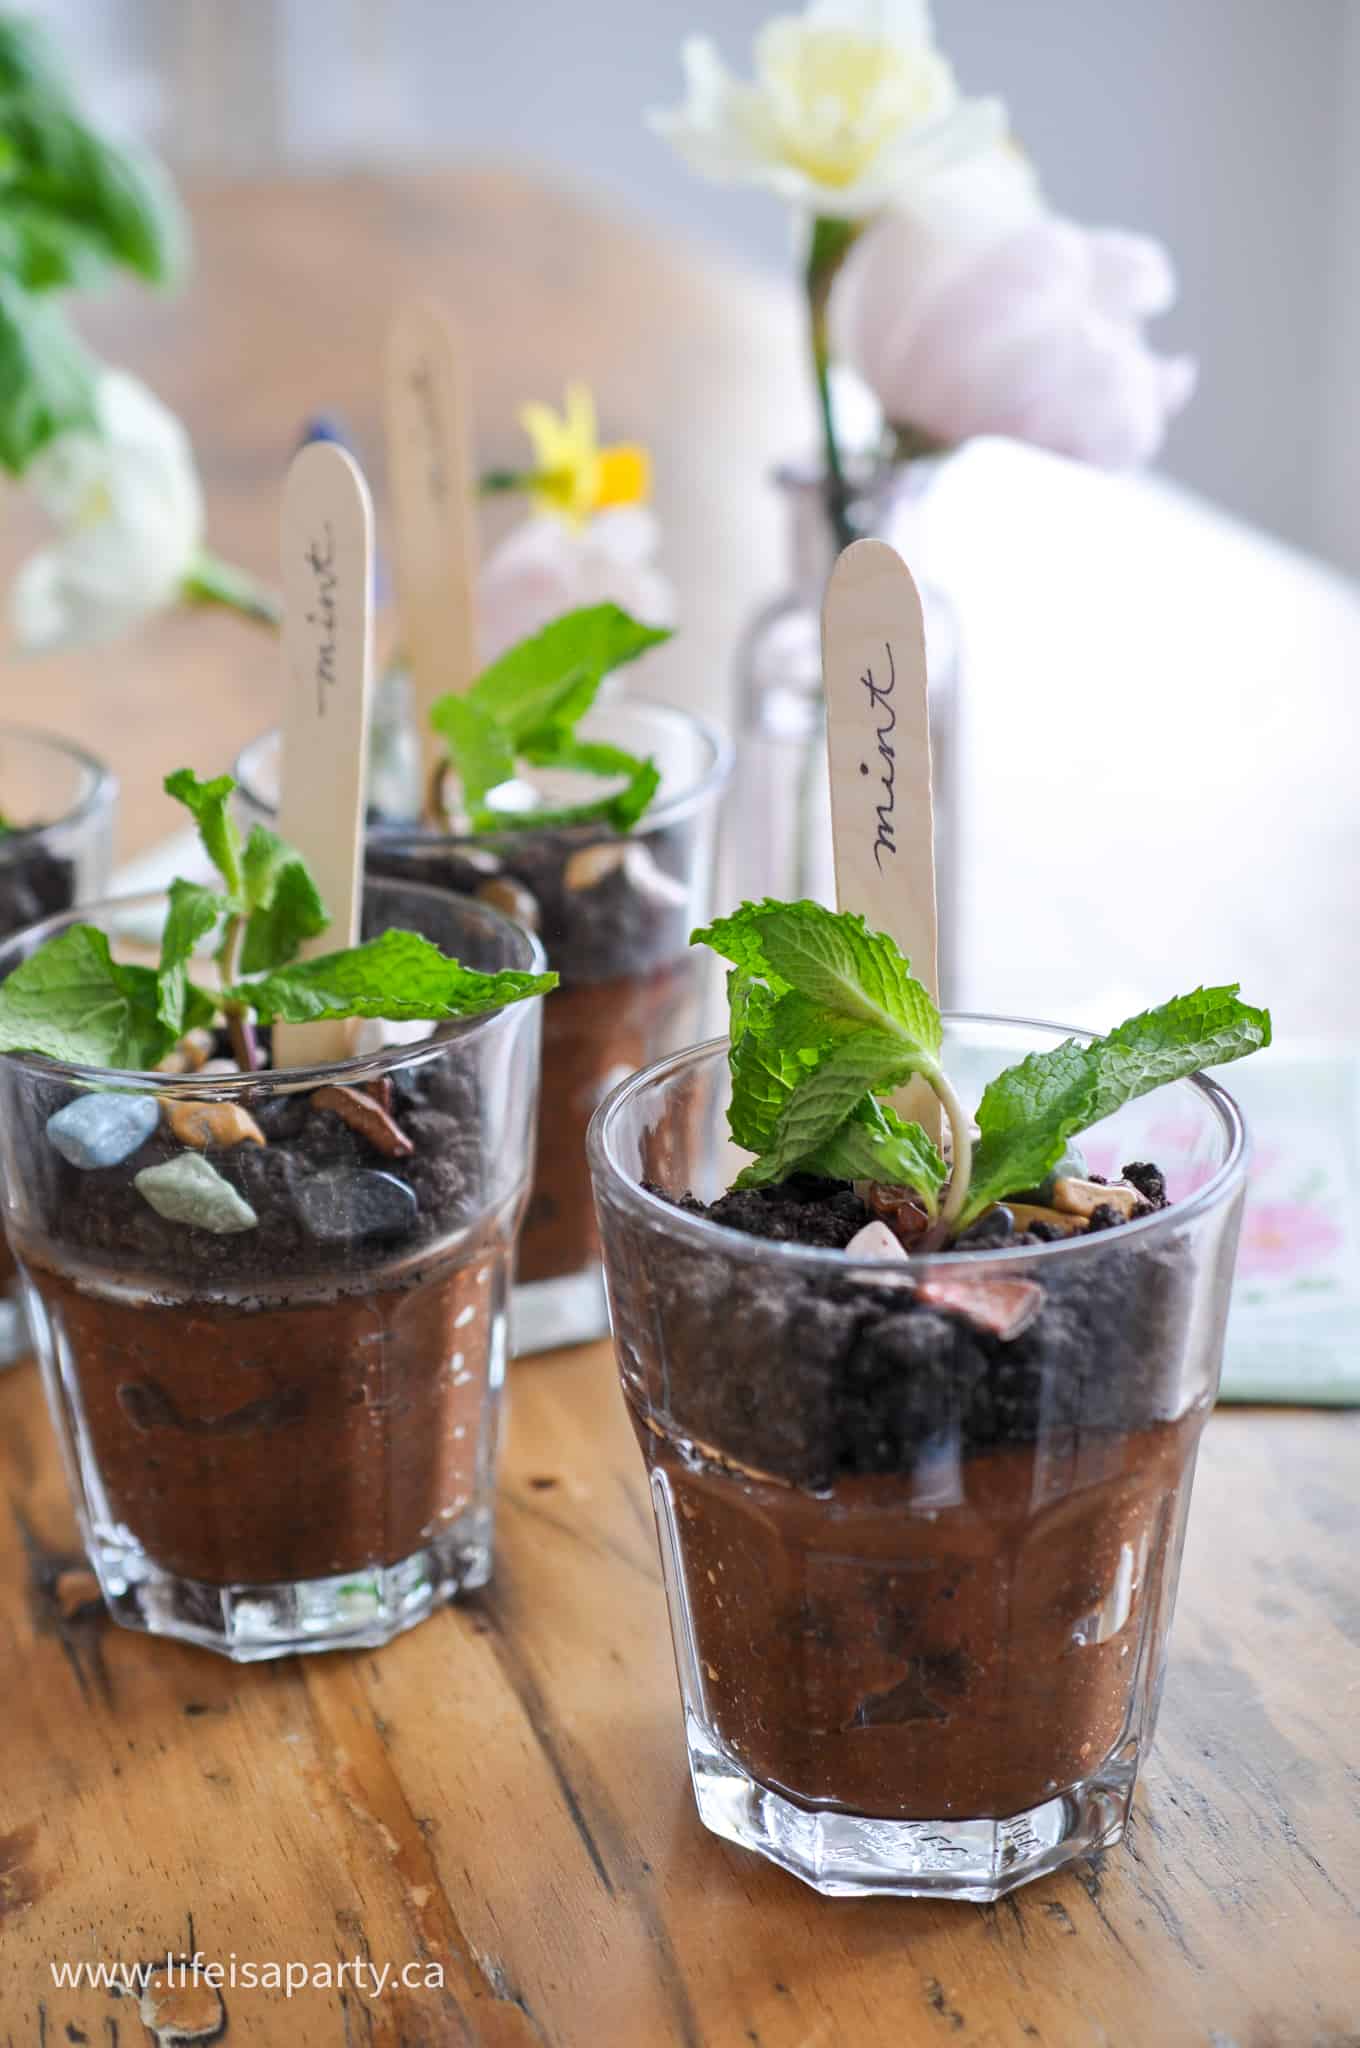
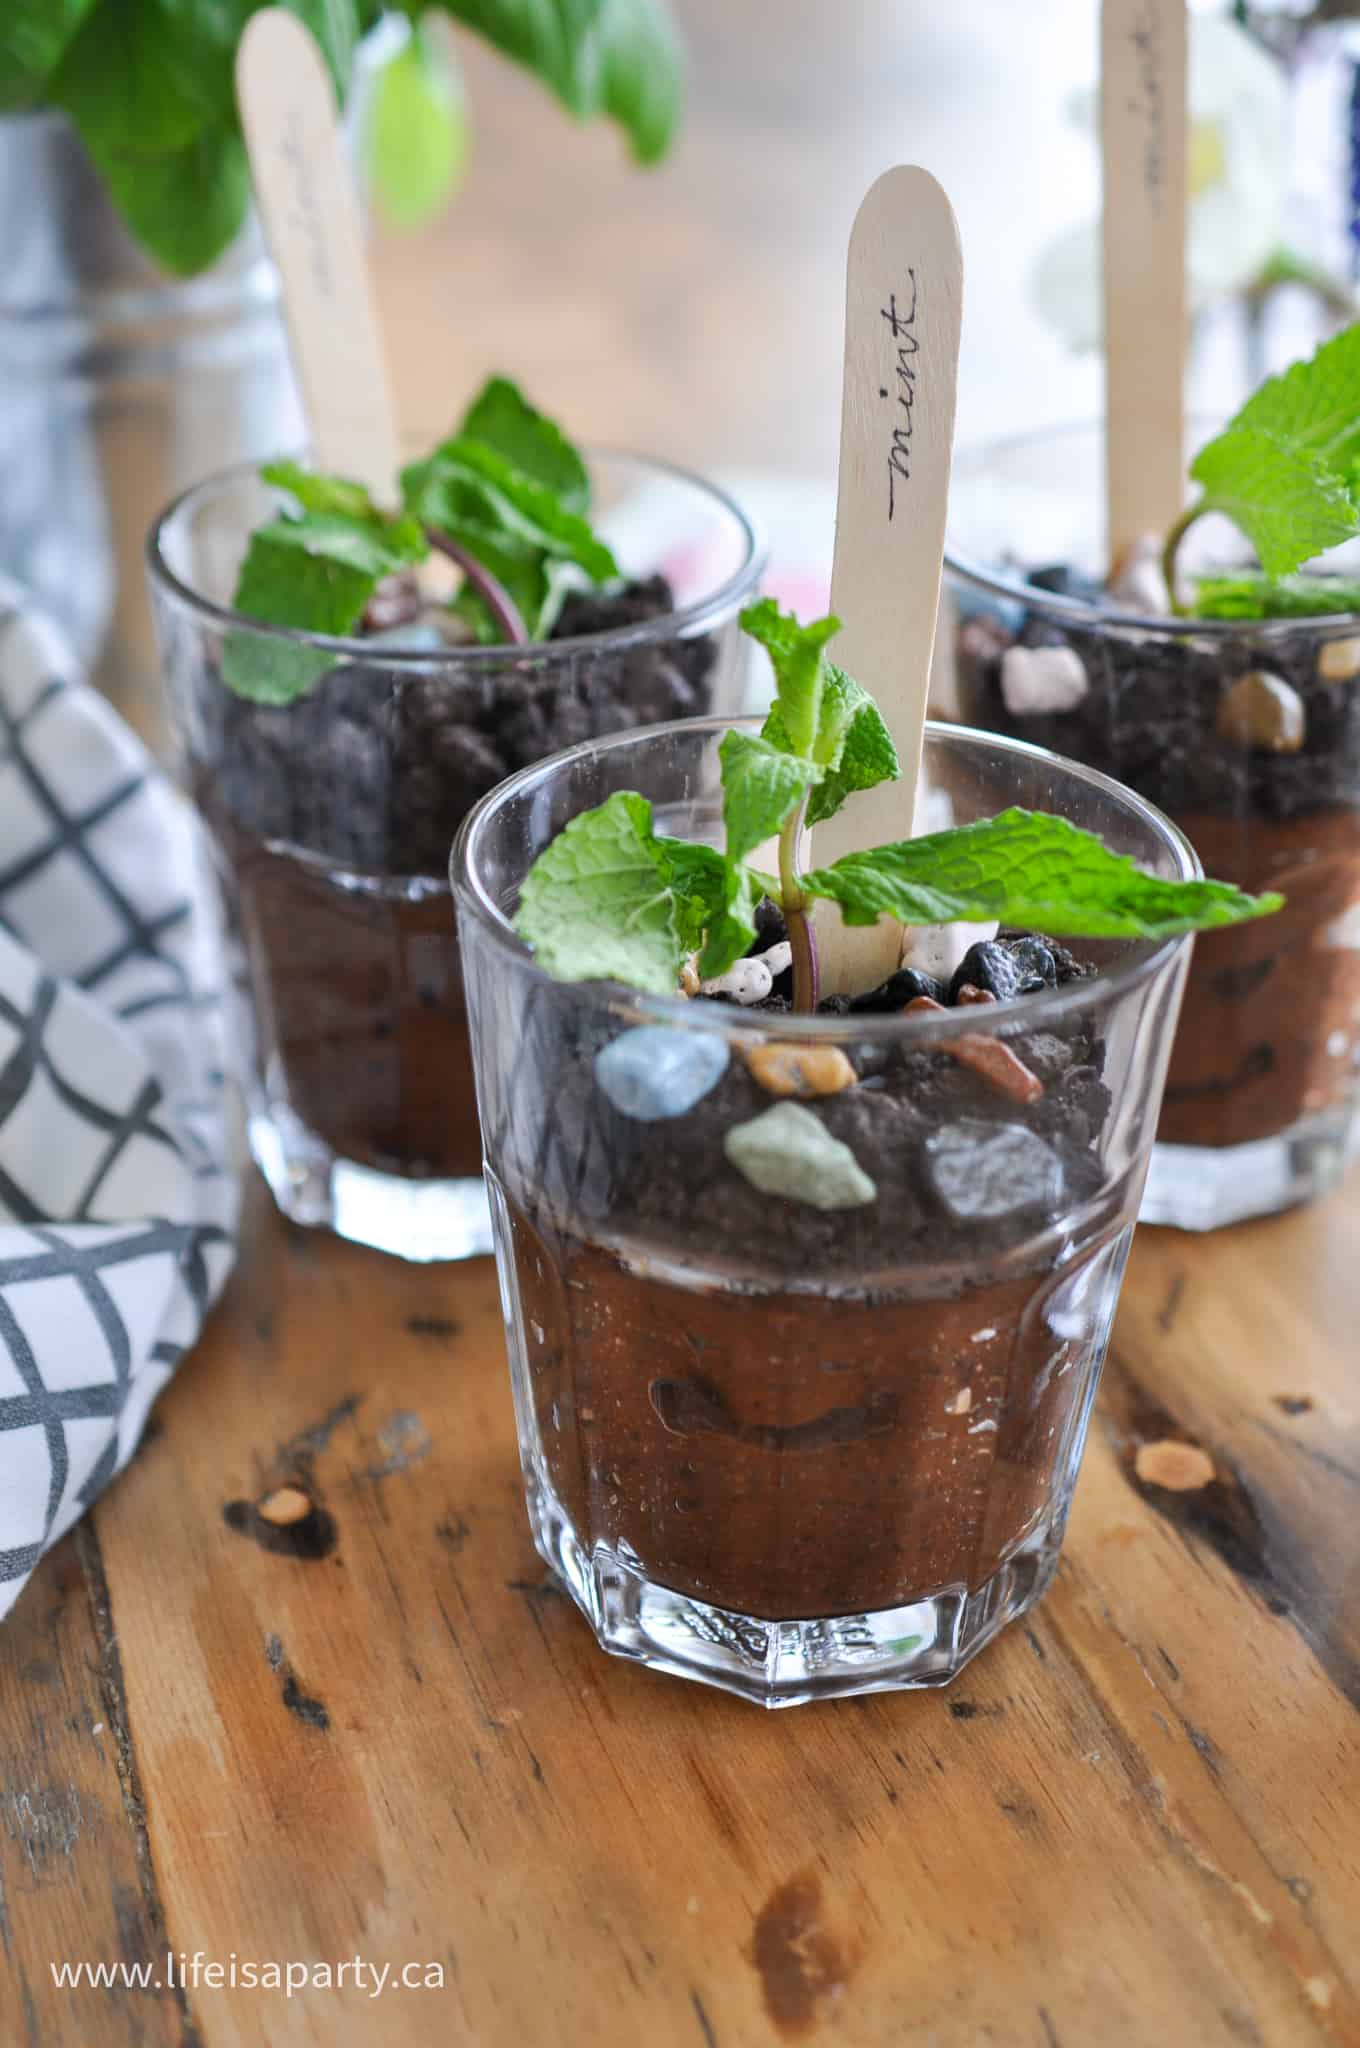
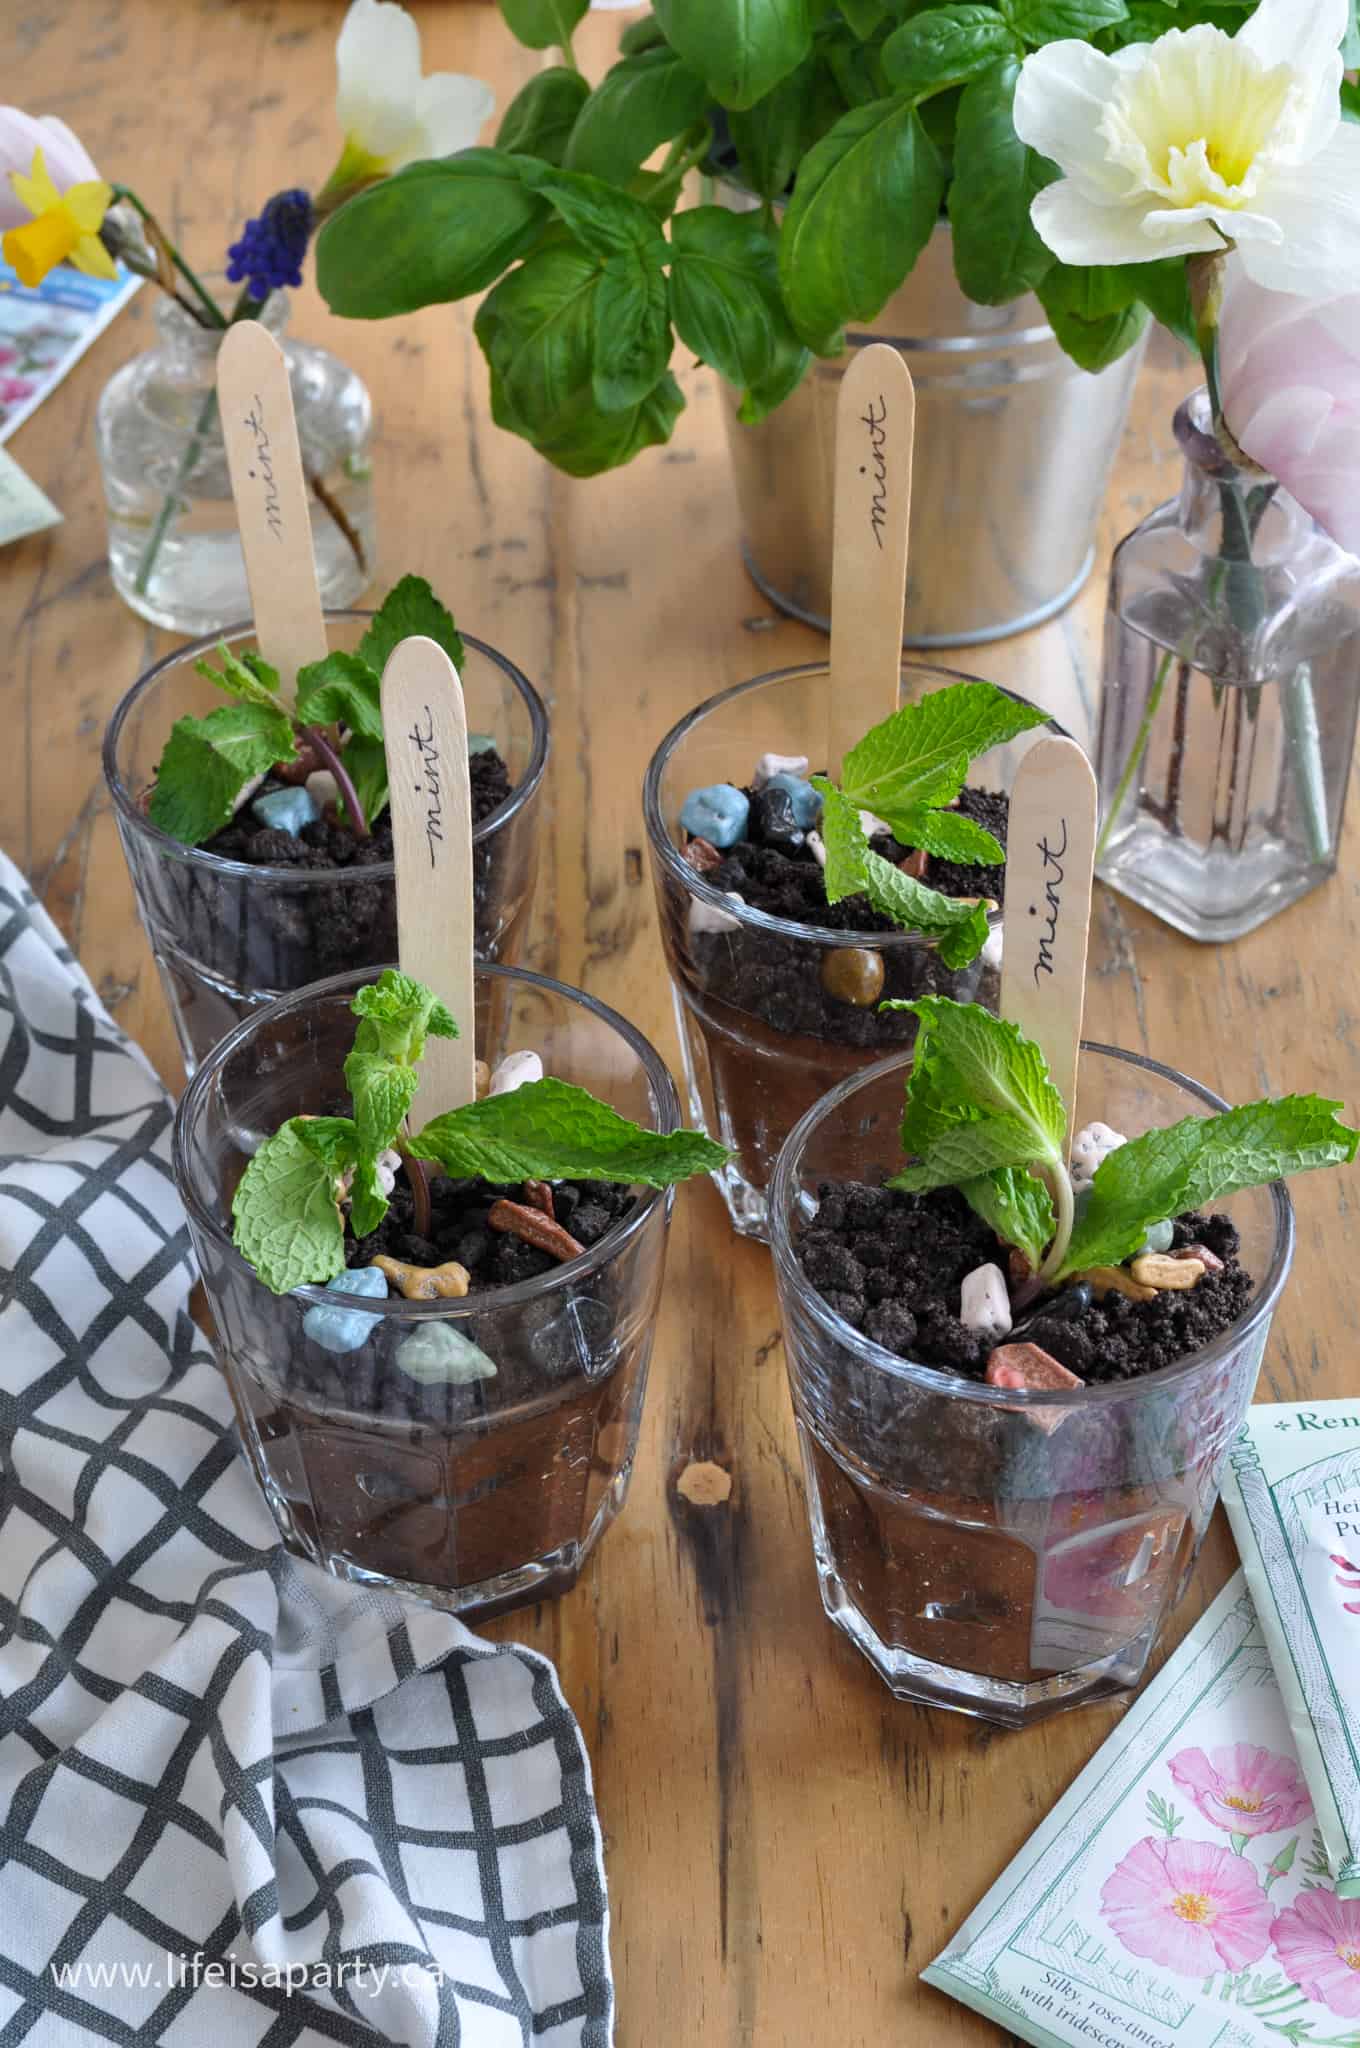
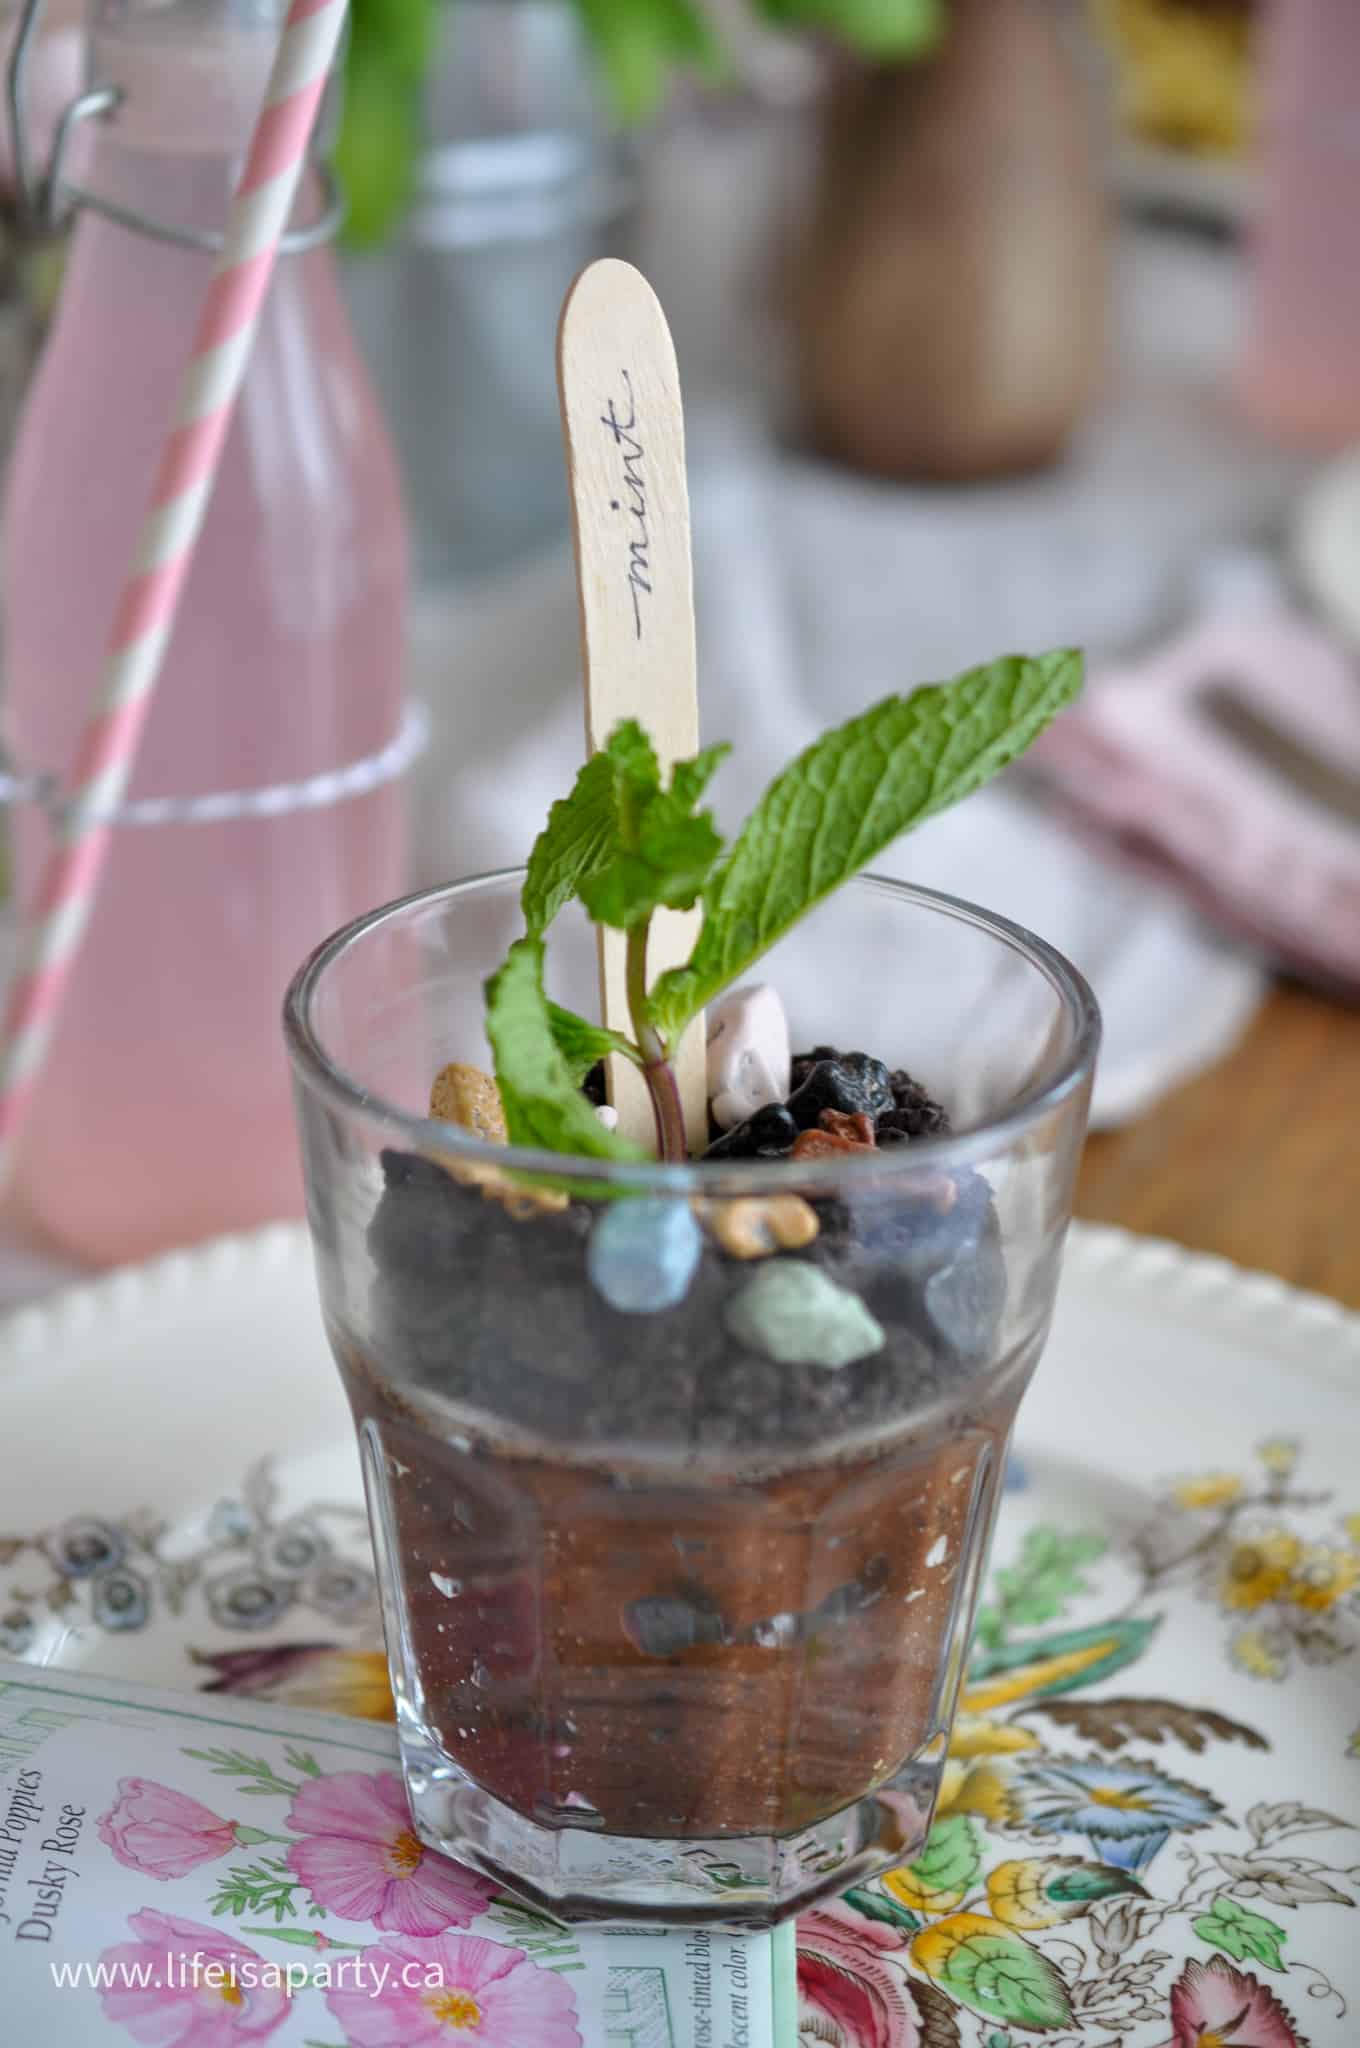
- Chocolate Rocks (optional garnish): These are the detail that makes the plant pot look so realistic. In Canada, you can find chocolate rocks at Bulk Barn. They are chocolate inside with a candy coating. If you cannot find them locally, look for them online.
- Fresh Mint (optional garnish): Mint is purely decorative here, but it genuinely looks like something is growing out of the dirt. Any fresh herb or edible flower works well. Add it right before serving so it stays fresh.
Instructions
Step 1. Mix the pudding. Combine the instant chocolate pudding mix with 2 cups of cold milk in a stand mixer or with a hand mixer. Beat until smooth and thick.
Step 2. Crush the Oreos. Place your Oreos in a zip-close bag and use a rolling pin to crush them. Leave some larger chunks in the mix. Those bigger pieces create the best texture. If you use a food processor, pulse in short bursts and stop before everything becomes a fine crumb.


Step 3. Combine. In a large bowl, mix the pudding with half of the crushed Oreo crumbs until fully combined.
Step 4. Fill the cups. Divide the pudding mixture evenly between 4 individual cups.
Step 5. Add the top layer. Sprinkle the remaining crushed Oreos evenly over the top of each cup to create the dirt effect.


Step 6. Decorate. Top each cup with a small handful of chocolate rocks. Tuck in a sprig of fresh mint so it looks like something is growing out of the dirt. For an extra fun touch, write "mint" on the handle of a wooden spoon with a marker and press it into the cup like a plant label.
Expert Tips
- Leave bigger Oreo chunks. This is the tip that makes the biggest difference. Resist the urge to crush everything into fine crumbs. A mix of sizes gives you a crunch in every bite and looks more realistic.
- Add the mint right before serving. Fresh herbs wilt quickly once they are in the pudding. Tuck them in just as you are setting out the cups.
- Use clear cups. The layered look is part of the charm here. Clear glass cups let you see the contrast between the chocolate pudding and the Oreo crumbs.
- In a rush? Use pre-made pudding cups instead of the instant mix. Stir your Oreo crumbs right in and you are done in five minutes flat.
Variations and Serving Ideas
- Make it in a large trifle bowl. If you would rather serve this family-style, layer everything in a big clear bowl instead of individual cups. You will likely need to double the recipe to fill it properly. Our mini individual trifle cups post has great tips on layering desserts for a crowd in different size vessels.
- Sand bucket presentation. For a summer party or a kids' birthday, layer this in a clean sand bucket and use the shovel as the serving spoon. Use Golden Oreos instead of regular ones, and vanilla pudding instead of chocolate and the whole thing becomes a "sand" pudding instead of dirt.
- Add gummy worms or candy bugs. If you are making this with or for kids, tuck some gummy worms into the top layer so they look like they are crawling out of the dirt. Little candy insects work beautifully too. We skipped these for our garden party version because we wanted a more realistic plant pot look, but they are such a fun addition.
- Clay pots. For a dinner party or a garden themed celebration, serve each portion in a small real clay pot. Line the inside with a cupcake liner first, then fill and decorate as usual. It looks amazing on a table and guests always do a double take.
- Easter version. Tuck a few mini eggs into the top layer and swap the wooden spoon plant label for a little flag that says "spring." So fun for an Easter table. For more Easter dessert inspiration, our Easter trifle with mini eggs is another no-bake favorite worth bookmarking.
- Vanilla pudding option. You can use vanilla pudding if you prefer, but in our opinion chocolate pudding is the better choice here because the color is so much more convincing as dirt. Vanilla pudding turns the whole thing a pale beige that does not quite land the same way visually.
Storage and Make-Ahead
Store your dirt pudding cups covered in the refrigerator for up to 3 days. The Oreo crumbs will soften over time as they absorb moisture from the pudding, so for the best texture serve these within the first day or two.
To Make Ahead: assemble the cups up to 24 hours in advance, cover with plastic wrap and refrigerate. Wait to add the mint sprigs, chocolate rocks, and any other garnishes until right before serving so everything stays fresh and crisp.
Frequently Asked Questions
There are a few good reasons. Some people find the cream cheese version too rich or heavy. Some people have a dairy sensitivity that makes cream cheese an issue even when regular milk is fine. And sometimes you just do not have cream cheese on hand and want to make dessert anyway. This recipe works beautifully without it, and it is actually simpler than most versions.
Yes, and this recipe already does. No Cool Whip, no whipped topping of any kind. Just pudding, milk, and Oreos. It is genuinely the most minimal version of dirt pudding you will find.
You can, but chocolate pudding looks more realistic as dirt and gives you a richer chocolate flavor throughout. If you prefer vanilla, go for it, but keep in mind the visual effect will be different.
Yes. The finished pudding will be a little sweeter because of the extra cream filling, but it tastes great.
Absolutely. Assemble the cups the night before and refrigerate them. Hold off on adding the mint and chocolate rocks until right before serving. The Oreo crumbs will soften slightly overnight, which some people actually prefer.
Yes, easily. Double all ingredients and fill 8 cups, or transfer the whole thing into a large trifle bowl or serving dish.
Yes. Skip the pudding mix and milk entirely and stir your Oreo crumbs directly into the prepared pudding. This makes the recipe even faster and requires zero mixing equipment.
If you try this Dirt Pudding Without Cream Cheese Recipe or any other recipe on my blog please leave a star rating and let me know how it went in the comments below. Thanks for visiting today!
More Dessert Recipes


Recipe
Easy Dirt Pudding Recipe without Cream Cheese
Ingredients
- 1 pkg instant chocolate pudding mix
- 2 cups cold milk
- 225 gram oreos mini or regular
- ¼ cup chocolate rocks optional
- 4 pieces fresh mint sprigs optional
Instructions
- Mix the chocolate instant pudding mix with 2 cups of cold milk using a hand mixer or stand mixer until smooth and thickened.1 pkg instant chocolate pudding mix, 2 cups cold milk
- Crush the Oreos using a rolling pin and a zip-close bag, or pulse in a food processor. Leave some larger chunks for the best texture.225 gram oreos
- In a large bowl, mix the pudding with half of the crushed Oreo crumbs until fully combined.
- Divide the pudding mixture evenly between 4 individual cups.
- Sprinkle the remaining crushed Oreos evenly over the top of each cup.
- Decorate with chocolate rocks and a sprig of fresh mint so it looks like something is growing from the dirt. For a fun extra touch, write "mint" on the handle of a wooden spoon and press it into the cup as a plant label.¼ cup chocolate rocks, 4 pieces fresh mint sprigs
Video
Notes
- Leave some larger Oreo chunks when you crush them. A mix of crumb sizes creates the best texture.
- Add your mint garnish right before serving so it stays fresh and does not wilt.


Dannyelle Nicolle-Ramjist says
This recipe is so quick and easy and your kids -or anyone else will love it!
Dannyelle Nicolle-Ramjist says
This easy recipe is fun to make and so delicious.