A beautiful mimosa bar is easier to set up than you think and it's the perfect addition to any brunch, bridal shower, or baby shower. This mimosa bar guide covers everything you need including the best juices, garnishes, glassware, non-alcoholic options, and tips for making it look absolutely stunning.

Quick Look
- 🥂 Perfect for: bridal shower, baby shower, brunch, Mother's Day
- 🍊 Juices: 6 delicious options
- 🌸 Signature garnish: edible flowers
- 🍾 Difficulty: Easy
- ⏰ Setup time: 30 minutes
- ✅ Make ahead: Yes
Why You'll Love This Mimosa Bar
- It looks absolutely stunning and takes less than 30 minutes to set up.
- Six juice options mean every guest finds their favorite combination.
- The floating edible flower garnish is completely unique and beautiful.
- Non-alcoholic options are built right in so every guest feels included and thought of.
- Everything can be prepped the day before so you actually enjoy your own party.
- It works beautifully for a bridal shower, baby shower, brunch, or Mother's Day gathering.
A mimosa bar is one of those party elements that looks impressive but is genuinely one of the easiest things you can set up for guests. A few bottles of sparkling wine, a selection of beautiful juices, some fresh fruit and flowers, and suddenly you have a drink station that feels special and celebratory and completely self serve.
We set up this mimosa bar for our Breakfast Under the Stars brinner party and it was one of the most photographed and talked about details of the whole evening. But a mimosa bar works beautifully for any occasion like a bridal shower, baby shower, Mother's Day brunch, Easter gathering, or really any time you want to make your guests feel genuinely spoiled.
If you love this idea you might also enjoy our full Breakfast for Dinner Party post where this mimosa bar made its debut, or our Crepe Bar post for the perfect food pairing. For more beautiful brunch inspiration check out our Sweet Crepe Recipe and our Strawberry Rhubarb Compote.
What You Need for a Mimosa Bar
Setting up a mimosa bar is really just a matter of gathering the right ingredients and the right vessels to serve them in beautifully. Here's everything you need:
- The Bubbly: Any sparkling wine you enjoy works beautifully in a mimosa bar. Prosecco, Cava, sparkling rosé, or your favorite domestic sparkling wine are all great options. You don't need to spend a lot here since the juice does a lot of the flavor work. Look for something in the $10 to $15 range and buy a brand you'd happily drink on its own.
- The Juices: The more variety the better. We served six juice options at ours and the colorful lineup of filled bottles was one of the most beautiful parts of the whole setup. More on our favorite juice combinations below.
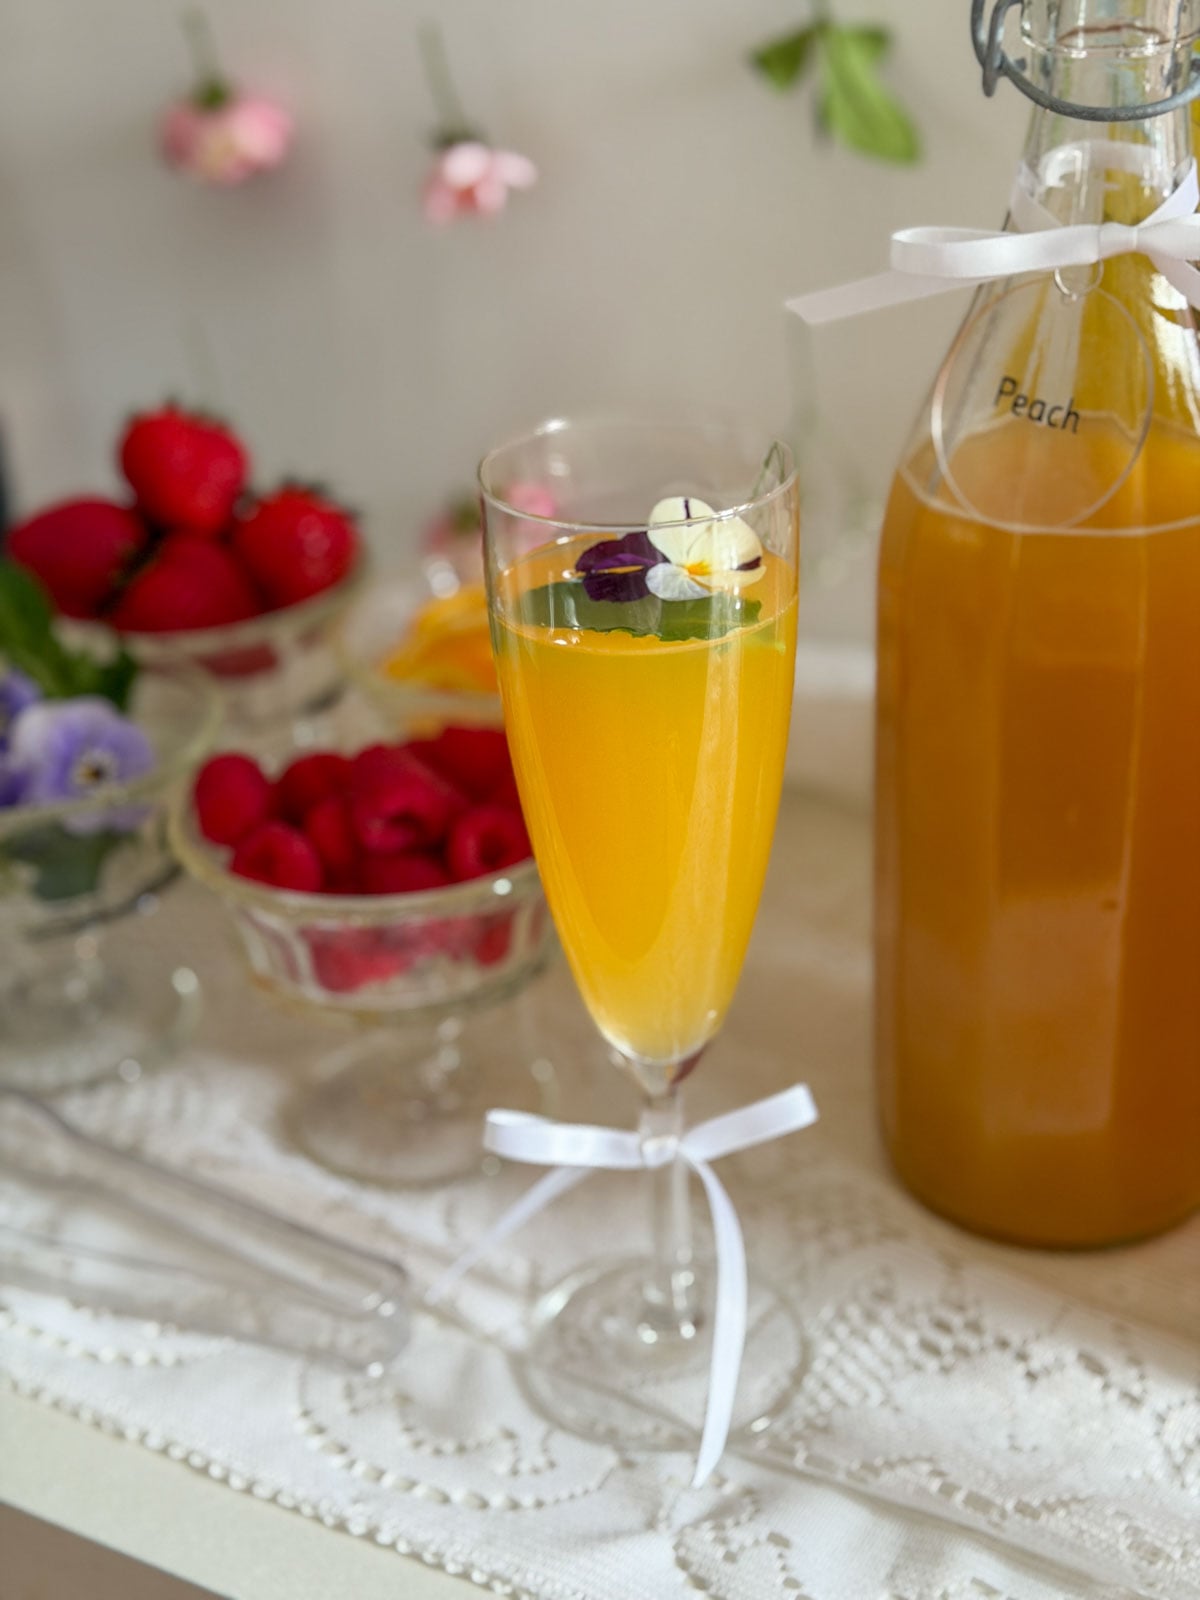
- The Garnishes: Fresh fruit and flowers take a mimosa bar from functional to genuinely beautiful. Our signature garnish is a floating pansy in each glass which is completely simple and completely stunning.
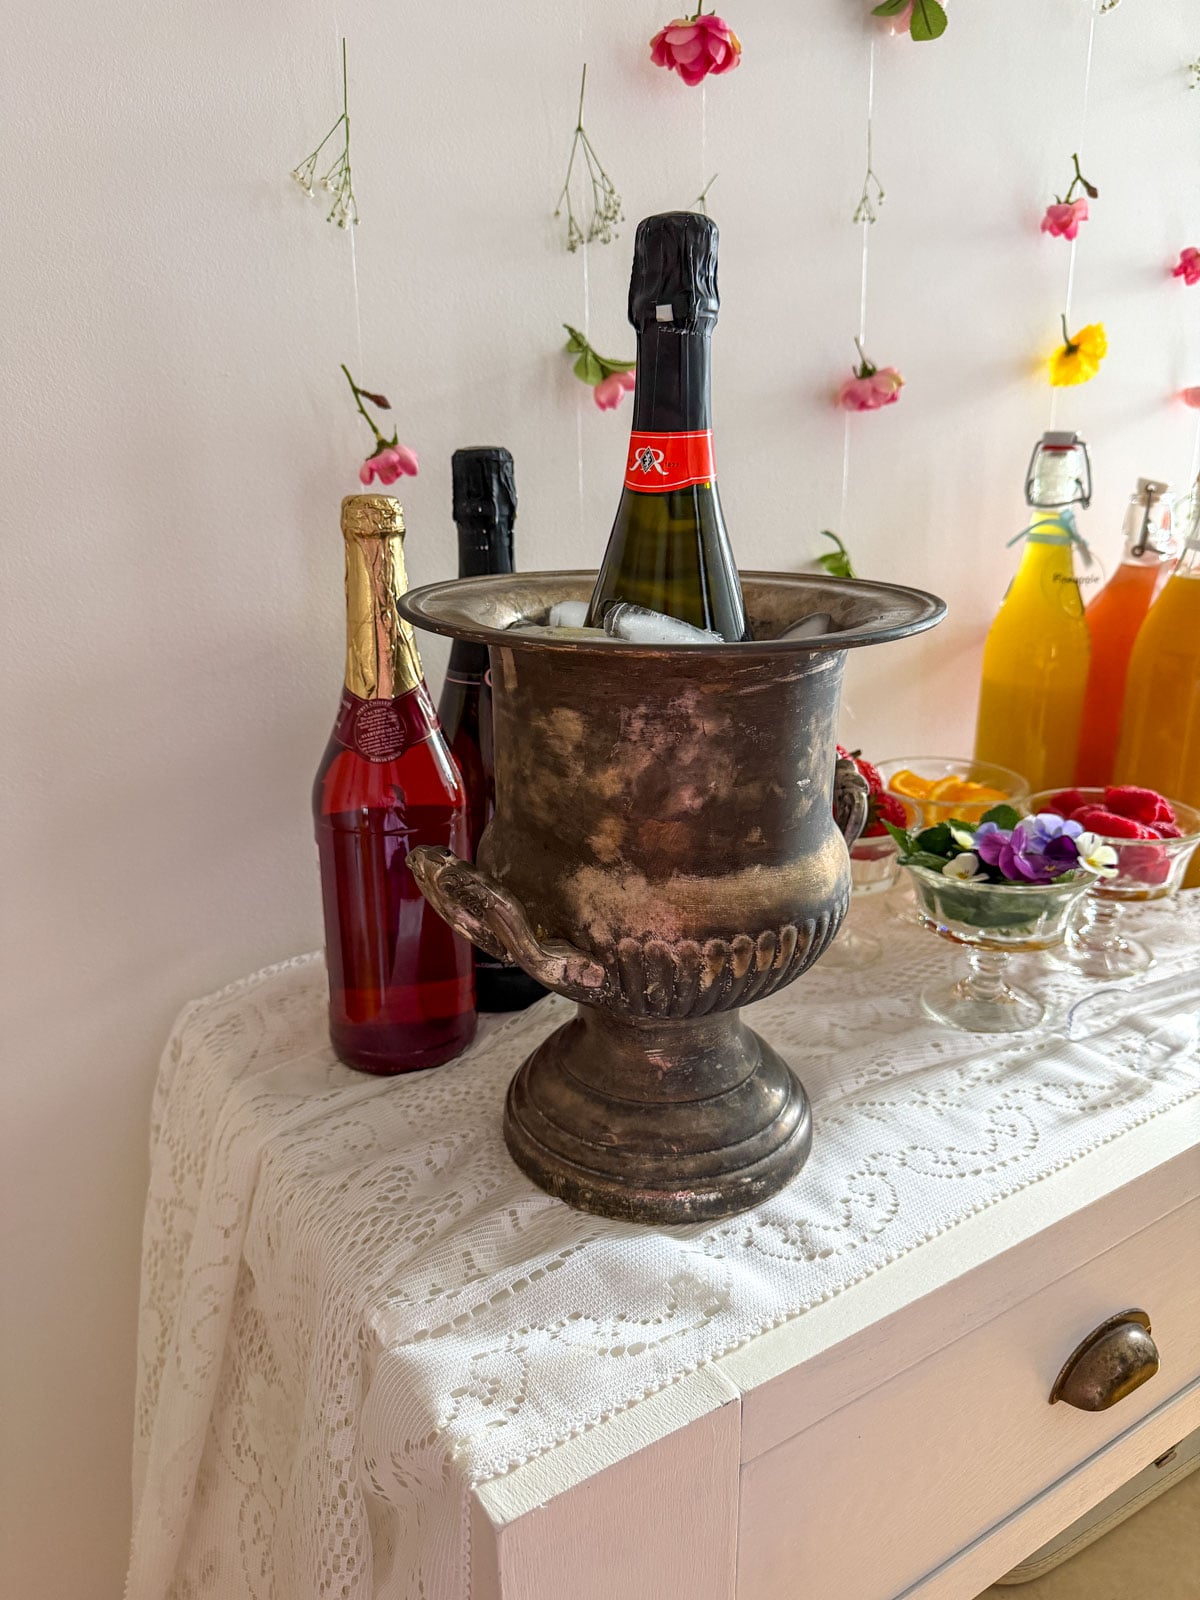
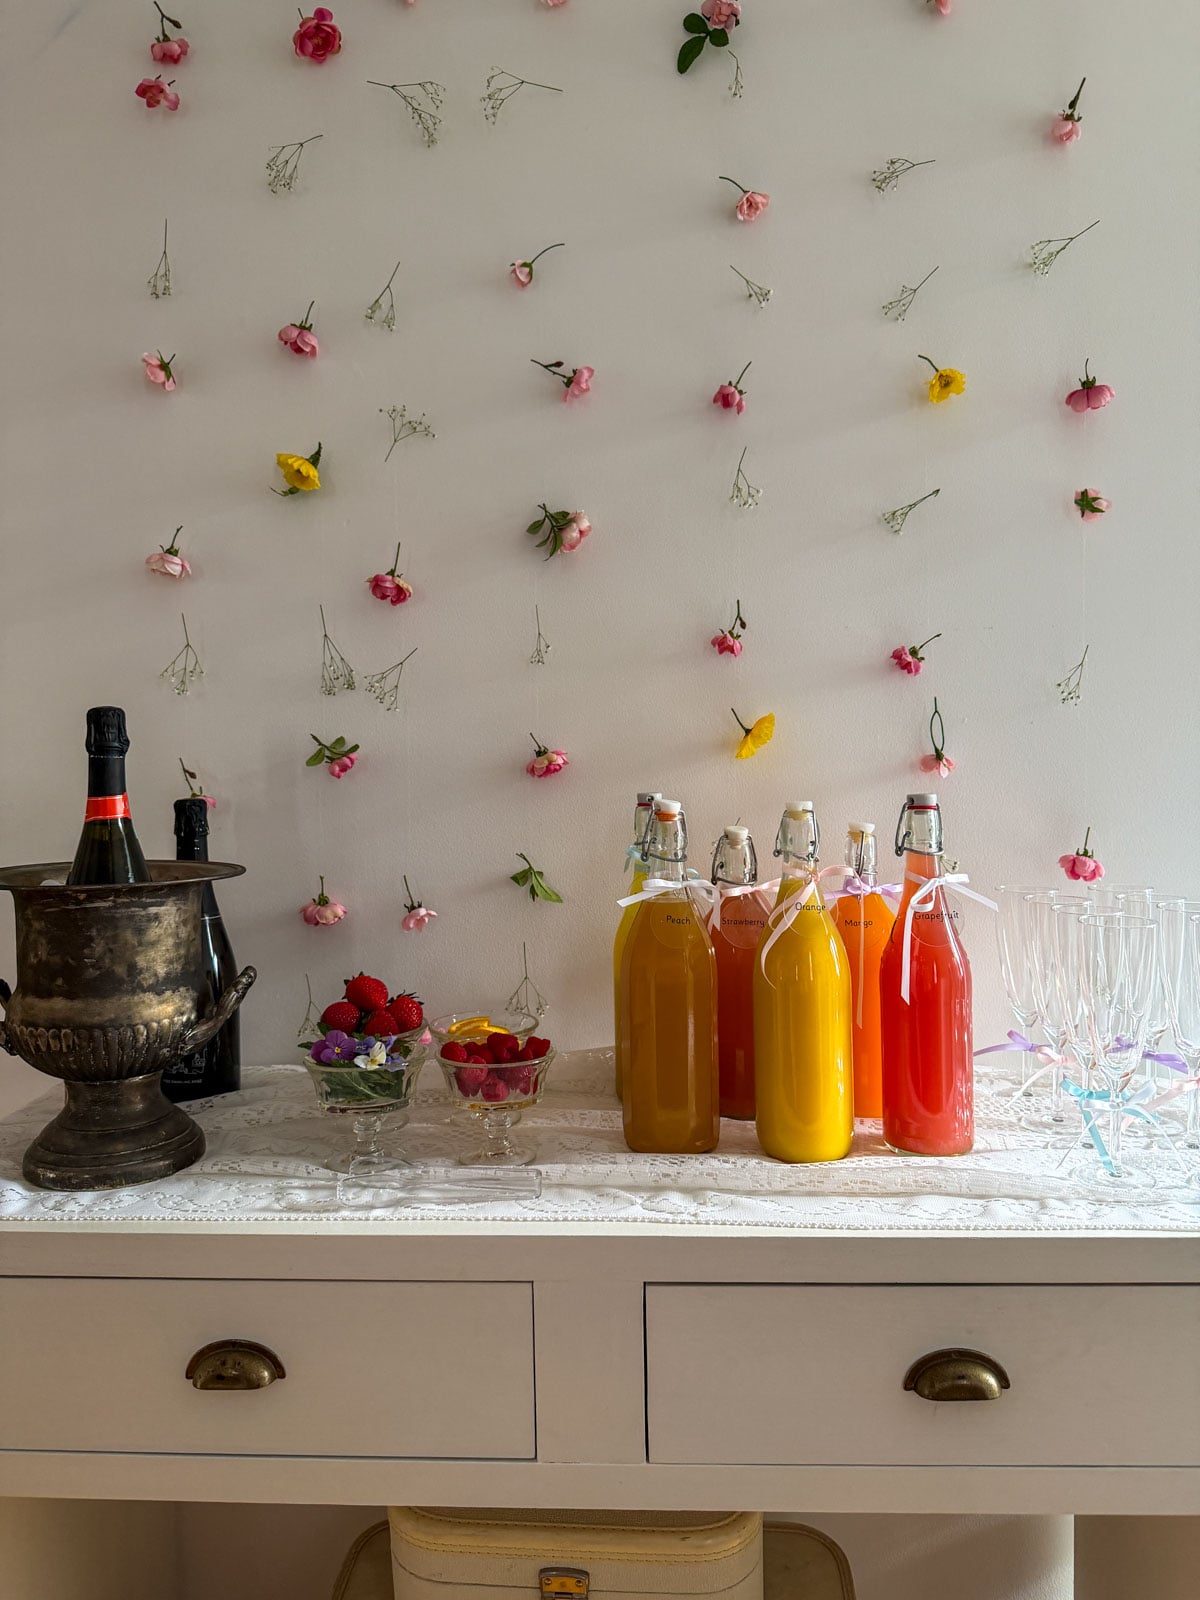
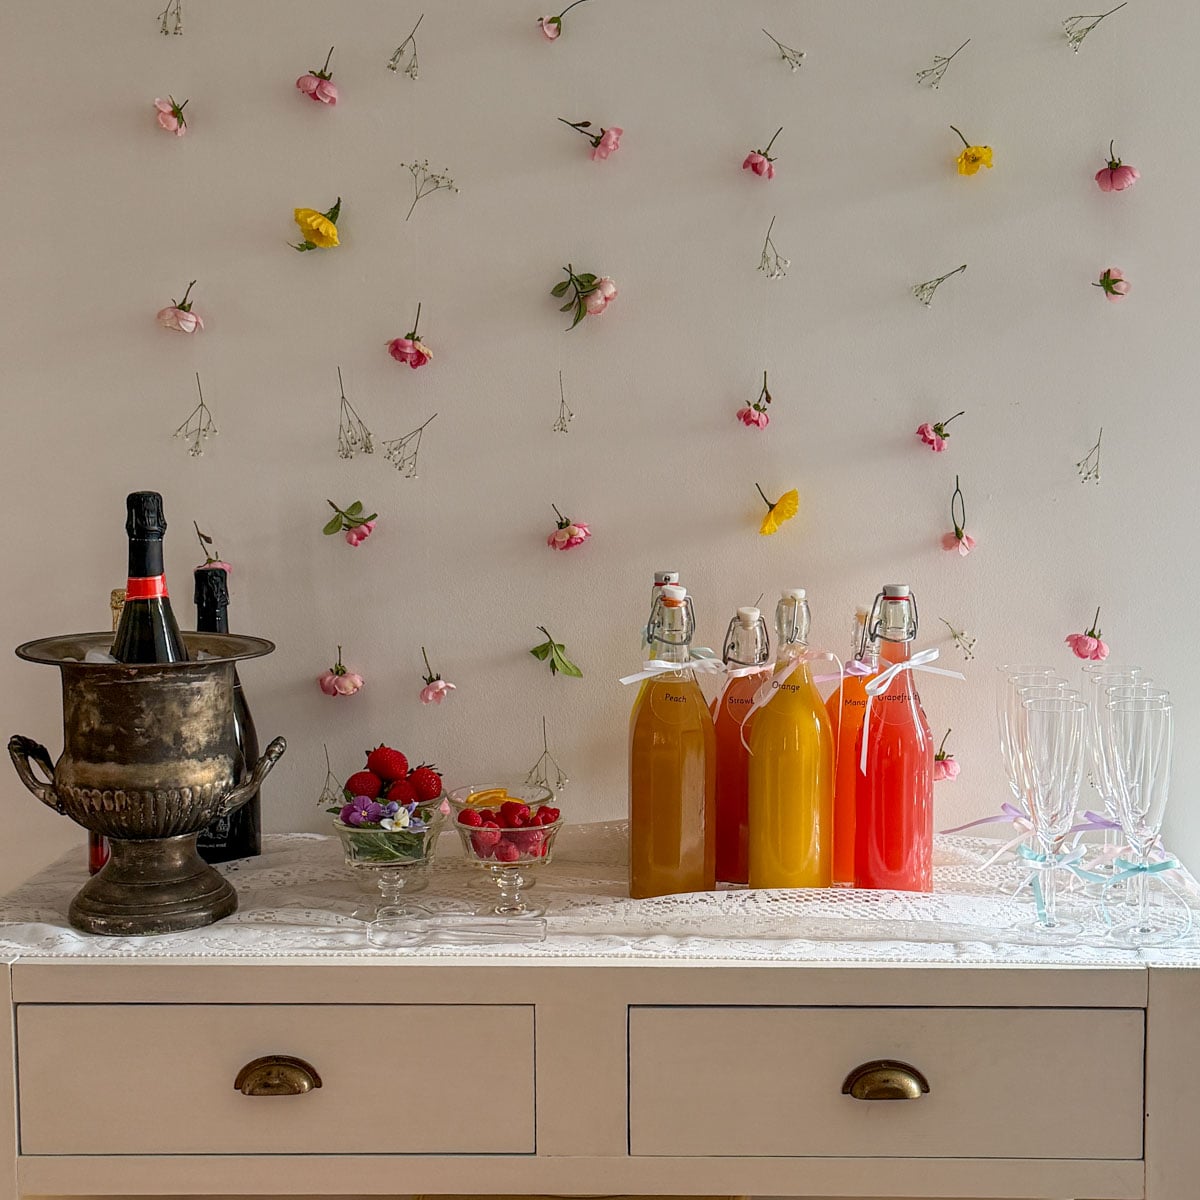
- The Serveware: Beautiful vessels make all the difference. We used swing top glass bottles for the juices, a vintage silver ice bucket for the prosecco, and small vintage bowls for the garnishes. More on our styling approach below.
- The Non-Alcoholic Options: Always have something beautiful for non-drinkers. We offered both a sparkling non-alcoholic wine and a sparkling white grape juice so every guest felt genuinely included. Soda is a great option too, like Sprite or ginger ale. More on this below too.
How Much Sparkling Wine to Buy
A standard 750ml bottle of sparkling wine makes approximately seven to eight mimosas. Most guests will have two or three over the course of a brunch or party, so here's a simple way to calculate how much to buy:
- Multiply the number of guests by two or three to get your estimated total mimosas. Divide that number by seven to get the number of bottles needed and round up.
For example for eight guests expecting two mimosas each you'd need roughly three bottles. We'd always suggest buying one extra bottle just in case. Running out of bubbly at a mimosa bar is not the hosting moment you want. 😄
Keep one bottle chilling in the ice bucket on the bar and the rest in the refrigerator until needed. Sparkling wine is best served well chilled so buy it at least a day ahead and refrigerate overnight before the party.
Non-Alcoholic Mimosa Bar Options
This is one of the details we feel most strongly about and it's genuinely underserved in most mimosa bar guides. Not every guest drinks and a sparkling water afterthought isn't the same as a real option.
We offered two dedicated non-alcoholic choices alongside the sparkling wine. A sparkling non-alcoholic wine for guests who miss the taste of wine and want something that feels like the real thing. And a sparkling white grape juice for guests who don't drink at all and don't particularly want something wine-flavored. Soda is a great option too, use Sprite or ginger ale. These all look identical to sparkling wine in the glass and are all genuinely delicious.
Mimosa Bar Juice Ideas

The juice selection is where your mimosa bar really comes alive visually. We served six options and the lineup of colorful filled bottles is honestly one of the most beautiful things on the whole bar. The colors range from deep pink through blush peach through golden orange and tropical yellow and the effect is stunning.
You don't need all six juice options to have a beautiful mimosa bar. Orange juice is the one non-negotiable since it's the classic mimosa juice and what most guests expect. From there choose as many additional options as suits your group and your setup. Two or three juices is plenty for a small gathering. If you're hosting a larger bridal shower or baby shower and want that abundant colorful lineup of bottles then go all out. Scale it to your crowd and your space and it will be perfect either way.
Here are our six favorite juice options for a mimosa bar:
- Orange: The classic and always the most popular. Fresh squeezed is wonderful if you have the time but a good quality store bought orange juice works beautifully.
- Grapefruit: A little tart and tangy and a gorgeous pink color in the bottle. Not everyone loves grapefruit but those who do really love it in a mimosa.
- Peach: Sweet and delicate and very popular. Peach juice or peach nectar both work well here.
- Strawberry: A beautiful deep pink color and a sweet fruity flavor that pairs wonderfully with prosecco. Very popular with guests.
- Mango: A gorgeous golden yellow color and a sweet tropical flavor that feels a little unexpected and special.
- Pineapple: Bright yellow and tropical. A crowd pleaser and beautiful in the bottle alongside the other colors.
A Tip For Serving: decant all your juices into glass bottles or glass carafes the day before the party. The visual effect of six beautiful bottles lined up with colorful juices visible through the glass is so much more striking than juice cartons on a table. Vintage decanters would be a great option too. Look for glass bottles, or decanters at the thrift store.
Label each bottle with a small tag so guests know what they're pouring. We used acrylic plastic labels and added the juice names in vinyl using our Cricut, but any labels will work.

Mimosa Bar Garnishes
Garnishes are what take a mimosa bar from a drinks station to a genuinely beautiful setup. They add color, texture, and that extra layer of thoughtfulness that makes guests feel really spoiled.
Fresh Fruit
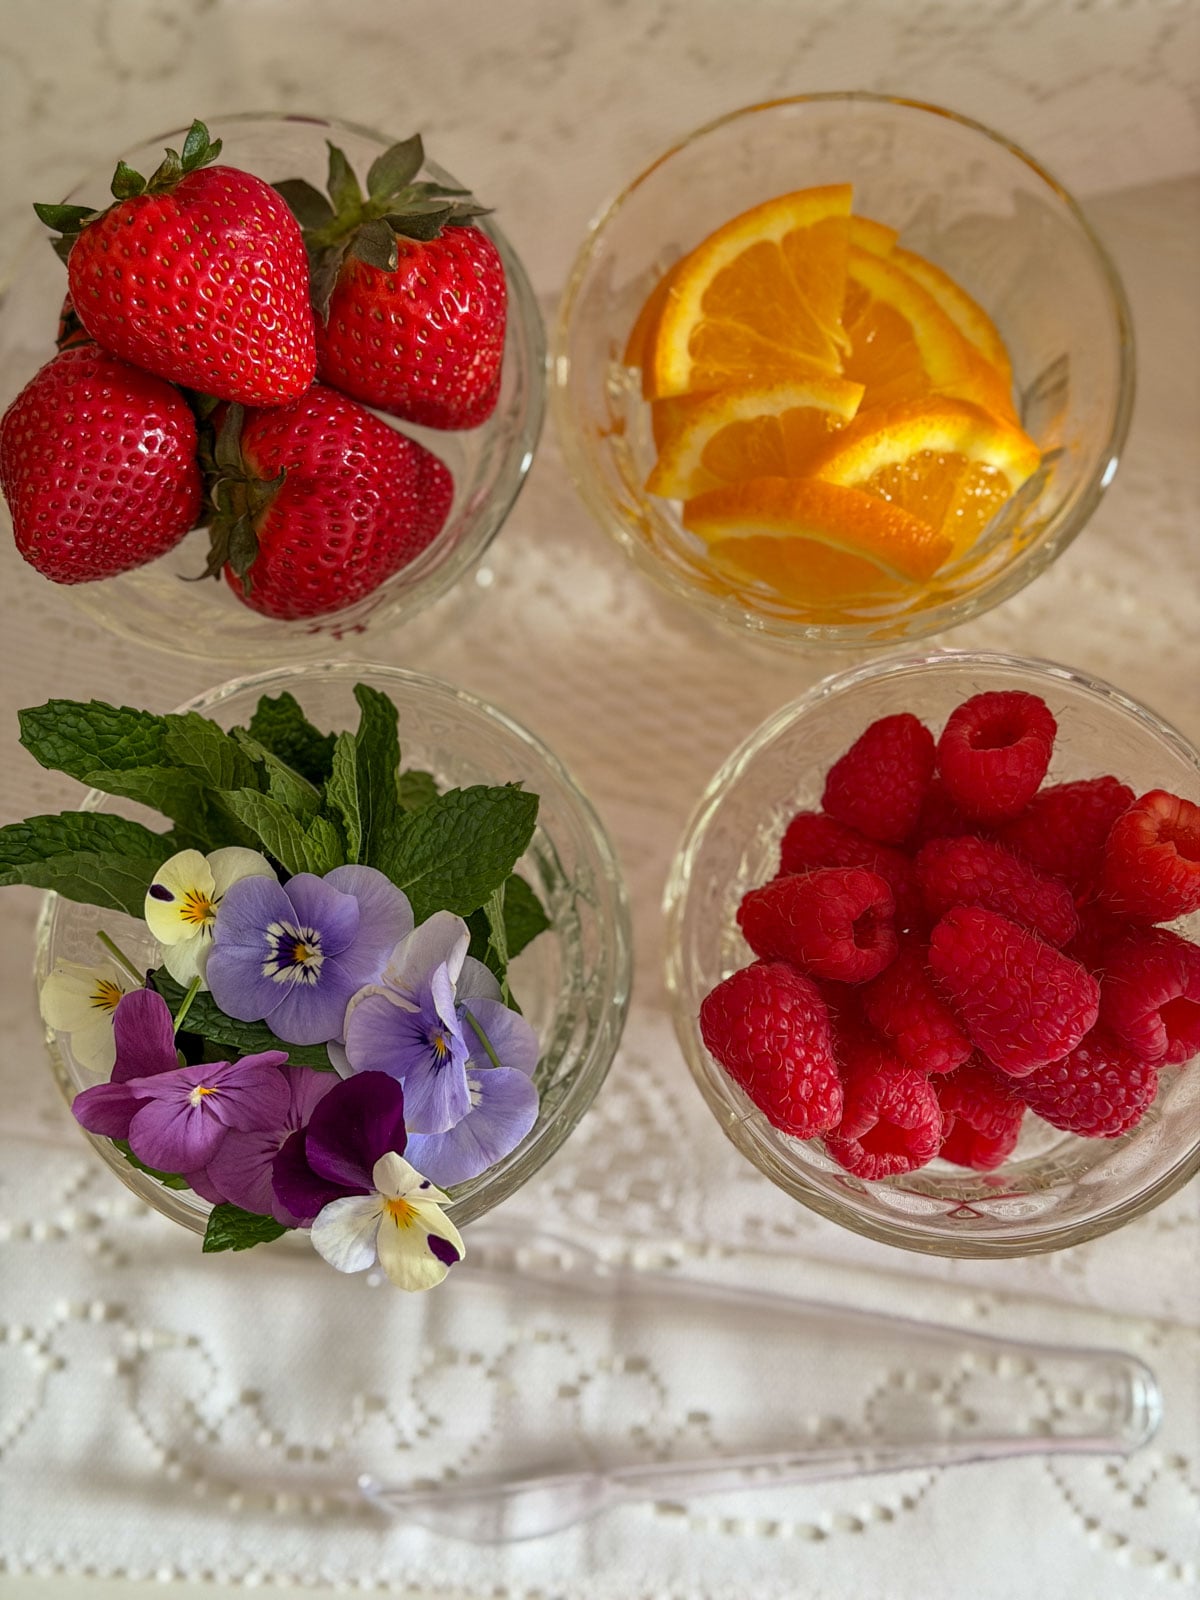
Serve fresh fruit in small bowls or pretty vessels alongside the bar. We used a mix of:
- Orange slices
- Strawberries
- Raspberries
- Blueberries
- Fresh mint sprigs
Keep garnishes small and delicate so they sit beautifully on the rim of a coupe or flute or float on the surface of the drink. Large chunks of fruit are awkward in a small glass, so slice everything thin and keep pieces bite sized.
Edible Flowers
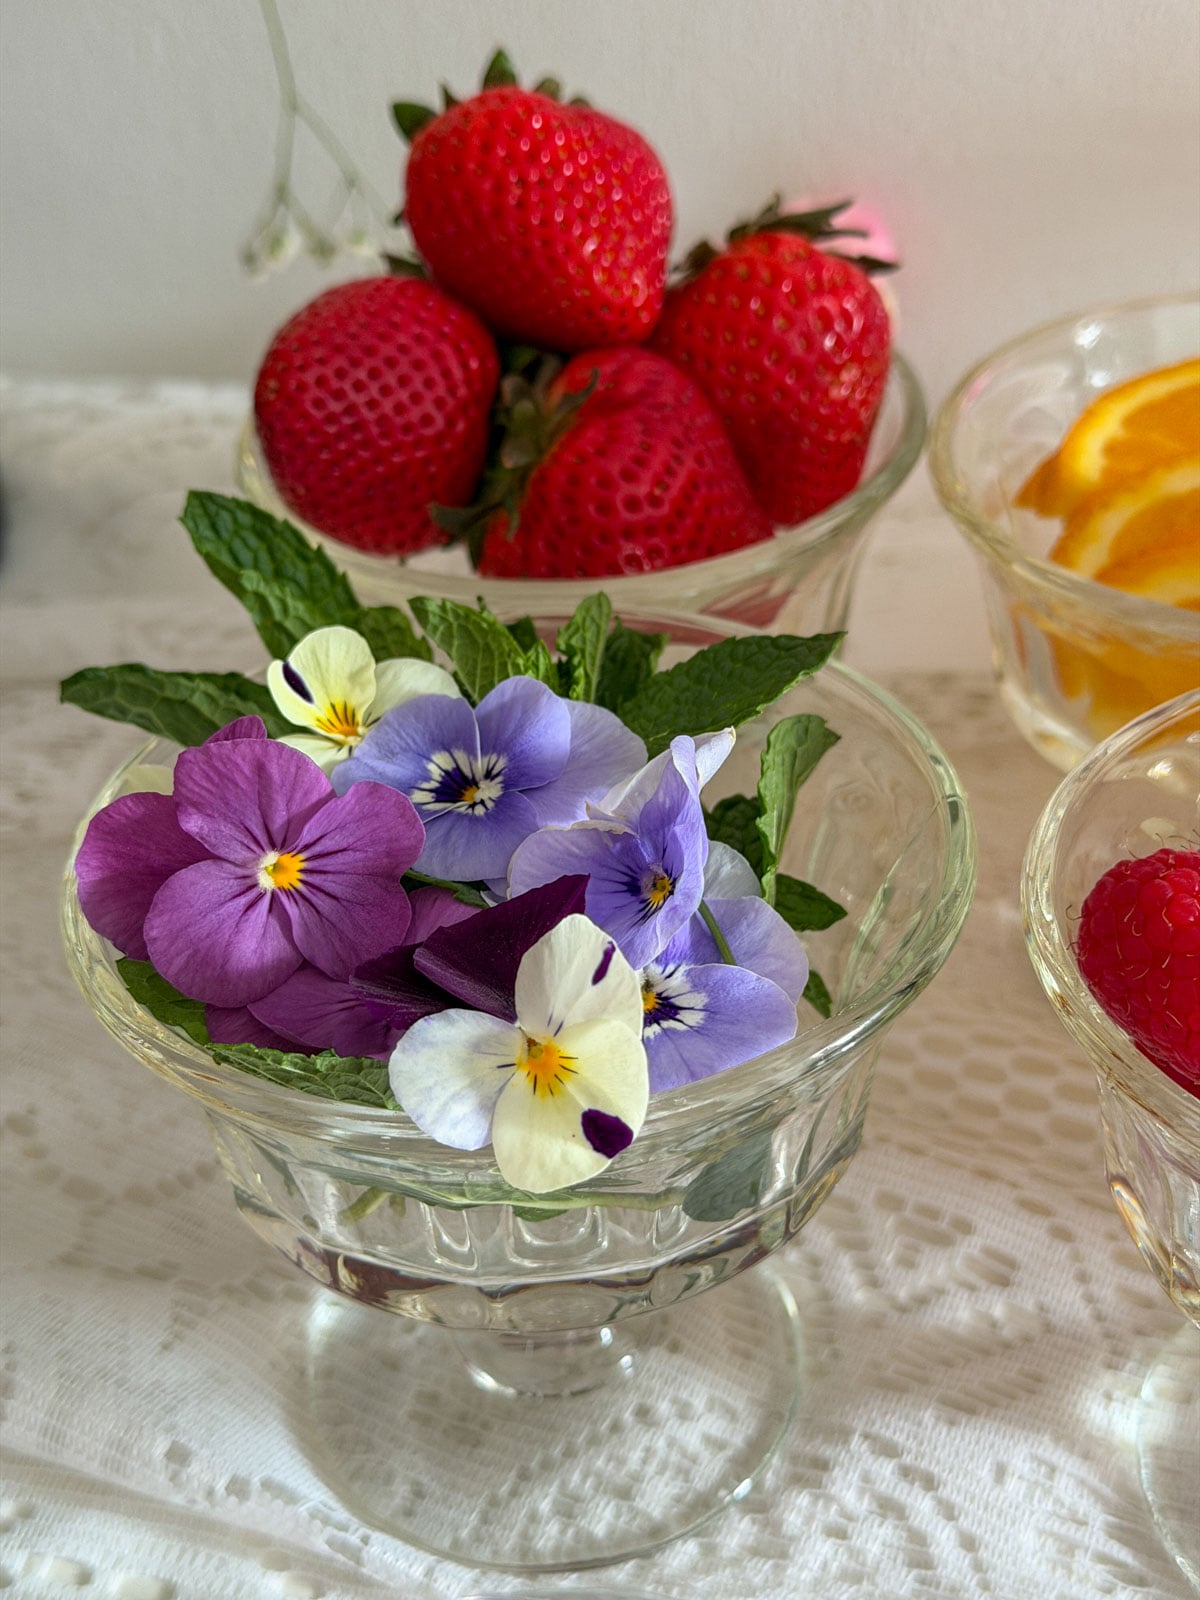
This is our signature mimosa bar detail and the one guests loved. Float a single fresh edible flower in each coupe or flute just before serving. It takes about ten seconds per glass and the effect is absolutely stunning. We used fresh pansy flowers from our garden. Research other edible flowers that you can use from your garden and that haven't been treated with insecticides. Also look for edible flowers to purchase at the farmer's market or good grocery stores.
Mimosa Bar Glassware
Champagne Flutes vs Coupes
Both champagne flutes and coupe glasses work beautifully for a mimosa bar and honestly the choice comes down to personal preference and what you have available. Flutes are the classic choice and keep the bubbles active longer. Coupes are wider and shallower with a vintage elegance that we absolutely love and they're perfect for floating a pansy on the surface of the drink.
We used champagne flutes for our bar and dressed them up with small pastel ribbon bows tied around the stems. It's such a simple detail but it instantly makes plain everyday glassware feel special and occasion worthy.

The Mismatched Vintage Approach
You don't need a matching set of twelve identical flutes to have a beautiful mimosa bar. In fact, mismatched vintage glassware is more interesting and more cottagecore than a perfectly matched set. If you have a few pretty vintage glasses, the variety adds charm rather than looking inconsistent.
Thrift Store Sourcing
The thrift store is your best friend for mimosa bar glassware. Crystal coupes, vintage champagne flutes, and interesting coupe glasses show up regularly and are usually inexpensive. A mixed collection of thrifted glassware unified with a small ribbon bow on each stem looks genuinely beautiful and costs a fraction of buying new.
How to Style a Beautiful Mimosa Bar
This is where your mimosa bar goes from functional to genuinely stunning. The ingredients and setup are important, but the styling is what makes guests stop and take a photo the moment they walk in.
The Ice Bucket
A beautiful ice bucket anchors the whole bar visually. We used a vintage tarnished silver ice bucket and it was one of the most commented on pieces of the whole setup. Tarnished silver has a beautiful patina that polished modern metal doesn't and it photographs beautifully. Check the thrift store. Silver ice buckets show up regularly because people don't know what to do with them anymore. Except you do. Another fun option would be using a large crystal punch bowl. These are at thrift stores all the time, and would look great filled with ice, and could hold several bottles of sparkling wine or sparkling juice.
The Backdrop
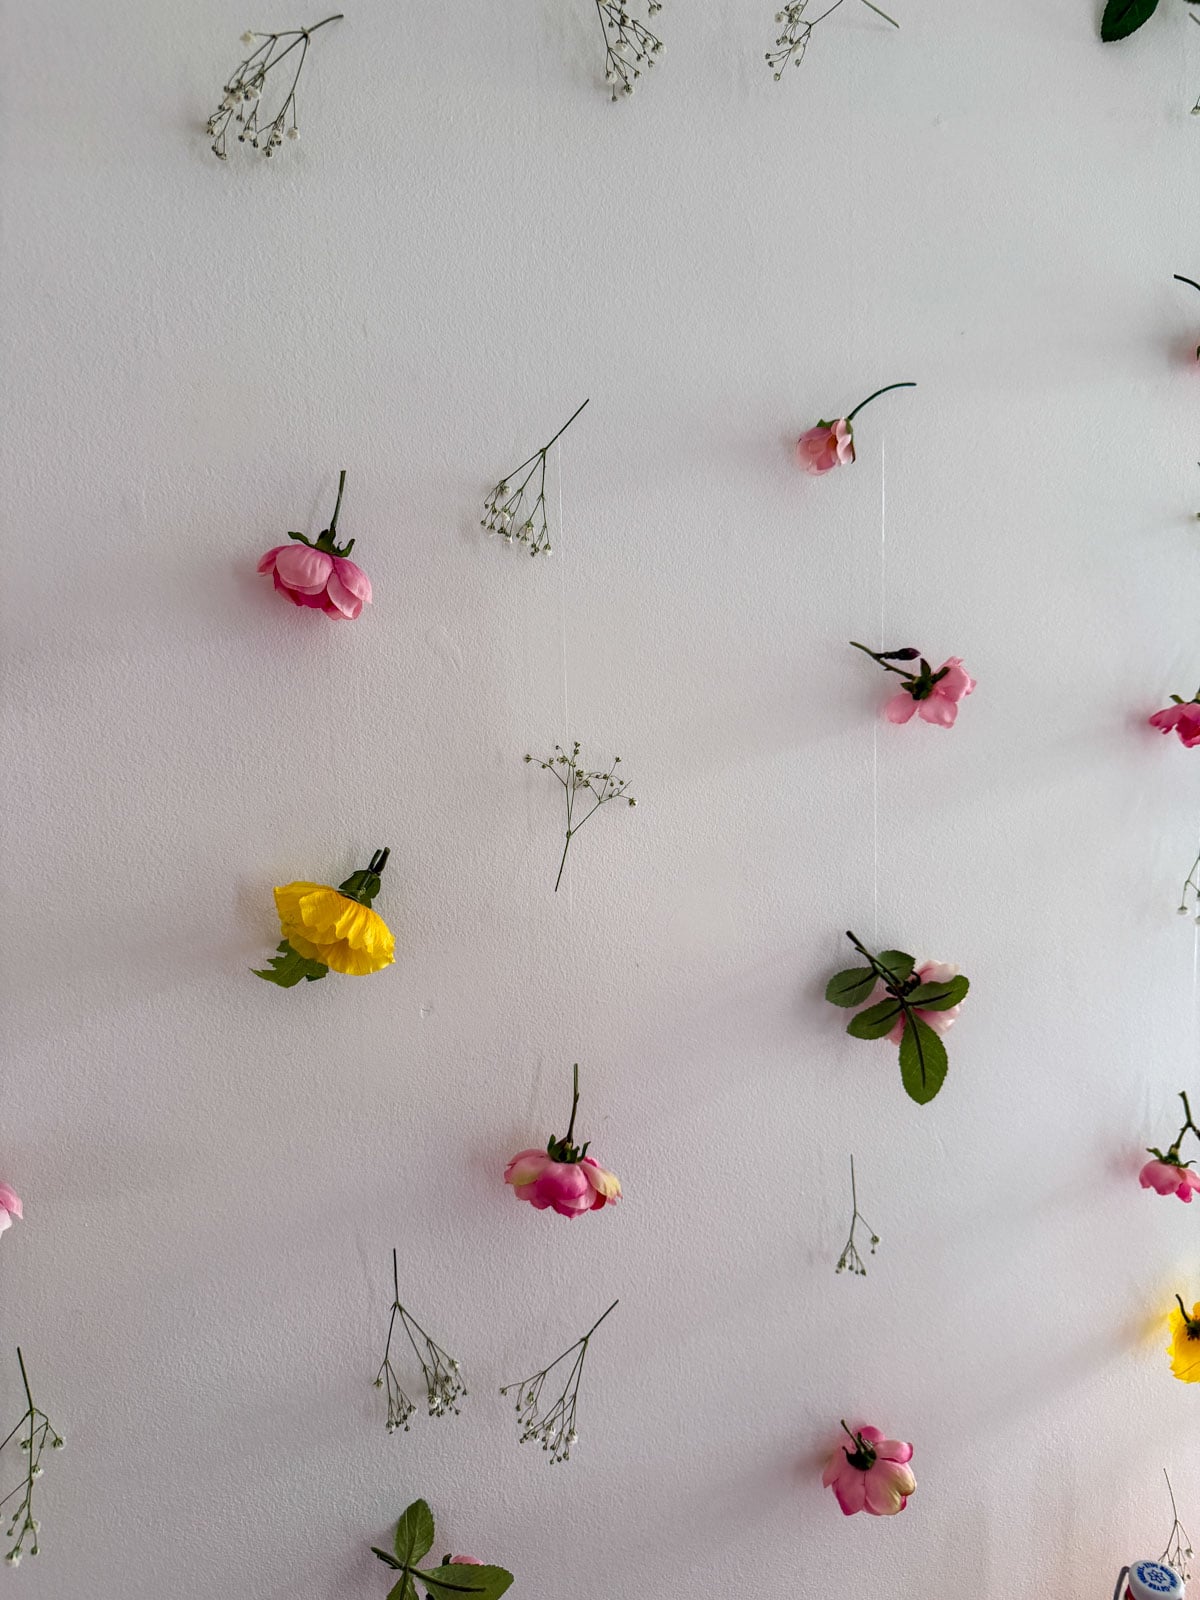
We hung a flower curtain behind the bar as a backdrop that made the whole setup look gorgeous. To make it, we tied faux flowers and sprigs of fresh baby's breath onto clear fishing line so they appear to float against the wall. It looks elaborate but comes together in an afternoon and the effect in photos is really beautiful. The soft pink and white blooms against a white wall create the perfect cottagecore backdrop. Using faux flowers and real baby's breath was the perfect combo, and meant no issues with wilting, since the baby's breath just dries. This also means you can set this up a day ahead of time and it will still look great.
Adding a vintge lace table cloth to the table adds texture, and ties in the color of the baby's breath.
The Color Story
Think about the visual effect of your whole bar together before you set it up. The juice colors tell a story. Deep pink strawberry through blush peach through golden orange through tropical yellow mango and pineapple. We also added pretty pastels with the ribbon on the glasses, and on the juice bottle labels.
How to Set Up a Mimosa Bar
Setting up a mimosa bar is really straightforward once you have everything gathered. Follow these steps and you'll have a beautiful bar ready in under 30 minutes.
1. Chill everything the day before. Buy your sparkling wine at least a day ahead and refrigerate overnight. Decant your juices into bottles or carafes, add the labels, and refrigerate those too.
2. Choose your location. Pick a spot that's accessible to guests without creating a traffic bottleneck near the food. A console table, kitchen island, or bar cart all work beautifully. Make sure there's enough surface space for your bottles, glassware, ice bucket, and garnish bowls with a little breathing room between each element.
3. Set up the backdrop first. If you're using a flower curtain or any backdrop element get that in place before anything goes on the table. It's much easier to hang and adjust without working around your beautifully arranged bottles.
4. Place the largest pieces first. Start with the ice bucket and the glassware since these are your weightiest and most visual anchors. Place the ice bucket to one side and the glasses grouped together on the other side to create natural flow.
5. Add the juice bottles. Arrange your labeled juice bottles in the center of the bar. Think about the color story as you place them and leave a little space between each bottle so nothing looks cramped.
6. Fill in with garnishes. Add your small bowls of fresh fruit, mint sprigs, and edible flowers. Avoid any garnishes that are too big.
7. Add ice. Just before guests arrive fill the ice bucket with ice and add the sparkling wine and juice bottles. Step back and enjoy what you've created.

Opening Sparkling Wine
Opening a bottle of sparkling wine or sparkling juice doesn't need to be stressful. A few simple tips make it easy and safe every time.
- Never shake the bottle before opening.
- Remove the foil and loosen the wire cage but keep it over the cork until you're ready.
- Drape a tea towel over the top of the bottle and grip the cork firmly through the towel.
- Hold the bottle at a slight angle pointing away from people and glassware.
- Then slowly twist the bottle rather than the cork, gently working the cork out with steady pressure. You're aiming for a gentle sigh, not a dramatic pop. The slower and more controlled the better.
Keep an eye on when you need to open more, so guests aren't struggling with the task.
Mimosa Bar Make Ahead Tips
One of the best things about a mimosa bar is how much you can do ahead of time. On the day of your party, the bar essentially sets itself.
- The day before: Decant all your juices into your bottles or carafes, add the labels, and refrigerate. Buy your sparkling wine and refrigerate overnight. Prep all your garnishes including washing and slicing the fruit, store in covered containers in the fridge. Make your acrylic tags and tie the ribbon bows on the glassware stems if you're doing that detail.
- The morning of: Set up the full bar except for the ice and the pansies. Arrange the bottles, the glassware, the garnish bowls, everything in place exactly as you want it.
- Just before guests arrive: Fill the ice bucket with ice and add the sparkling wine and sparkling juice. You're done.
The whole morning of setup takes about 20 minutes because all the prep is already done. That's the goal, to spend your party day hosting not bartending.
Frequently Asked Questions
A mimosa bar is a self serve drink station where guests build their own mimosa by choosing from a selection of sparkling wine, juices, and garnishes. It's one of the easiest and most impressive drink setups you can create for a brunch or shower.
The classic mimosa ratio is equal parts sparkling wine and juice, so roughly half and half in the glass. That said most people prefer a little more bubbly than juice so a ratio of two parts sparkling wine to one part juice is also very popular. The beauty of a self serve mimosa bar is that every guest can pour their own perfect combination.
Pour the juice first then top with sparkling wine. Adding the bubbly last prevents it from fizzing over the top of the glass and gives you more control over the ratio. A gentle pour down the side of the glass keeps the bubbles intact beautifully.
Orange juice is the classic non-negotiable. From there popular options include grapefruit, peach, strawberry, mango, and pineapple. We love offering four to six juice options for maximum variety and visual impact. And don't forget that guests can mix two juices together for their own custom combination, a strawberry orange mimosa is absolutely delicious.
Mimosas are traditionally served at brunch because they're usually made with orange juice and the juice dilutes the alcohol content making them a lighter lower alcohol option appropriate for daytime drinking.
Plan on one 750ml bottle for every three guests assuming two mimosas each. Always buy at least one extra bottle just in case.
Champagne flutes are the classic choice. Coupe glasses are a beautiful vintage alternative and perfect for floating edible flowers on top. Mismatched thrifted glasses unified with a ribbon bow on each stem is also beautiful.
You can do most of the prep the night before including decanting the juices, labeling the bottles, prepping the garnishes, and tying the ribbon bows on the glasses. Set up the full bar right before your party and add the ice just before guests arrive.
We recommend offering both a sparkling non-alcoholic wine for guests who miss the taste of wine and a sparkling white grape juice or soda for guests who prefer something sweeter and less wine-like. Both look identical to prosecco in the glass so nobody feels singled out.
A mimosa bar is perfect for a bridal shower, baby shower, Mother's Day brunch, Easter gathering, birthday brunch, or any occasion worth celebrating with something bubbly.
More Drink Inspiration


If you try this mimosa bar or any other ideas on my blog please let me know how it went in the comments below. Thanks for visiting today!
Recipe
How to Set Up a Mimosa Bar
Equipment
- Ice bucket
- Glass bottles or glass carafes for juice
- Acrylic tags or labels for bottles
- Champagne flutes or coupe glasses
- Ribbon for glassware stems
- Small bowls for garnishes
- Tongs or spoons for garnishes
Ingredients
- 3 bottles Sparkling wine (1 per 3 guests)
- Sparkling non-alcoholic wine or sparkling white grape juice, or soda like Sprite or ginger ale for non-drinkers
- Orange juice (non-negotiable!)
- 2 to 5 additional juices: grapefruit, peach, strawberry, mango, pineapple
- Fresh garnishes: orange slices, strawberries, raspberries, blueberries, mint sprigs
- Fresh edible flowers for floating (pansies or violas)
- Ice for the ice bucket
Instructions
- Chill sparkling wine and juices overnight in the refrigerator.3 bottles Sparkling wine , Sparkling non-alcoholic wine or sparkling white grape juice, or soda like Sprite or ginger ale for non-drinkers
- Decant juices into bottles or carafes and label each one.Set up backdrop if using.2 to 5 additional juices: grapefruit, peach, strawberry, mango, pineapple, Orange juice
- Place ice bucket and glassware as your largest anchor pieces.
- Arrange labeled juice bottles in the center.
- Arrange garnish bowls with fresh fruit, mint, and edible flowers.Fresh garnishes: orange slices, strawberries, raspberries, blueberries, mint sprigs
- Just before guests arrive, add ice to the bucket.Ice for the ice bucket
Video
Notes
- Pour juice first then top with sparkling wine for the perfect mimosa.
- Classic ratio is equal parts juice and bubbly though most guests prefer a little more bubbly than juice.
- Always buy one extra bottle of sparkling wine just in case.


Leave a Reply
You must be logged in to post a comment.