How to make a doormat with Cricut Iron-On Vinyl to form a stencil that is more leak proof than any other methods. This is the easiest and most effective method for creating a doormat with Cricut. The results have nice crisp edges, even with intricate paterns.

Jump to:
Why You'll Love This Craft
- Creating your own custom Cricut doormat is cheaper than buying one that's custom made for you.
- You can create any look you like with a custom design and colors.
- This method of stenciling gives the best crisp results.
- Using iron-on vinyl to make your stencil is easier than other ways of making a doormat with your Cricut.
There's several popular methods for using your Cricut to create a doormat. We're going to use iron-on vinyl to create a stencil, and look at why it's the easiest and most effective way to use your Cricut to make a doormat.
You might also like How To Sharpen Your Cricut Blade, How To Make Earrings With Your Cricut, and the Beginner's Guide to Cricut Mats.
Create a Custom Look
Making a custom doormat is a fun way to create exactly what you're looking for. Take a boring, plain doormat and choose your own saying, name, house number, fonts, and colors to create your custom look. These are great for decorating your front porch, or for giving as gifts for friends to use at their front door, or even for selling. Start with a blank doormat and turn it into a funny doormat that welcomes guests, or a pretty doormat that matches your personal style.
Materials:

Why Iron-On Vinyl?
There's many popular different ways to create a doormat using your Cricut machine. Using iron-on vinyl to create a stencil is the easiest way to create a doormat with your Cricut. I've tested out several other popular methods, but they all have more draw backs than advantages.
Regular Vinyl
One popular method is to cut out regular adhesive vinyl and then adhere it to your doormat to create a stencil. The problem with trying to create a doormat this way is that you can not use transfer tape with a doormat. The doormat itself is too rough and textured for the transfer tape to adhere to it, making it impossible to peel off of the vinyl.
Some people try to use vinyl as a sticker stencil. The problem is that the sticker stencil is quite large -large enough to fit a doormat, and also usually full of a detailed design, including intricate fonts. It's extremely difficult to remove the vinyl from the backing and then stick it down on to large doormats without it getting all stuck to itself and turning into a sticker ball, rather than a nice flat stencil.
If you do manage to get it down onto your mat, the regular vinyl doesn't stick well to the outdoor mat, so it won't create nice crisp lines for you stencil. The paint often seeps under the stencil and results in a messy paint job.
Stencil Vinyl
You might think Cricut stencil vinyl would be easier to use. It is almost as difficult to work with vinyl stencil as it is to work with regular vinyl for this project. It has the same problem, since it's also sticky on the back, and hard to move from the carrier sheet to the doormat.
Freezer Paper Stencil
Some people like to use freezer paper and then iron it onto the mat. The small bit of wax melts into the coir material of the doormat and sticks, helping create crisp edges to the stencil. The problem with using freezer paper is that it's so delicate that it's very difficult to get it off of the sticky cutting mat all in one piece.
Some people work in small pieces rather than the entire design, and then piece it together on the doormat as a work around, but it's still flimsy, and very difficult to work with, without tearing it when removing it from the Cricut mat. It's also difficult to position the cut out part of the design, like the inside of letters.
And with all of these methods you will still need something like painter's tape, or straight pins to help hold certain places down, as well as a hair dryer or iron to try and help make either one stick to the doormat. Both of these methods often result in frustration and wasted materials. I found the best way to create a doormat is to use iron-on vinyl to create a stencil with your Cricut machine. This is such a good option for saving frustration.
What Kind Of Paint Should You Use For A Doormat?
We used regular acrylic craft paint for our doormat. It offered the best range of colors for our rainbow color scheme. It is not the most durable paint. We gave it two coats of paint in most places and applied it until it was opaque. It may wear off after a season or two, depending on how much foot traffic your welcome mat gets. You could spray it with a clear outdoor acrylic spray to help protect it. You could also use a detail brush to touch up any areas that need it in the future.
Some people like to use different kinds of paint for doormats that are more durable. Many people recommend using flex seal, because it gives really great coverage and is long lasting. It's available in limited colors, but it's a great option if you're just using black or white. Just make sure you spray it in a well-ventilated area.
Another option is using an outdoor acrylic paint, or an exterior paint that will be more long lasting and hard wearing then regular acrylic paint.
Free "Hello Sunshine" Cricut Cut File
If you want to create a mat exactly the way I did, search for "Life is a Party" using the search bar on the home page of Cricut Design Space. Scroll down to the bottom of the screen to the Community Members section, and click on the follow button for "Life is a Party -Dannyelle Nicolle-Ramjist". On my profile page, click on the "Hello Sunshine Doormat" project, and choose to customize or make it. Or use this link directly to the Cricut Design Space cut file.
Video Tutorial
Check out our step by step tutorial video, to see exactly how to create your own custom doormat.


Instructions:
1. Design Your Mat In Cricut Design Space
Create a mat template by adding a square shape to the canvas, unlock the measurements and adjust to the size of your doormat. Change the colour to brown.
Add a text box and type the word "hello". Change the font to Babette.
Add another text box with the word "summer" all in capital letters, in the Cricut Sans font.
Drag the text boxes down to the lower right of the brown rectangle mat template and adjust the font sizes. Use the letter space box along the top menu to adjust letter spacing in the word "summer".
When you're happy with the word sizes, select both and use the align center along the top menu to align them.While they're still both selected use the attach button at the bottom of the layers panel to attach them.
Use hide button beside the brown square mat template to hide it from the canvas so that it will not cut out. Use the save button to save your project.
Or use our "Hello Sunshine" Cricut design in Cricut Design Space.
2. Cutting Out Your Iron-On Vinyl Stencil
Click make it. Be sure to turn mirror on. Select your iron-on vinyl from the materials list. We used a Cricut Maker 3, so we took advantage of the ability to create oversize pieces and used smart vinyl. If you are using a regular Cricut you could make the design a smaller size, cut it out in multiple pieces, or use a 12 x 24 inch cutting mat.
If you're using smart iron-on vinyl, feed the smart vinyl into your Cricut with the shiny side down. If you're cutting your iron-on vinyl out on a mat, be sure to to apply it shiny side down.
3. Weed Your Vinyl
After the material is cut on the Cricut, use your weeding tool to remove the letters. Remember you're reverse weeding this project and removing the letters, and keeping the background to create a stencil.
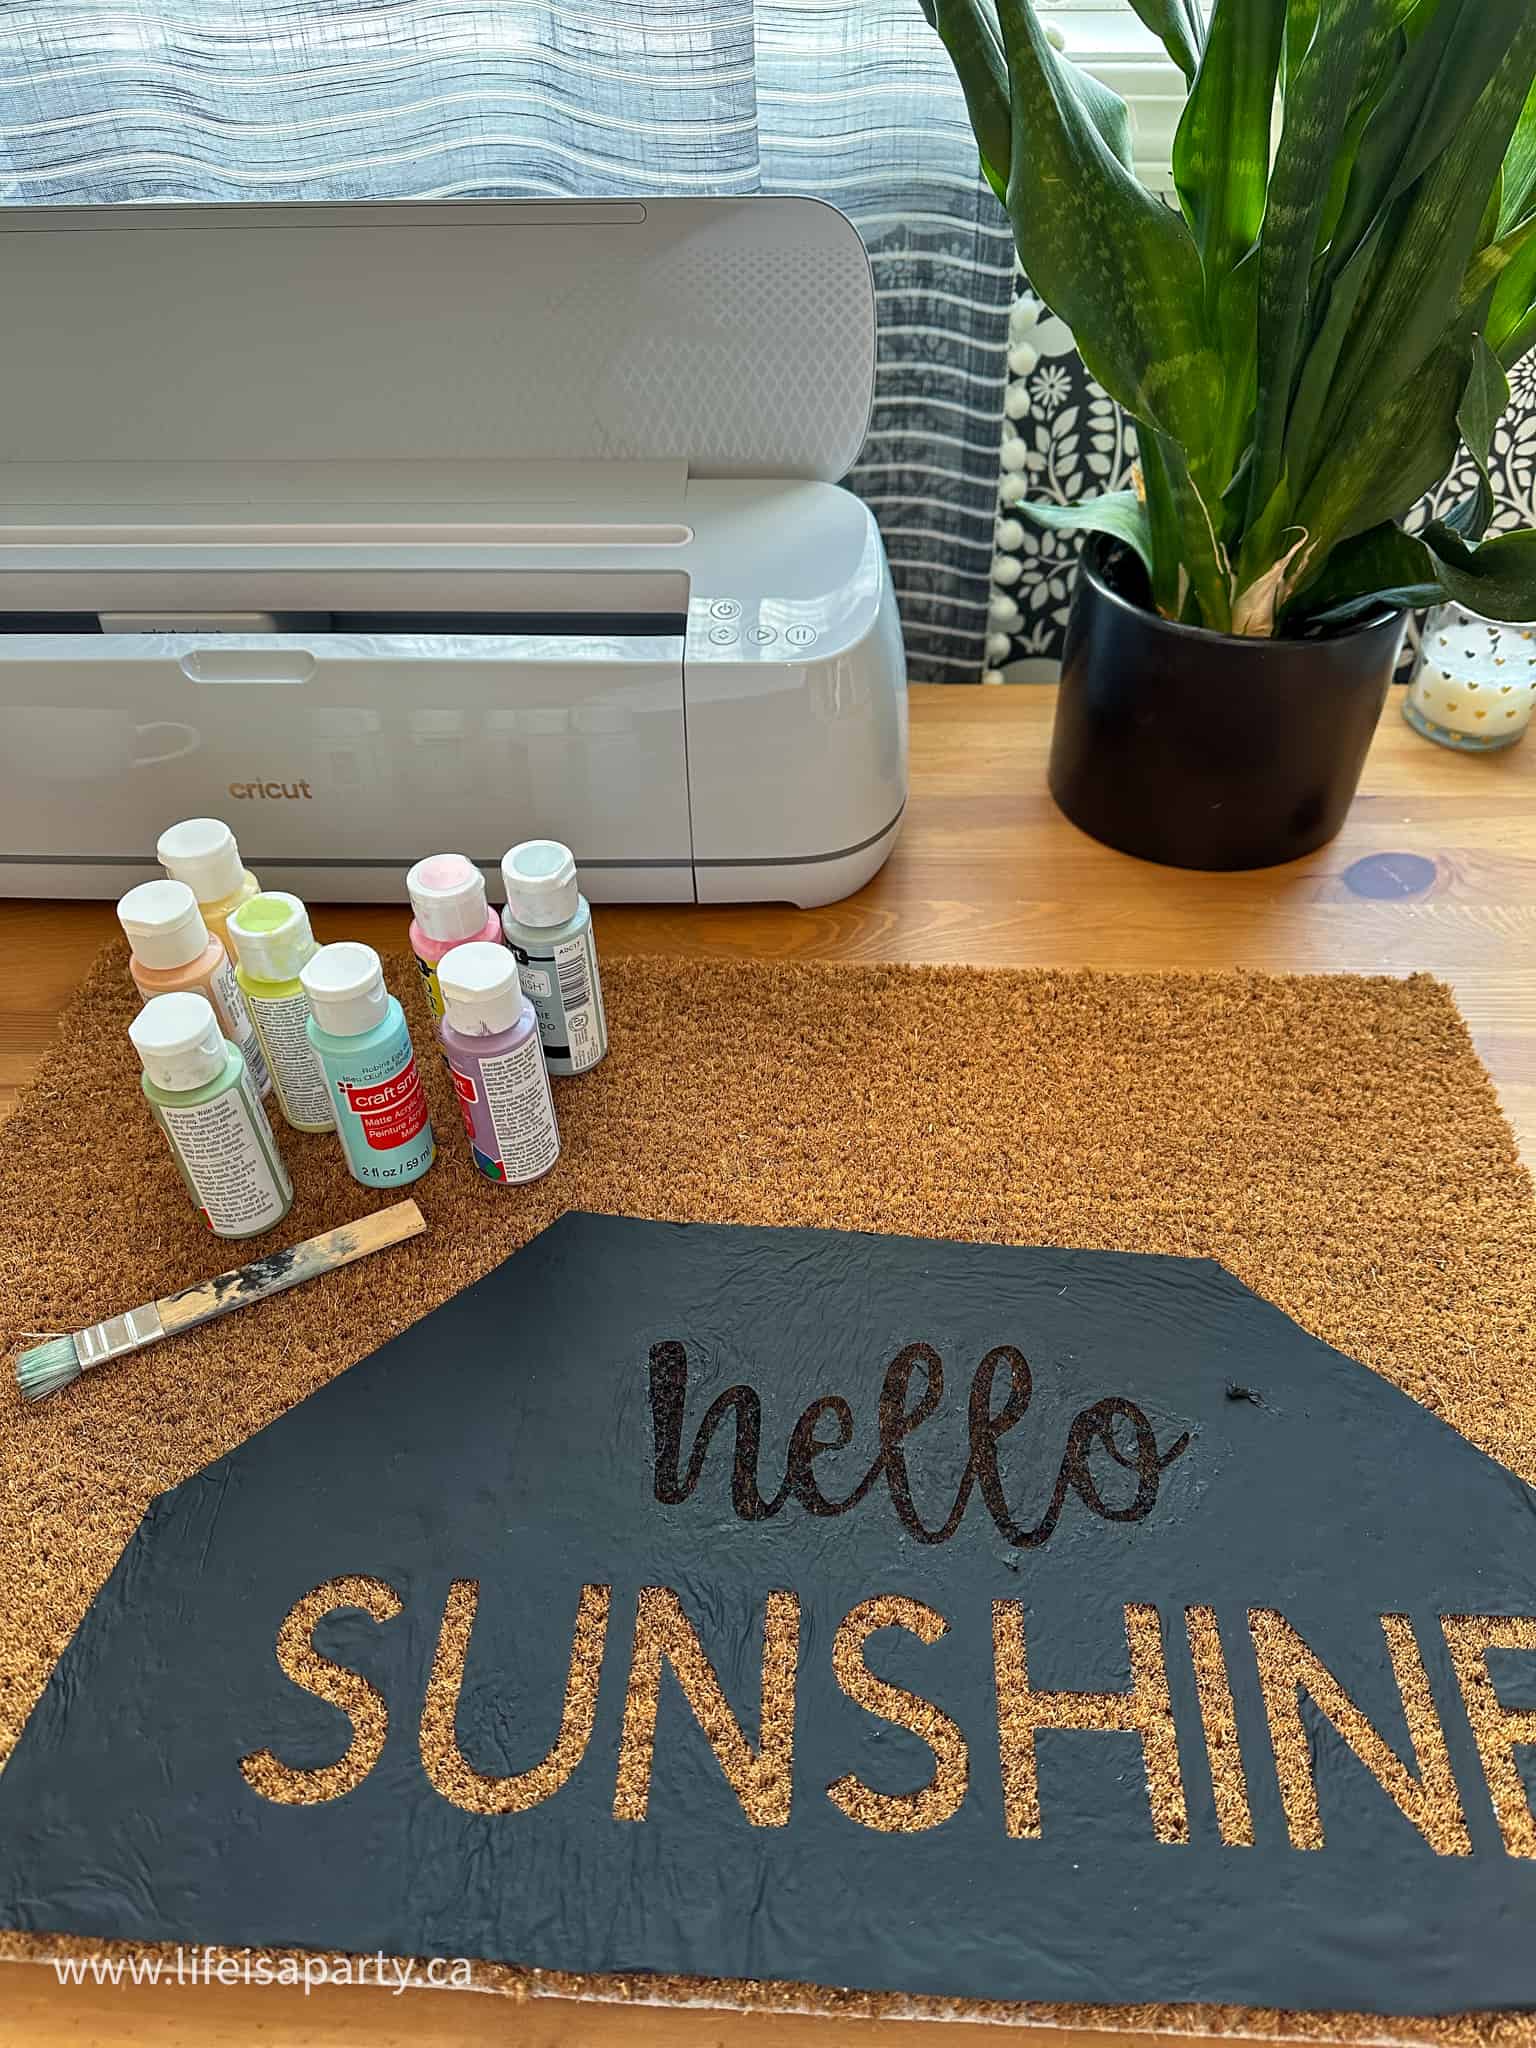
4. Apply The Stencil To The Mat
Position your iron-on stencil on your blank coir doormat and use the Easy Press or an iron to apply it. We pressed at 310 degrees for about 30 sec. at a time. Slowly work the heat press over the entire piece, moving your Easy Press section by section. While the vinyl is still hot, use a small scraper tool to burnish it. Take special care around the inside of the letters, and any very small pieces,

Once the iron-on is cool to the touch, you can try to slowly remove the backer piece. If the vinyl is not fully adhered, repress again. This part may take several attempts, and touch ups in some areas. Save the backer piece, and set aside for later.
5. Paint Your Doormat
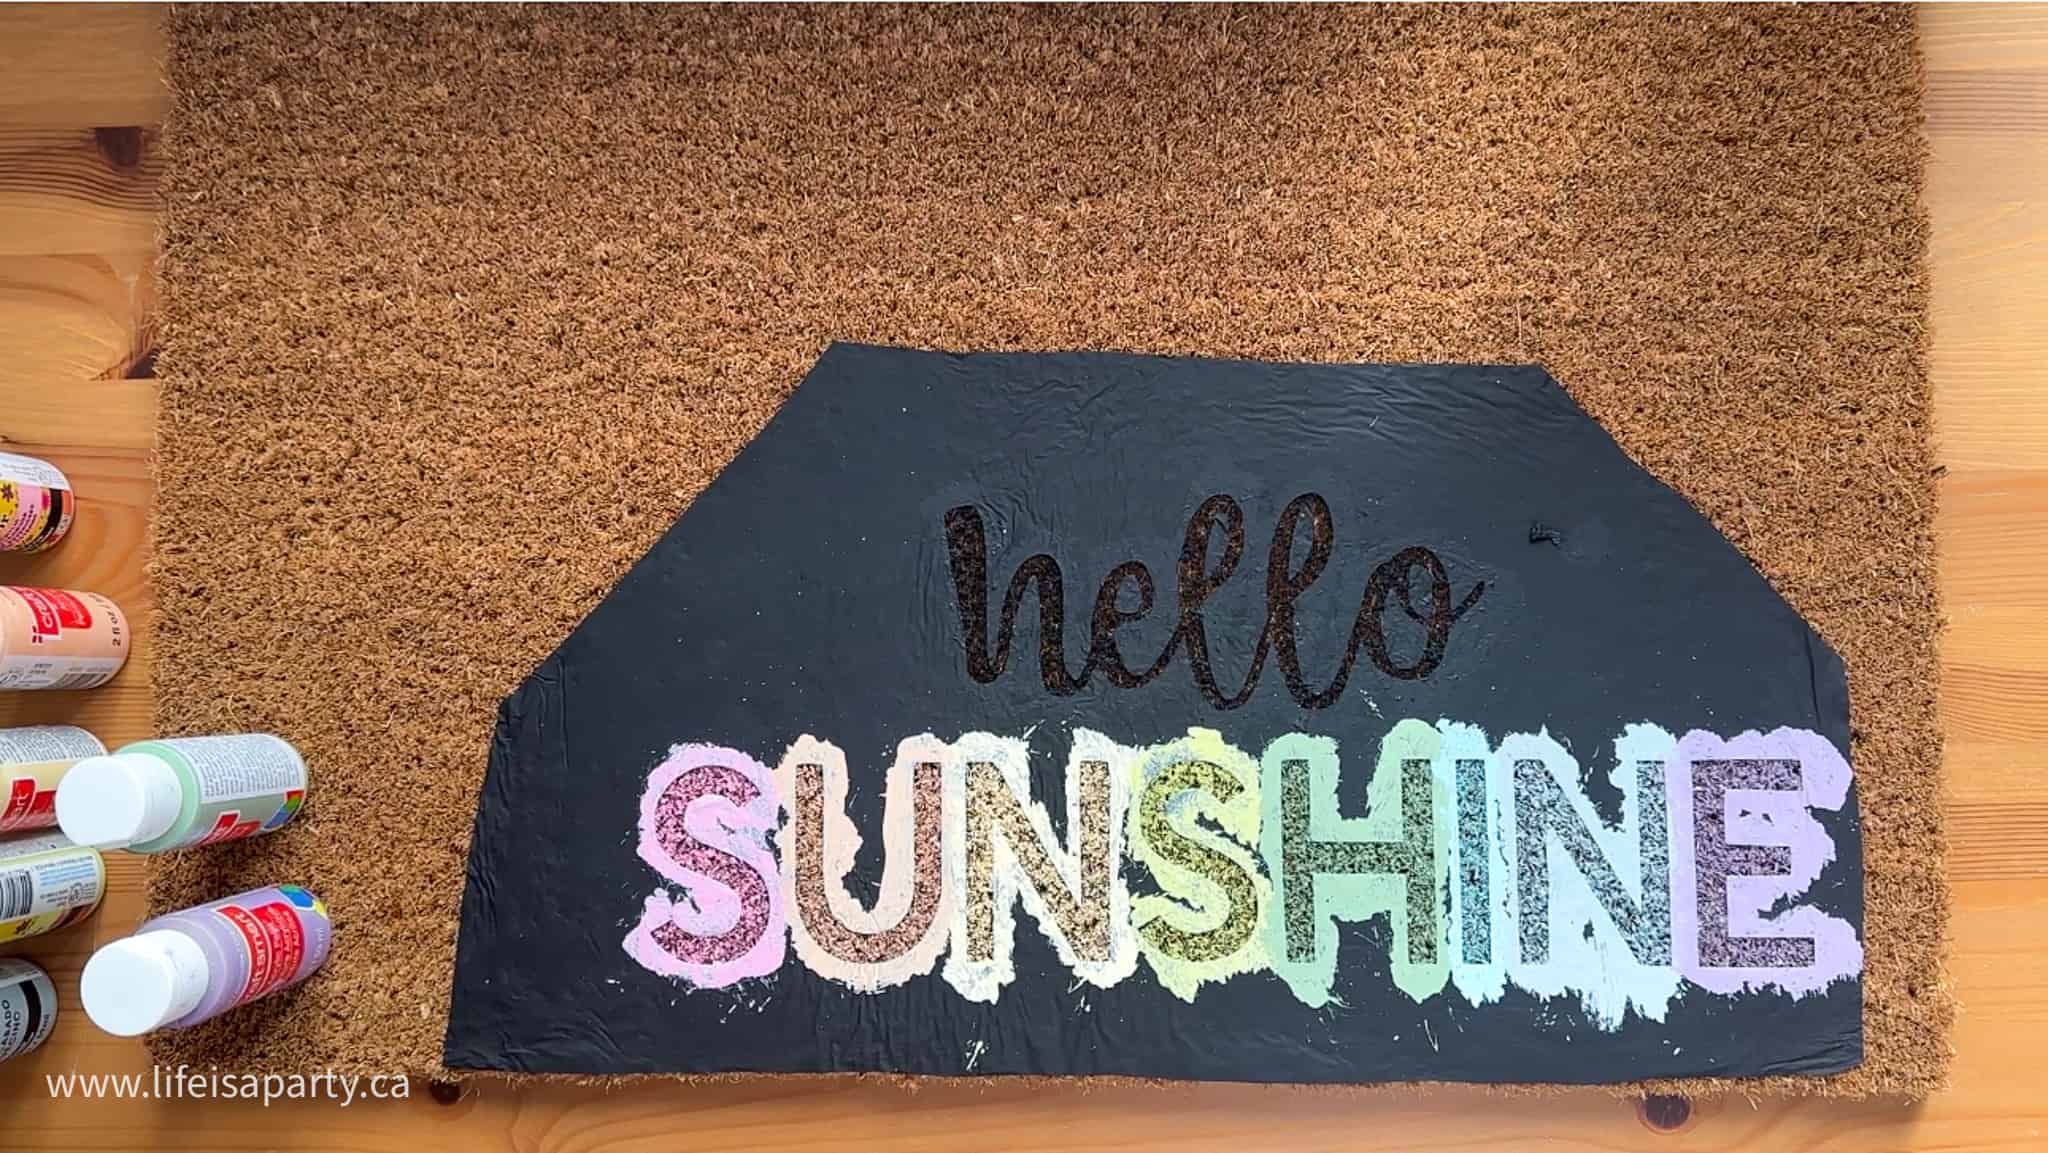
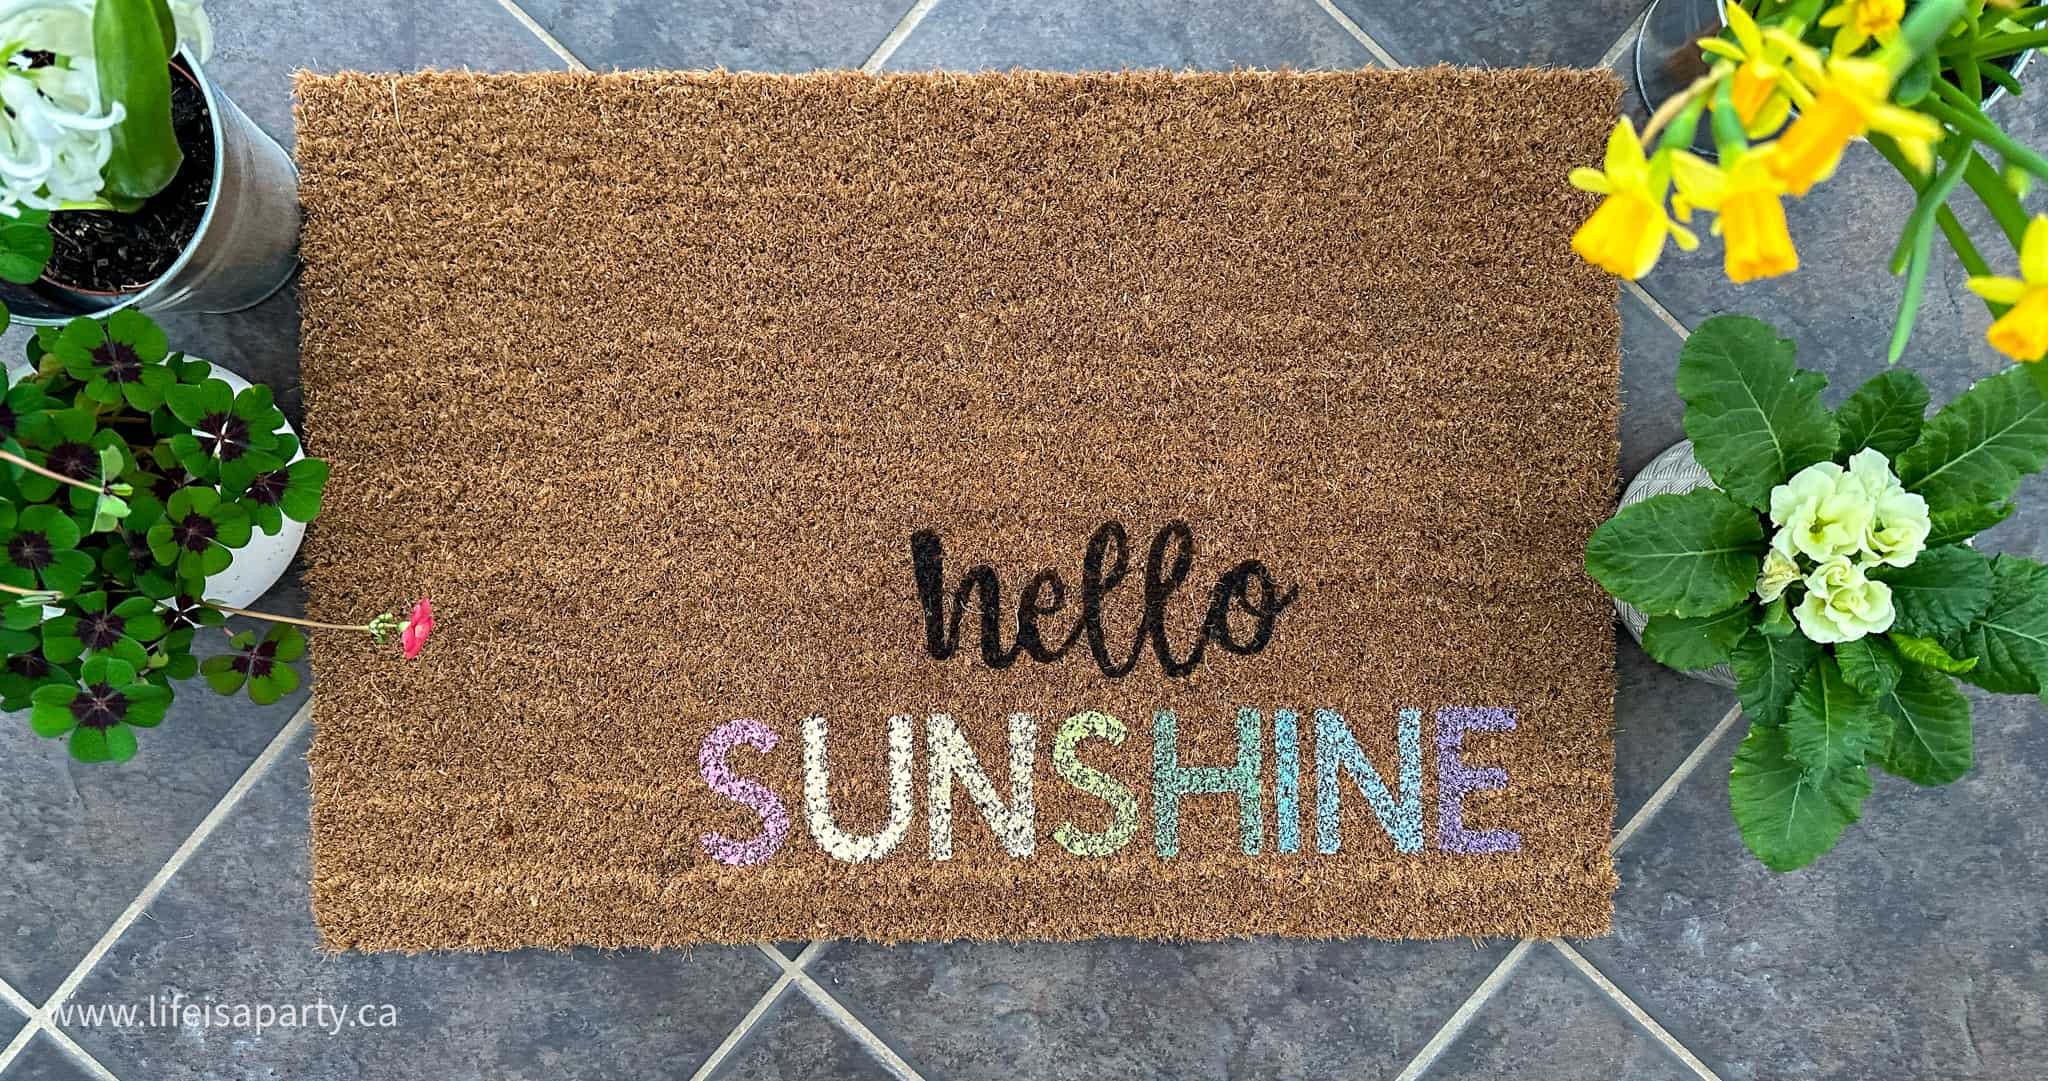
Use a dapping down motion to stencil the letters with your paint, using a regular paint brush or stencil brushes. Use just a little bit of paint for each coat, so that excess paint doesn't seep underneath, and so you create nice crisp edges to your letters. You may want to give it a second coat of paint for full coverage. We used black paint for "hello" and rainbow colors for "Sunshine".
6. Remove The Stencil
Once the paint is dry remove the iron-on vinyl, by peeling it off of the doormat. If it's difficult to remove, use the Easy Press at 310 degrees and press for 20 seconds. Be sure to replace the backer piece before pressing so that the vinyl doesn't stick to your Easy Press. Use the weeder tool to remove little pieces, like the insides of the letters
Expert Tips
Because the heat transfer vinyl is removed after it's used as a stencil don't worry if there's a few wrinkles in it after you've applied it to the doormat. The main important thing is that it's well sealed around the edges of the words or images.
Also, because the vinyl will be removed after it's used as a stencil, feel free to use up any colors you're not too fond of, or look for iron-on vinyl that's on sale, because the color or pattern won't matter at all.
More Cricut Inspiration


Frequently Asked Questions
It can be difficult to get the stencil completely stuck to the mat, and you do want it to be well stuck down in order to get nice crisp edges on your paint. Take your time and repress any spots that are not adhered well.
If you're having trouble getting the used stencil off of your doormat, don't pull too hard and damage the mat. Instead, reheat the vinyl by placing the backer piece over it, and repressing it. This should re-heat the glue enough to make it easy to remove.
Acrylic craft paint isn't the hardest wearing. You can either try using an outdoor or exterior paint, spray acrylic paint with a protective clear acrylic sealing coating, or touch up any areas that need it with a small paint brush.
No. After making the mat, you will remove the stencil and it's only good for one time use.
If you try this Doormat Made With A Cricut Iron-On Stencil or any other idea on my blog please leave a star rating and let me know how it went in the comments below. Thanks for visiting today!
Equipment
- Cricut Easy Press or iron
- Cricut cutting machine
Materials
- blank coir door mat
- iron-on smart vinyl or regular vinyl with a standard grip cutting mat
- craft paints
- paint brush
- "Hello Sunshine" Cricut Design Space Cut File
Instructions
- Create DesignIf you want to create a mat exactly the way I did, search for "Life is a Party" using the search bar on the home page of Cricut Design Space. Scroll down to the bottom of the screen to the Community Members section, and click on the follow button for "Life is a Party -Dannyelle Nicolle-Ramjist". On my profile page, click on the "Hello Sunshine Doormat" project, and choose to customize or make it.If you want to create a different version, follow this tutorial and change the words, fonts, and locations to create your own design. Begin with a blank canvas in Cricut Design Space.Create a mat template by adding a square shape to the canvas, unlock the measurements and adjust to the size of your doormat. Change the colour to brown.The next step is to add a text box and type the word "hello". Change the font to Babette.Add another text box with the word "summer" all in capital letters, in the Cricut Sans font.Drag the text boxes down to the lower right of the brown rectangle mat template and adjust the font sizes. Use the letter space box along the top menu to adjust letter spacing in the word "summer".When you're happy with the word sizes, select both and use the align center along the top menu to align them.While they're still both selected use the attach button at the bottom of the layers panel to attach them.Use hide button beside the brown square mat template to hide it from the canvas so that it will not cut out. Use the save button to save your project.
- Cut Out The Iron-On VinylClick make it. Be sure to turn mirror on. Select your iron-on vinyl from the materials list. We used a Cricut Maker 3, so we took advantage of the ability to create oversize pieces and used smart vinyl. If you are using a regular Cricut you could make the design a smaller size, cut it out in multiple pieces, or use a 12 x 24 inch cutting mat.If you're using smart iron-on vinyl, feed the smart vinyl into your Cricut with the shiny side down. If you're cutting your iron-on vinyl out on a mat, be sure to to apply it shiny side down.
- Weed StencilAfter the material is cut on the Cricut, use your weeding tool to remove the letters. Remember you're reverse weeding this project and removing the letters, and keeping the background to create a stencil.
- Apply Stencil To The MatPosition your iron-on stencil on your blank coir doormat and use the Easy Press or an iron to apply it. We pressed at 310 degrees for about 30 sec. at a time. Slowly work the heat press over the entire piece, moving your Easy Press section by section. While the vinyl is still hot, use a small scraper tool to burnish it. Take special care around the inside of the letters, and any very small pieces.Once the iron-on is cool to the touch, you can try to slowly remove the backer piece. If the vinyl is not fully adhered, repress again. This part may take several attempts, and touch ups in some areas. Save the backer piece, and set aside for later.
- Paint The DoormatUse a dapping down motion to stencil the letters with your paint, using a regular paint brush or stencil brushes. Use just a little bit of paint for each coat, so that excess paint doesn't seep underneath, and so you create nice crisp edges to your letters. You may want to give it a second coat of paint for full coverage. We used black paint for "hello" and rainbow colors for "Sunshine".
- Remove The StencilOnce the paint is dry remove the iron-on vinyl. If it's difficult to remove, use the Easy Press at 310 degrees and press for 20 seconds. Be sure to replace the backer piece before pressing so that the vinyl doesn't stick to your Easy Press. Use the weeder tool to remove little pieces, like the insides of the letters


Dannyelle Nicolle-Ramjist says
This doormat turned out so great, with perfectly crisp lines. I'll use another method again.
Cluster Rush says
I love this idea! The combination of Cricut and iron-on vinyl makes it so easy to personalize a doormat. Can't wait to try this out for my front porch! Thanks for sharing such a fun and creative project!
MINECRAFT MOD APP says
This is such a fun and creative project! I love how customizable the doormat can be with Cricut and iron-on vinyl. Can't wait to try it out for my entryway! Thanks for the step-by-step instructions!
7win9 says
I love this idea! The step-by-step instructions make it so easy to follow. I can’t wait to personalize my own doormat for the entrance. Thanks for sharing such a creative project!
MINECRAFT says
This is such a fun project idea! I love how you’ve broken down the steps so clearly. Can’t wait to try making my own doormat with my Cricut. Thanks for the inspiration!
Bitlife Play says
This is such a fun and creative idea! I love how you made it look so easy with the step-by-step instructions. Can't wait to try this out and personalize my own doormat for my entryway! Thanks for the inspiration!
REMINI MOD APP says
Wow, this is such a fun and creative project! I love the idea of personalizing a doormat with my favorite quotes. Can’t wait to try it out with my Cricut! Thank you for the detailed steps!
11 WINNER APK says
I absolutely loved this step-by-step guide! The combination of Cricut and iron-on vinyl for a personalized doormat is such a fun idea. Can't wait to give it a try for our entryway! Thank you for sharing!
VIDMATE APP says
This is such a fun project! I love the idea of personalizing a doormat with vinyl. Can't wait to try this out for my front porch—thanks for the step-by-step guide!
Online Scribd Downloader says
I absolutely love this idea! The step-by-step guide is super helpful, and I can't wait to try making my own doormat. The personalization options are endless! Thanks for sharing such a creative project!
hills of steel says
What a fun and creative project! I love the idea of personalizing a doormat with Cricut and iron-on vinyl. The step-by-step instructions are so clear – I can't wait to try this out for my own entrance. Thanks for sharing!
91 Club says
This is such a fun idea! I love how easy it seems to personalize a doormat with Cricut and iron-on vinyl. Can't wait to try this project out for my front porch! Thanks for the clear instructions!