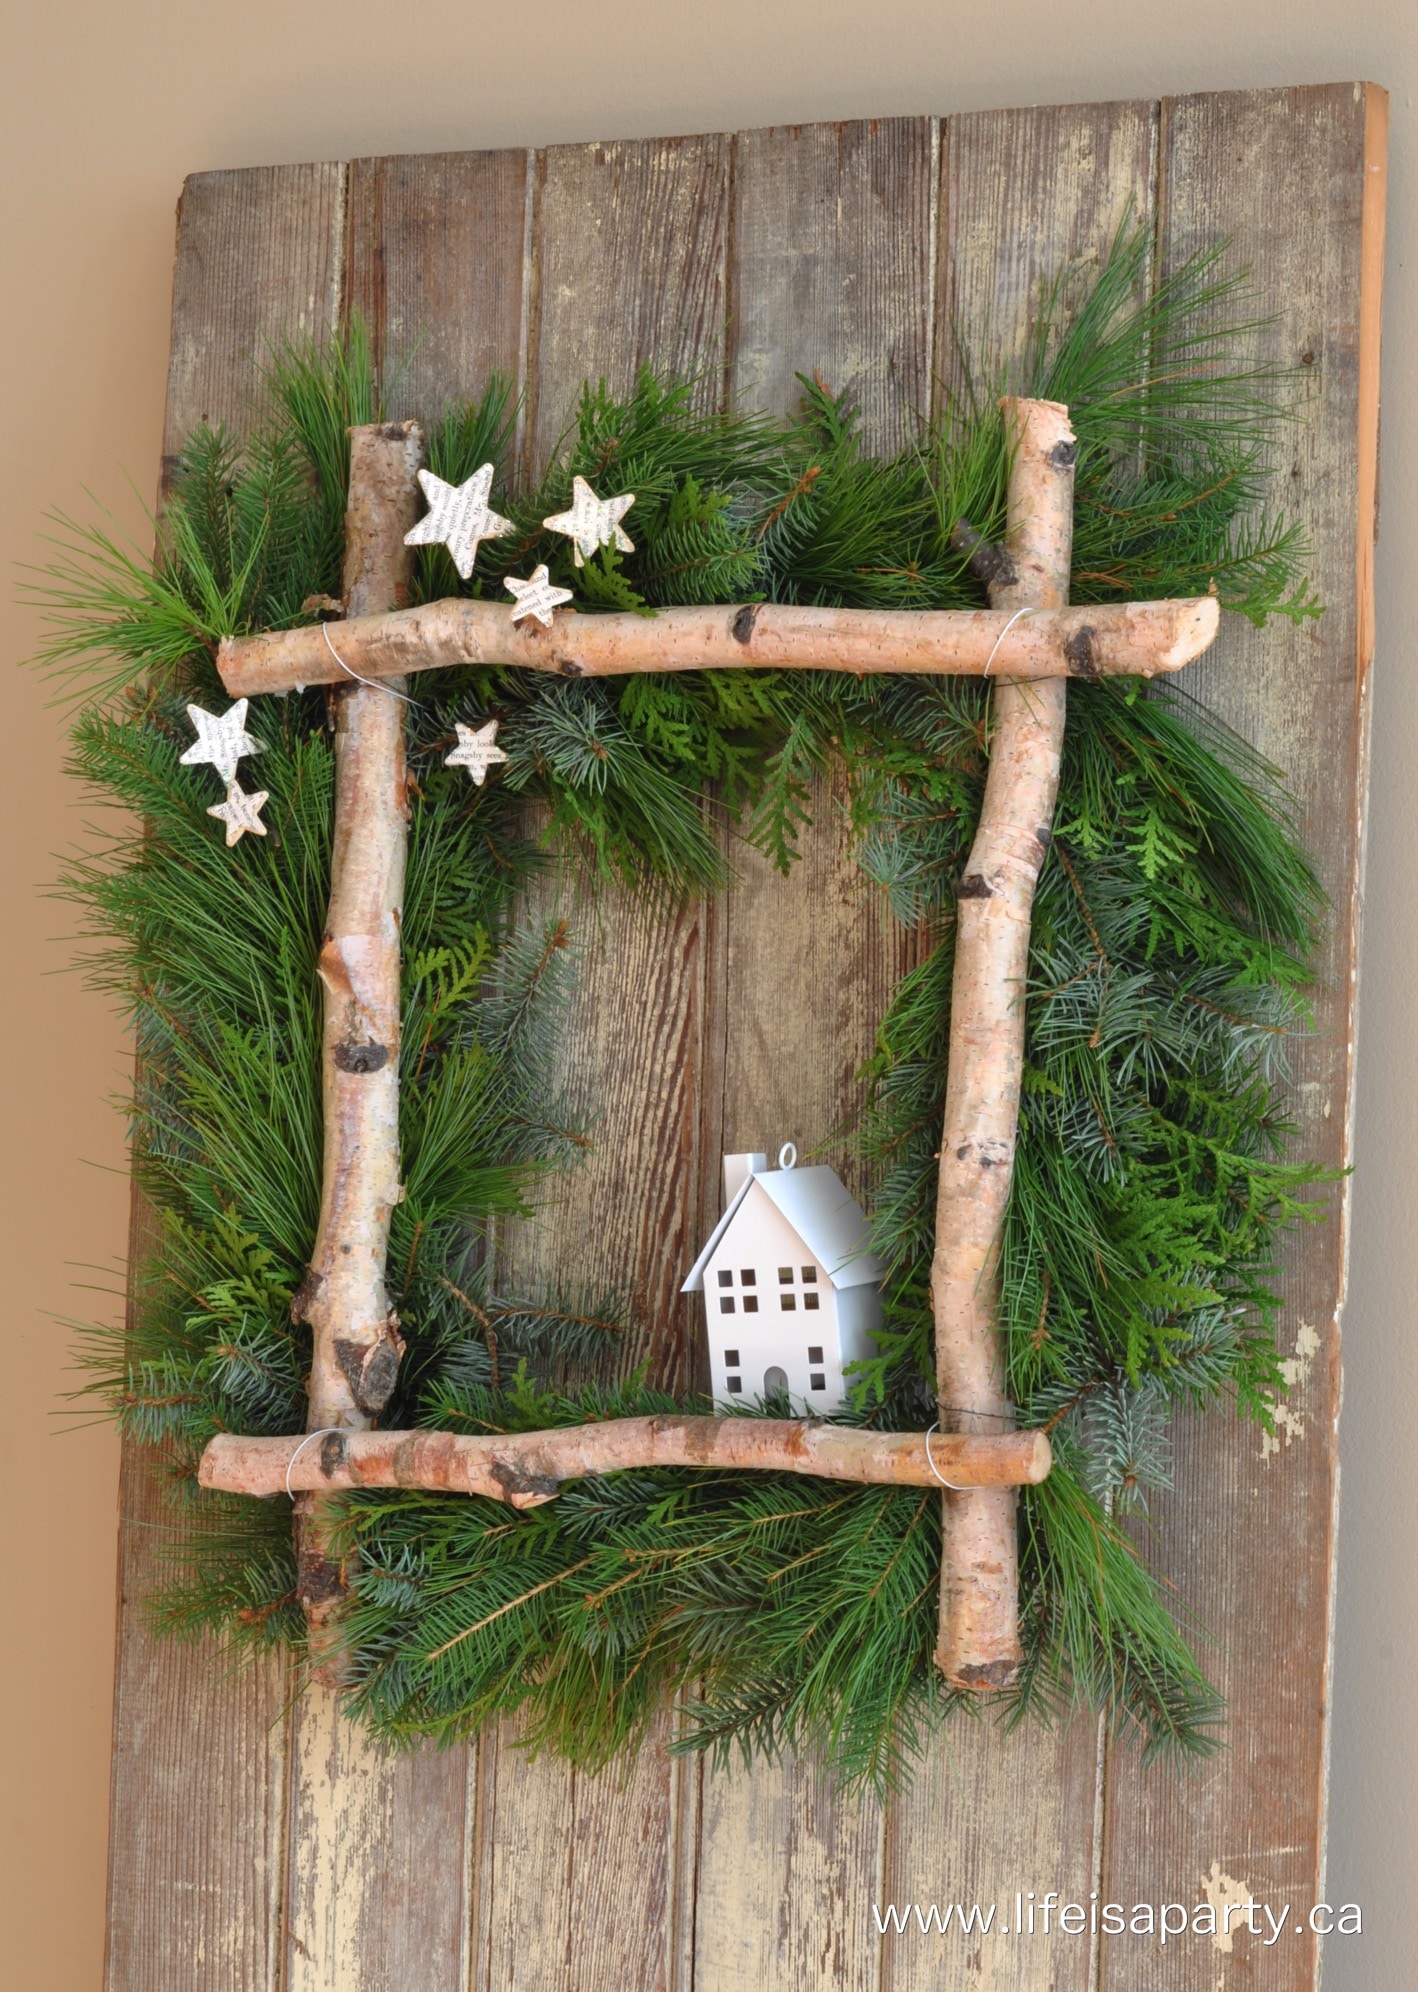
Looking for a beautiful and unique holiday wreath? This DIY Birch Wreath combines fresh greens, rustic birch logs, and a cozy little house accent for the perfect Christmas decoration. The square shape sets it apart from traditional round wreaths, and it's easy to make using simple materials like coat hangers, branches, and wire. Whether you hang it on your front door, over a mantel, or use it as part of a Scandinavian-inspired Christmas theme, this birch wreath adds natural texture and festive charm. In this tutorial, I'll show you step by step how to make your own birch wreath so you can create a holiday piece that looks stunning and costs very little.

Why You'll Love This Craft
- It's beautiful and the perfect holiday wreath for your door.
- The square shape and birch logs add interest and texture.
- The fresh greens smell and look beautiful.
- Most of the items we forged for making it very inexpensive to make.
"I made it. Gathered natural elements. It turned out very nice." -Garry via Pinterest
Jump to:
It's November, and already time to start thinking about Christmas! This birch wreath is the perfect touch to your door this Christmas.
This year I'm planning on going for a white Christmas look at my house, which got me thinking how pretty some birch branches would be. I also knew I wanted to use some traditional Christmas greens. So, off to the woods I went with my little pruning shears.
Nothing gets you into the Christmas spirit like the smell of fresh cut pine…and there may or may not have been a little, tiny bit of Christmas music involved, but I promise I wasn't into the Christmas cheer yet. 😉
You might also like our Gingerbread Salt Dough Recipe, Easy DIY Star Garland, DIY Christmas Diorama, and Mini Macrame Christmas Ornaments.
Birch Wreath Materials
Full list of materials in How-To Instructions below.
- Wire Coat Hanger for Wreath Form: We bent two wire hangers into our wreath base. These are inexpensive. You could use a wire wreath frame instead.
- Mixed Fresh Greens: We used some pine, cedar, and fir branches for our wreath. Any combination of fresh greens will work.
- Birch Pieces: Look for birch pieces that have nice white bark. You don't want them to be too big around. We cut ours to length. If you don't have access to birch, look for it at crafts stores, or anywhere that sells fresh Christmas decorations.
- Small Wooden Stars: We found these at the craft store.
- Old Book Pages: We upcycled an old book and used a book page to add some interest and texture to your wood stars.
- Glitter: Since it's Christmas, we added a little glitter to our stars. You can omit this if you prefer.
- Little House Lantern: This metal house is perfect for an outdoor wreath, since it won't be affected by water. The little windows are perfect for letting the light out.
- Battery Powdered Tea Light with Remote: The little candle lights up the house. The remote makes it easier to turn off and on, you could also use a strand of fairy lights inside instead.
Variations
- Faux Greens: If you want your wreath to be everlasting you can use faux greens instead. Look for them at the craft store.
- Ribbon: We love the simple Scandinavian style of this wreath, but you can add a holdiay bow if you prefer.
- Pinecones: You can also add some decorative pinecones to the wreath.
- Different Branches: If you don't have access to birch, you can use any wood branches for this wreath.
HowTo Make A Birch Wreath
1. Creating the Wire Wreath Base
I wanted to make this simple wreath out of inexpensive things around the house so I used a few coat hangers for the base. Using pliers helped to un-twist them, and then form them into a rectangle shape. I used two to make the form a little sturdier.

2. Add Fresh Greens
To put the greens on to the wire form, just cut little pieces, and create small mixed little bundles of three or so pieces. I used a combination of pine, fir, and cedar, but whatever you can find will work. Next, take your little bundle, and use thin wire to attach it to the wreath. Just lay your greens on the wire wreath form where you want them, and wind the wire around the bundle and the form to secure it. Then, create another bundle of greens, and over lap it over the previous bundle, and wrap with the wire again working your way all the way around the wreath. Easy peasy. Although…a little prickly so you might want to wear some gloves for this part.
Expert Tip: For longer life, mist your wreath every few days.

Once you've worked all the way around the wreath secure your wire, and the base is done.
3. Add The Birch Logs
The next layer is the birch logs. I had some, and just used a hand saw to cut them to length. I attached the birch to the wreath with some more thin wire. For the top birch piece, I used white wire so it would blend in.

4. Add The Metal House
The next step is decorating. I think I'm developing a thing for little tiny houses. Remember my little house village from last year? Well they'll be making a reappearance this year…along with some friends. When I saw this little white metal house at the craft store months ago, I thought it would look so sweet in a wreath with little battery operated light inside.

I kind of love how it turned out.
5. Add The Stars
I wanted to keep it simple, but couldn't help myself from adding one more sweet little detail, some stars. I used some wooden stars and added some book page paper to the front, and then added a little glitter. You know since it's Christmas and I'm now officially allowed to glitter everything.

To attached the stars to the wreath, I just hot glued some little wires to the back and wired them into the wreath.

I'm loving this simple, rustic Christmas wreath, and the little house is so sweet lit up at night with a battery operated tea light.

With a birch wreath like this one, life really is a party!
Frequently Asked Questions
If you don't have access to birch logs, purchase them at the craft store, or anywhere that sells fresh items for Christmas decorating.
Because birch logs can be heavy, choose small ones for wreath making. Attach them to the wreath using white wire.
Look for birch branches or small birch logs at craft supply stores or hardware stores during the holidays.
More Christmas Inspiration
If you try this Birch Wreath or any other ideas on my blog please leave a star rating and let me know how it went in the comments below. Thanks for visiting today!

DIY Birch Wreath Tutorial
Equipment
- scissors
- Wire Cutters
- Glue Gun and Glue
- Small Hand Saw
Materials
- 2 Wire Coat Hanger
- Mixed Fresh Greens
- Black Spool Wire
- 4 Birch Logs
- Small Wooden Stars
- Old Book Page
- Mod Podge
- Glitter
- Small Metal House
- White Wire
- Battery-Powered Tea Light With Remote
Instructions
- Using pliers open the two wire coat hangers, and bend into a square base for the wreath.
- Next, add the greens to the wire base. Begin by cutting little pieces of greens, and creatin small mixed bundles of three or so pieces. Then, take your little bundle, and use the spool wire to attach it to the wreath. Just lay your greens on the wire wreath form where you want them, and wind the wire around the bundle and the form to secure it. Then, create another bundle of greens, and over lap it over the previous bundle, and wrap with the wire again working your way all the way around the wreath, without cutting the wire in-between. When your finished filling in the wreath, cut the wire and secure it at the back.
- The next layer is the birch logs. If they aren't the right length, use a hand saw to cut them to length. Attach the birch to the wreath using white wire.
- Next, use some more white wire to attach the house with the light inside to the bottom right of the wreath.
- Trace the wood stars onto the book page paper, and cut them out. Then use mod podge to add the paper to the stars. You can also add some glitter. After they dry, use hot glue to attach a wire to the back of each star, and then use the wire to attach the stars to the wreath in a grouping.


Lindi says
I love the subtle details in this wreath! The book pages especially. Very pretty for a front door, or an indoor decoration 🙂
Ariel says
I am in love with the little stars and the house 🙂 the square wreath is original 🙂 well done!
Jen @ RamblingRenovators says
What a sweet little wreath! I love the shape of it and having it light up is such a cute feature.
dnr says
Please pin away, just click on the individual post to open it, rather than the home page, and then hover over the picture and click on the pin-it button. Thanks so much.
Dannyelle
Kraft Sister says
Love it! Thanks for sharing! Is there a way to pin on Pinterest?
Thea says
I love all of the fabulous projects that you come up with and share on yoru blog but I have to admit that this wreath is my favrouite. It truly is a work of creative art and so delightful. The little battery operated house and the book page glitter stars are perfect details. I agree with you that Christmas is a great reason to bring out the glitter!
Bette @bette's house says
This is so original. I love the little house and the stars and the use of greenery!
Meagan says
Oh Dannyelle! Love this wreath. Very very cute - especially the little house. Great work!
Meagan
Andrea @ personallyandrea says
Oh my gosh, the house and the little stars are just the best! I love this!
dani@lifeovereasy says
So pretty! I love the little stars - what a great idea to add the book paper!
Colleen Pastoor says
Super cute! The house and those book page stars... it's all so good 🙂
Julia Mander says
Its beautiful Danielle. I love it
Christine says
I love the simplicity !!!! Super cute!
Christina @ The DIY Mommy says
Eeek! I love this. The little stars... the shape... the house... all of it! Thanks for the inspiration!
Laurie @ Vin'yet Etc. says
I may have squealed a bit when I saw this wreath! I LOVE it!!!! How perfect, simple and so darn cute! Pinned!